Difference between revisions of "Quick Start Guide"
| [unchecked revision] | [checked revision] |
Lgodesberg (talk | contribs) |
|||
| (30 intermediate revisions by 3 users not shown) | |||
| Line 1: | Line 1: | ||
| − | |||
| − | |||
=== Installation === | === Installation === | ||
| − | + | * Download the MailStore Gateway setup file from here [https://www.mailstore.com/en/products/mailstore-gateway/]. | |
| − | + | * Start the installation process by double-clicking on the downloaded setup file . | |
| − | * | + | * Select the language and click ''OK''. |
| − | * Select the language and click OK. | ||
* Read the license agreement. | * Read the license agreement. | ||
| − | * Select I accept the agreement and click Next. | + | * Select ''I accept the agreement'' and click ''Next''. |
| − | * Specify the target folder for the program files (default: C:\Program Files\MailStore\MailStore Gateway) and click Next. | + | * Specify the target folder for the program files (default: <p style="white-space: nowrap;word-break: keep-all;">C:\Program Files\MailStore\MailStore Gateway)</p> and click ''Next''. |
* The setup program now extracts all program files into the given target folder. | * The setup program now extracts all program files into the given target folder. | ||
* Click Finish to exit the installation program. | * Click Finish to exit the installation program. | ||
| − | === Configuration | + | === Initial Configuration === |
| − | The | + | The initial configuration must be performed to set up the email domain and TLS certificate to use. Furthermore, the network environment must be adapted so that emails can be delivered to MailStore Gateway. |
| − | * | + | |
| − | * Configure the | + | * Start the MailStore Gateway Config Tool by clicking on the desktop shortcut MailStore Gateway. |
| − | + | * Configure the ''E-Mail Domain'' by entering the domain you want to be handled by MailStore Gateway. Usually this domain is different than your primary domain. For example, if your primary domain is currently ''example.com'', you can use the domain ''gateway.example.com'' for MailStore Gateway. | |
| − | *: [[File: | + | * Add an A-record to your DNS zone which points to the public IP address of the MailStore Gateway server. The A-record should match one of the SANs (Subject Alternative Names) of the TLS certificate to be used. |
| − | * | + | * Add an MX-record to your DNS zone which points to the name of the A-record created in the previous step. The MX-record must match the ''E-Mail Domain'' setting. For example, you can create an MX record ''gateway.example.com'' that points to the A record ''gateway.example.com''. |
| − | * | + | * If MailStore Gateway is located behind a NAT router or firewall, additional configuration may be needed, e.g. SMTP and HTTP may need to be forwarded to MailStore Gateway. Refer to [[Firewall Configuration]] for further details. |
| − | * | + | *: [[File:MailStore Gateway Configuration.png|center|450px]] |
| − | * Click the | + | * Leave the Management-console port set to the default of 8450 and the Let's Encrypt Port set to the default of 80. |
| + | * Next to the ''Certificate'' field, click the three dots box and select ''Create self-signed certificate...''. | ||
| + | * Enter the desired ''Common Name'' of the certificate. This name is also used as a ''Subject Alternative Name'' (SAN) of the certificate. | ||
| + | * Click ''OK''. The self-signed certificate is created and selected. | ||
| + | ** Alternatively choose ''Obtain from Let's Encrypt...'' to obtain a certificate from Let's Encrypt. Refer to [[Using_Let%27s_Encrypt_Certificates|this article]] for further details. | ||
| + | * Click the ''Apply'' button to apply the configuration changes. | ||
| + | * Click ''Start Service'' to start the service. | ||
=== Creating A MailStore Gateway Mailbox === | === Creating A MailStore Gateway Mailbox === | ||
| − | + | The mailboxes are managed via the MailStore Gateway Management Console web interface. | |
| + | |||
| + | You need one mailbox for each email source. E.g. when you receive journal messages from Microsoft 365 and you are using MailStore Gateway as POP3 and SMTP proxy, you need two mailboxes and two archiving profiles in MailStore Server or MailStore SPE of the correct type to archive from these mailboxes. | ||
| + | |||
| + | To log onto the MailStore Gateway Management Console and create a mailbox follow these instructions. | ||
* Open a [[System_Requirements|supported web browser]]. | * Open a [[System_Requirements|supported web browser]]. | ||
* Navigate to <tt><nowiki>https://<hostname-of-mailstore-gateway-server>:8450</nowiki></tt>. | * Navigate to <tt><nowiki>https://<hostname-of-mailstore-gateway-server>:8450</nowiki></tt>. | ||
| Line 33: | Line 40: | ||
* Click ''Sign in'' to proceed. | * Click ''Sign in'' to proceed. | ||
* Click ''Create Mailbox'' to proceed. | * Click ''Create Mailbox'' to proceed. | ||
| − | * Type a name in the ''Name'' field, i.e. '' | + | * Type a name in the ''Name'' field, i.e. ''M365 Journal Mailbox''. |
| − | * ''Optional: '' Enter a description that helps to identify the purpose of the mailbox, e.g. ''Target for journal emails from | + | * ''Optional: '' Enter a description that helps to identify the purpose of the mailbox, e.g. ''Target for journal emails from Microsoft 365''. |
* Click ''OK''. | * Click ''OK''. | ||
* A strong, random password is generated and displayed. | * A strong, random password is generated and displayed. | ||
*: [[File:JournalMailboxSetup.png|center|350px]] | *: [[File:JournalMailboxSetup.png|center|350px]] | ||
| − | * Carefully read the warning, and afterwards tick the checkbox ''I've read and understood the above warning''. | + | * Carefully read the warning, copy the password, and afterwards tick the checkbox ''I've read and understood the above warning''. |
* Click ''OK'' to finish the mailbox creation.<br/><br/> | * Click ''OK'' to finish the mailbox creation.<br/><br/> | ||
*; <p class="msnote">'''Important notice:''' Make sure to store the password in a safe place as it is not stored in MailStore Gateway. The password is needed to decrypt the content of the mailbox. If the password is lost, there is no way to access emails that are still in the mailbox ever again; a lost password cannot be retrieved.<br/><br/>For MailStore Server customers we recommend to use an enterprise password manager to store such critical passwords. For MSPs using MailStore Service Provider Edition we do not recommend to store these passwords but instead ensure that when providing them to end customers, add a note about the importance of keeping the password safe.</p> | *; <p class="msnote">'''Important notice:''' Make sure to store the password in a safe place as it is not stored in MailStore Gateway. The password is needed to decrypt the content of the mailbox. If the password is lost, there is no way to access emails that are still in the mailbox ever again; a lost password cannot be retrieved.<br/><br/>For MailStore Server customers we recommend to use an enterprise password manager to store such critical passwords. For MSPs using MailStore Service Provider Edition we do not recommend to store these passwords but instead ensure that when providing them to end customers, add a note about the importance of keeping the password safe.</p> | ||
| Line 45: | Line 52: | ||
* You now have a functional gateway mailbox to receive journal messages from your email host. | * You now have a functional gateway mailbox to receive journal messages from your email host. | ||
| − | * From our | + | *: [[File:MailStore_Gateway_Management_Console_mailbox.png|center|450px]] |
| − | + | * From our domain above, the functional gateway mailbox address is as below:<br/>'' mbx-e52cdd7279194af9c57b3c2a064a7db@gateway.example.com'' | |
| + | * Head back to MailStore Server and set up archiving profiles that transfer the messages from MailStore Gateway to MailStore Server. [https://help.mailstore.com/en/server/MailStore_Help] | ||
| + | |||
| + | [[de:Quick Start Guide]] | ||
| + | [[en:Quick Start Guide]] | ||
Latest revision as of 13:46, 4 December 2024
Installation
- Download the MailStore Gateway setup file from here [1].
- Start the installation process by double-clicking on the downloaded setup file .
- Select the language and click OK.
- Read the license agreement.
- Select I accept the agreement and click Next.
- Specify the target folder for the program files (default:
C:\Program Files\MailStore\MailStore Gateway)
and click Next. - The setup program now extracts all program files into the given target folder.
- Click Finish to exit the installation program.
Initial Configuration
The initial configuration must be performed to set up the email domain and TLS certificate to use. Furthermore, the network environment must be adapted so that emails can be delivered to MailStore Gateway.
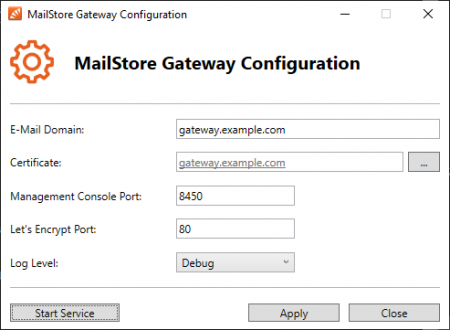
- Start the MailStore Gateway Config Tool by clicking on the desktop shortcut MailStore Gateway.
- Configure the E-Mail Domain by entering the domain you want to be handled by MailStore Gateway. Usually this domain is different than your primary domain. For example, if your primary domain is currently example.com, you can use the domain gateway.example.com for MailStore Gateway.
- Add an A-record to your DNS zone which points to the public IP address of the MailStore Gateway server. The A-record should match one of the SANs (Subject Alternative Names) of the TLS certificate to be used.
- Add an MX-record to your DNS zone which points to the name of the A-record created in the previous step. The MX-record must match the E-Mail Domain setting. For example, you can create an MX record gateway.example.com that points to the A record gateway.example.com.
- If MailStore Gateway is located behind a NAT router or firewall, additional configuration may be needed, e.g. SMTP and HTTP may need to be forwarded to MailStore Gateway. Refer to Firewall Configuration for further details.
- Leave the Management-console port set to the default of 8450 and the Let's Encrypt Port set to the default of 80.
- Next to the Certificate field, click the three dots box and select Create self-signed certificate....
- Enter the desired Common Name of the certificate. This name is also used as a Subject Alternative Name (SAN) of the certificate.
- Click OK. The self-signed certificate is created and selected.
- Alternatively choose Obtain from Let's Encrypt... to obtain a certificate from Let's Encrypt. Refer to this article for further details.
- Click the Apply button to apply the configuration changes.
- Click Start Service to start the service.
Creating A MailStore Gateway Mailbox
The mailboxes are managed via the MailStore Gateway Management Console web interface.
You need one mailbox for each email source. E.g. when you receive journal messages from Microsoft 365 and you are using MailStore Gateway as POP3 and SMTP proxy, you need two mailboxes and two archiving profiles in MailStore Server or MailStore SPE of the correct type to archive from these mailboxes.
To log onto the MailStore Gateway Management Console and create a mailbox follow these instructions.
- Open a supported web browser.
- Navigate to https://<hostname-of-mailstore-gateway-server>:8450.
- Accept possible certificate warnings from your web browser when using a self-signed certificate.
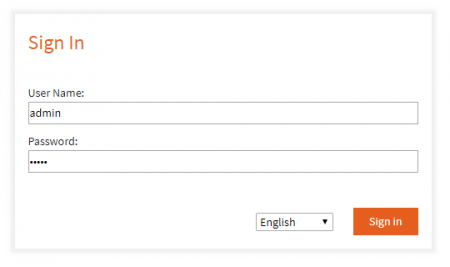
- In the User Name field enter admin.
- In the Password field enter the corresponding password of the admin user. For the first time login, the password is admin. After the first login, a random, secure password is created automatically.
- Click Sign in to proceed.
- Click Create Mailbox to proceed.
- Type a name in the Name field, i.e. M365 Journal Mailbox.
- Optional: Enter a description that helps to identify the purpose of the mailbox, e.g. Target for journal emails from Microsoft 365.
- Click OK.
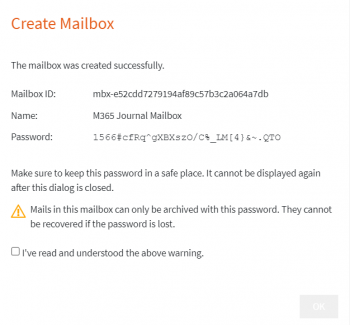
- A strong, random password is generated and displayed.
- Carefully read the warning, copy the password, and afterwards tick the checkbox I've read and understood the above warning.
- Click OK to finish the mailbox creation.
Important notice: Make sure to store the password in a safe place as it is not stored in MailStore Gateway. The password is needed to decrypt the content of the mailbox. If the password is lost, there is no way to access emails that are still in the mailbox ever again; a lost password cannot be retrieved.
For MailStore Server customers we recommend to use an enterprise password manager to store such critical passwords. For MSPs using MailStore Service Provider Edition we do not recommend to store these passwords but instead ensure that when providing them to end customers, add a note about the importance of keeping the password safe.
Using your new journal Mailbox hosted on MailStore Gateway
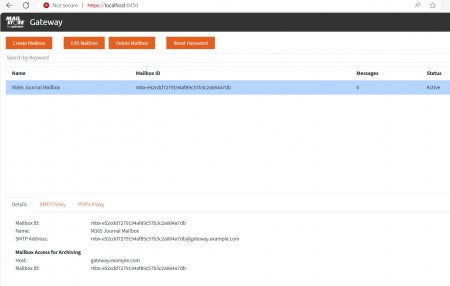
- You now have a functional gateway mailbox to receive journal messages from your email host.
- From our domain above, the functional gateway mailbox address is as below:
[email protected] - Head back to MailStore Server and set up archiving profiles that transfer the messages from MailStore Gateway to MailStore Server. [2]
