Difference between revisions of "Quick Start Guide"
| [unchecked revision] | [unchecked revision] |
| Line 22: | Line 22: | ||
* Click the "Apply" button to apply the configuration changes and then click "Start Service". | * Click the "Apply" button to apply the configuration changes and then click "Start Service". | ||
| − | === | + | === Creating A MailStore Gateway Mailbox === |
| − | + | TO log onto the MailStore Gateway Management Console and create a mailbox follow these instructions. | |
| − | + | * Open a [[System_Requirements|supported web browser]]. | |
| − | * | + | * Navigate to <tt><nowiki>https://<hostname-of-mailstore-gateway-server>:8450</nowiki></tt>. |
| − | * | + | * Accept possible certificate warnings from your web browser when using a self-signed certificate. |
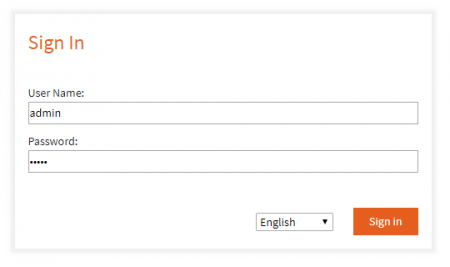
| − | * | + | *: [[File:MailStore_Gateway_Login.png|center|450px]] |
| − | * | + | * In the ''User Name'' field enter ''admin''. |
| − | + | * In the ''Password'' field enter the corresponding password of the admin user. For the first time login, the password is ''admin''. After the first login, a random, secure password is created automatically. | |
| − | + | * Click ''Sign in'' to proceed. | |
| − | * Click | ||
| − | |||
=== Installation === | === Installation === | ||
Revision as of 14:06, 28 February 2024
MailStore Gateway Quick Start Guide
Installation
If you have not already downloaded the MailStore Gateway software, please download it from https://www.mailstore.com/en/support/downloads-and-resources/.
- After downloading, start the installation process by double-clicking on the downloaded setup file .
- Select the language and click OK.
- Read the license agreement.
- Select I accept the agreement and click Next.
- Specify the target folder for the program files (default: C:\Program Files\MailStore\MailStore Gateway) and click Next.
- The setup program now extracts all program files into the given target folder.
- Click Finish to exit the installation program.
Configuration Tool setup
The following web browsers in their respective current version are supported by the Management Console:
- The configuration tool shortcut is located on the desktop of your machine and is named "MailStore Gateway". Double-click to open that tool.
- Configure the "E-Mail Domain" by entering your (MailStore Gateway domain) which is different than your primary domain.
- Using the fictional domain "mytdomain.com" and MailStore Gateway will receive emails, a DNS record like msgw.mytdomain.com needs to be created in the DNS zone mytdomain.com. The record must point to a public IP address on which MailStore Gateway is reachable. In MailStore Gateway the value of E-Mail Domain would be set to msgw.mytdomain.com. If MailStore Gateway is located behind a NAT router or firewall, additional configuration may be needed. Refer to Firewall Configuration for further details.
- Example: Using our example above from our fictional domain, assuming we have a public IP address of 11.12.13.14 assigned to msgw.mytdomain.com and the internal IP address of our MailStore Gateway server is 20.21.22.23, we would create a firewall rule of 11.12.13.14:25-->20.21.22.23.
- In the "Certificate" field, click the box with the three dots and choose "Create Self-Signed Certificate" and click "OK". This will create a self-signed certificate using the FQDN of the MailStore Gateway machine which is the default configuration.
- Leave the Management-console port set to the default of 8450 and the Let's Encrypt Port set to 80.
- Click the "Apply" button to apply the configuration changes and then click "Start Service".
Creating A MailStore Gateway Mailbox
TO log onto the MailStore Gateway Management Console and create a mailbox follow these instructions.
- Open a supported web browser.
- Navigate to https://<hostname-of-mailstore-gateway-server>:8450.
- Accept possible certificate warnings from your web browser when using a self-signed certificate.
- In the User Name field enter admin.
- In the Password field enter the corresponding password of the admin user. For the first time login, the password is admin. After the first login, a random, secure password is created automatically.
- Click Sign in to proceed.
Installation
If you have not already downloaded the MailStore Gateway software, please download it from https://www.mailstore.com/en/support/downloads-and-resources/.
- After downloading, start the installation process by double-clicking on the downloaded setup file .
- Select the language and click OK.
- Read the license agreement.
- Select I accept the agreement and click Next.
- Specify the target folder for the program files (default: C:\Program Files\MailStore\MailStore Gateway) and click Next.
- The setup program now extracts all program files into the given target folder.
- Click Finish to exit the installation program.

