Difference between revisions of "Template:Archiving Exchange Single Mailbox"
| [unchecked revision] | [checked revision] |
Rrommelrath (talk | contribs) |
|||
| (32 intermediate revisions by 4 users not shown) | |||
| Line 1: | Line 1: | ||
| − | |||
| − | |||
| − | |||
| − | |||
For each mailbox, please proceed as follows: | For each mailbox, please proceed as follows: | ||
* Unless the mailbox of the current user is to be archived into his or her own user archive, log on to MailStore Client as MailStore administrator. Only an administrator can archive emails for other users. | * Unless the mailbox of the current user is to be archived into his or her own user archive, log on to MailStore Client as MailStore administrator. Only an administrator can archive emails for other users. | ||
* Click on ''Archive Email''. | * Click on ''Archive Email''. | ||
| − | * From the list in the | + | * From the ''Email Servers'' list in the ''Create Profile'' area of the window, select ''Microsoft Exchange'' to create a new archiving profile. |
* A wizard opens to assist in specifying the archiving settings. | * A wizard opens to assist in specifying the archiving settings. | ||
* Select ''Single Mailbox''. | * Select ''Single Mailbox''. | ||
| − | *:[[File: | + | {{#ifeq: {{{1}}}|Office 365|*: [[File:Office365_mailbox_01.png|center|347px]] |
| − | * | + | * Leave the protocol under ''Access via'' on ''HTTPS''. Also the option ''Ignore SSL Warnings'' should be left deactivated because Office 365 uses official certificates.|*: [[File:Xchg_mailbox_01.png|center|347px]] |
| − | * '''Please note:''' | + | * Under ''Access via'', select the protocol to be used to access the Exchange server. Whenever possible, ''HTTPS'' should be used. |
| − | + | *: '''Please note:''' {{Option Accept all certificates}} }} | |
| − | * Under | + | * {{#ifeq: {{{1}}}|Office 365|Leave the setting of ''Host'' to its default ''(Auto Detect)''.|Under ''Host'', enter the name of your Exchange server.}} |
| − | * '''Please note:''' Alternatively, any user with the appropriate access | + | * Under ''User Name'', enter the {{{1|Windows}}} login name of the user whose emails are to be archived (e.g. {{#ifeq: {{{1}}}|Office 365|barbara.ross@example.com|barbara.ross@example.local or barbara.ross@example.com}}). |
| − | * | + | *: '''Please note:''' Alternatively, any user with the appropriate access permissions for the mailbox to be archived can be specified. In this case, it is imperative that this mailbox is specified under ''Mailbox'' (see below). |
| − | + | * Under ''Password'', enter the user's password. | |
| − | * Click on | + | * The field ''Mailbox'' must be left blank if a user, whose {{{1|Windows}}} login name and password is being used, wants to archive his own mailbox. Otherwise, the primary email address of the user whose mailbox you want to archive has to be entered here. |
| + | * Click on ''Test'' to verify that MailStore can access the mailbox. | ||
* Click on ''Next''. | * Click on ''Next''. | ||
| − | * If needed, adjust the settings for the [[Email_Archiving_with_MailStore_Basics#Archiving_Specific_Folders|List of Folders to be Archived]], the filter and the [[Email_Archiving_with_MailStore_Basics#Archiving_Specific_Folders|Deletion Rules]]. By default, no emails will be deleted from the mailbox. The ''Timeout'' value only has to be adjusted in specific cases (e.g. with very slow servers). | + | * If needed, adjust the settings for the [[Email_Archiving_with_MailStore_Basics#Archiving_Specific_Folders|List of Folders to be Archived]], the [[Email_Archiving_with_MailStore_Basics#Specifying_Filter_Criteria_for_Archiving|filter]] and the [[Email_Archiving_with_MailStore_Basics#Archiving_Specific_Folders|Deletion Rules]]. By default, no emails will be deleted from the mailbox. The ''Timeout'' value only has to be adjusted in specific cases (e.g. with very slow servers). |
| − | *:[[File:Xchg_mailbox_03.png|center| | + | *:[[File:Xchg_mailbox_03.png|center|347px]] |
| − | <p class="msnote">'''Important notice:''' Did you specify ''IMAP'' as the protocol and have also defined a deletion rule? If so, | + | *: <p class="msnote">'''Important notice:''' Did you specify ''IMAP'' as the protocol and have also defined a deletion rule? If so, folders containing no emails, such as ''Tasks'', ''Calendar'' or ''Contacts'' have to be added to the list of excluded folders manually. This is the only way to avoid these folders being archived and deleted according to the deletion rule specified. Please read more in chapter [[Email_Archiving_with_MailStore_Basics#Archiving_Specific_Folders|Archiving Specific Folders]].</p> |
* Click on ''Next'' to continue. | * Click on ''Next'' to continue. | ||
| − | * If logged on to MailStore Server as MailStore administrator, the | + | * If logged on to MailStore Server as MailStore administrator, the ''Target Archive'' can be specified. Select the archive of the user for whom the selected mailbox is to be archived. If the user does not exist yet, click on ''Create a New User''. |
| − | *:[[File:Xchg_mailbox_02.png|center| | + | *:[[File:Xchg_mailbox_02.png|center|347px]] |
* Click on ''Next''. | * Click on ''Next''. | ||
| − | * | + | * In the last step, a name for the archiving profile can be specified. After clicking ''Finish'', the archiving profile will be listed under ''Saved Profiles'' and, if desired, can be run immediately or automatically. |
| + | <noinclude> | ||
| + | [[de:Vorlage:Archivierung Einzelnes Exchange-Postfach archivieren]] | ||
| + | [[en:Template:Archiving Exchange Single Mailbox]] | ||
| + | </noinclude> | ||
Latest revision as of 08:57, 4 November 2022
For each mailbox, please proceed as follows:
- Unless the mailbox of the current user is to be archived into his or her own user archive, log on to MailStore Client as MailStore administrator. Only an administrator can archive emails for other users.
- Click on Archive Email.
- From the Email Servers list in the Create Profile area of the window, select Microsoft Exchange to create a new archiving profile.
- A wizard opens to assist in specifying the archiving settings.
- Select Single Mailbox.
- Under Access via, select the protocol to be used to access the Exchange server. Whenever possible, HTTPS should be used.
- Please note: If the certificate provided by the remote host cannot be verified (e.g. self-signed or signed by an unknown certificate authority), enable the option Accept all certificates to allow MailStore to establish a connection. As this option leads to an insecure configuration, warnings may appear in the summary and/or the dashboard.
- Under Host, enter the name of your Exchange server.
- Under User Name, enter the Windows login name of the user whose emails are to be archived (e.g. barbara.ross@example.local or barbara.ross@example.com).
- Please note: Alternatively, any user with the appropriate access permissions for the mailbox to be archived can be specified. In this case, it is imperative that this mailbox is specified under Mailbox (see below).
- Under Password, enter the user's password.
- The field Mailbox must be left blank if a user, whose Windows login name and password is being used, wants to archive his own mailbox. Otherwise, the primary email address of the user whose mailbox you want to archive has to be entered here.
- Click on Test to verify that MailStore can access the mailbox.
- Click on Next.
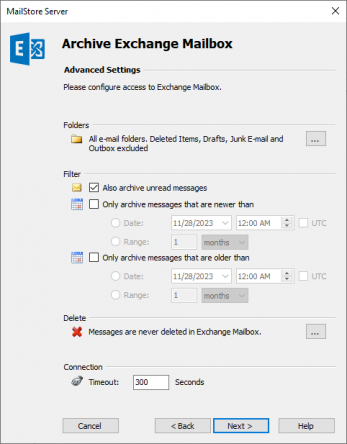
- If needed, adjust the settings for the List of Folders to be Archived, the filter and the Deletion Rules. By default, no emails will be deleted from the mailbox. The Timeout value only has to be adjusted in specific cases (e.g. with very slow servers).
Important notice: Did you specify IMAP as the protocol and have also defined a deletion rule? If so, folders containing no emails, such as Tasks, Calendar or Contacts have to be added to the list of excluded folders manually. This is the only way to avoid these folders being archived and deleted according to the deletion rule specified. Please read more in chapter Archiving Specific Folders.
- Click on Next to continue.
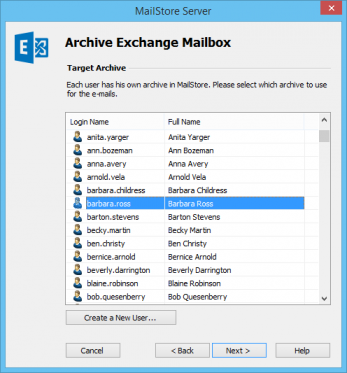
- If logged on to MailStore Server as MailStore administrator, the Target Archive can be specified. Select the archive of the user for whom the selected mailbox is to be archived. If the user does not exist yet, click on Create a New User.
- Click on Next.
- In the last step, a name for the archiving profile can be specified. After clicking Finish, the archiving profile will be listed under Saved Profiles and, if desired, can be run immediately or automatically.


