Difference between revisions of "Archiving IMAP and POP3 Multidrop Mailboxes"
| [unchecked revision] | [unchecked revision] |
| Line 9: | Line 9: | ||
Please proceed as follows: | Please proceed as follows: | ||
| − | *Log on as MailStore administrator using MailStore Client. | + | * Log on as MailStore administrator using MailStore Client. |
| − | *In MailStore, click on ''Archive Email''. | + | * In MailStore, click on ''Archive Email''. |
| − | *To create a new archiving profile, select ''IMAP | + | * To create a new archiving profile, select ''Other Server via IMAP/POP3'' from the ''Email Server'' list in the ''Create Profile'' area of the application window. |
| − | *A wizard opens guiding you through the setup process. | + | * A wizard opens guiding you through the setup process. |
| − | * | + | *:[[File:arch_imap_catch_01.png|center|550px]] |
| − | + | ||
| − | + | {{:Includes:Archiving_IMAP_and_POP3_Multidrop_Mailboxes}} | |
| − | |||
| − | |||
| − | |||
| − | |||
= Starting the Archiving Process = | = Starting the Archiving Process = | ||
Revision as of 14:47, 31 May 2011
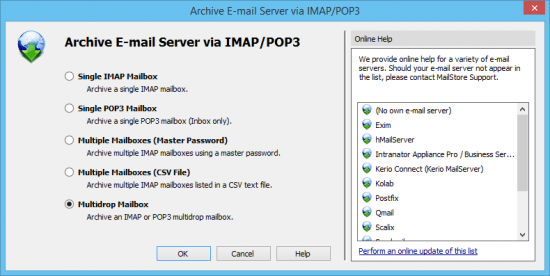
In this chapter, learn how to archive multidrop mailboxes. Multidrop mailboxes, also called catchall mailboxes, contain emails for more than one person. Generally, all emails for a certain domain are collected therein to be retrieved by an internal email server; the server then distributes the emails among the appropriate user mailboxes. Multidrop mailboxes are also used when sending a copy of all emails to a single mailbox on the email server; MailStore extracts the sender and recipient information from the email headers to assign them to the appropriate users.
Important: This article describes the general procedure independent from the e-mail server used. Please find e-mail server specific information in our Implementation Guides.
Setting up the Archiving Process
Setting up archiving processes for multidrop mailboxes is done using archiving profiles. General information about archiving profiles is available in chapter Working with Archiving Profiles.
Please proceed as follows:
- Log on as MailStore administrator using MailStore Client.
- In MailStore, click on Archive Email.
- To create a new archiving profile, select Other Server via IMAP/POP3 from the Email Server list in the Create Profile area of the application window.
- A wizard opens guiding you through the setup process.
Includes:Archiving IMAP and POP3 Multidrop Mailboxes
Starting the Archiving Process
Starting the archiving process manually
On the start page of MailStore Client, click on Archive E-mail and select the appropriate archiving profile from the list under Saved Settings (Profiles). Click on Run. After the archiving process has been executed, a protocol appears. It contains information about the amount of e-mails that have been archived as well as any errors that may have occurred.
The archiving profile can be executed any number of times. MailStore only archives those e-mails that are not yet stored in the archive.
Automating the archiving process
In addition to being executed manually, archiving tasks can also be executed automatically according to a schedule. Simply right-click on an existing profile and select Schedule Task. Additional information about this topic is available in chapter Automating the Archiving Process.

