Difference between revisions of "Template:Archiving Exchange Create Journal Mailbox"
| [checked revision] | [checked revision] |
| Line 1: | Line 1: | ||
To set up a new Exchange user with a meaningful name, e.g. ''journal'', please proceed as follows: | To set up a new Exchange user with a meaningful name, e.g. ''journal'', please proceed as follows: | ||
| − | {{#switch: {{{1|2013}}}| | + | {{#switch: {{{1|2013}}}|2007|2010=* Start the Exchange Management Console |
| + | * Click on ''Recipient Configuration''. | ||
| + | * Select ''New Mailbox'' from the action or context menu. | ||
| + | * Select ''User Mailbox'' and click on ''Next''. | ||
| + | * Select ''New User'' and click on ''Next''. | ||
| + | * Enter the necessary data to create a new user. | ||
| + | :[[File:Xchg_jour_{{{1|2010}}}_01.png|center|530px]] | ||
| + | * Confirm by clicking ''Next''. | ||
| + | * Click on ''Browse'' to select a mailbox database and click on Next. | ||
| + | * Confirm the summary by clicking on ''New''. The new user as well as the corresponding mailbox are created.|* Log on to the ''Exchange admin center'' of your Microsoft Exchange environment as an Exchange administrator. | ||
* Choose the ''recipients'' menu item. | * Choose the ''recipients'' menu item. | ||
* In the ''mailboxes'' section, click on ''+ (New)'' and choose ''User mailbox''. | * In the ''mailboxes'' section, click on ''+ (New)'' and choose ''User mailbox''. | ||
| Line 9: | Line 18: | ||
* Click on ''More options...'' | * Click on ''More options...'' | ||
* Click on ''Browse'' to select a mailbox database. | * Click on ''Browse'' to select a mailbox database. | ||
| − | * Click on ''save | + | * Click on ''save''. The new user as well as the corresponding mailbox are created.}} |
| − | |||
| − | |||
| − | |||
| − | |||
| − | |||
| − | |||
| − | |||
| − | |||
| − | |||
<noinclude> | <noinclude> | ||
[[de:Vorlage:Archivierung Exchange Journal-Postfach erstellen]] | [[de:Vorlage:Archivierung Exchange Journal-Postfach erstellen]] | ||
[[en:Template:Archiving Exchange Create Journal Mailbox]] | [[en:Template:Archiving Exchange Create Journal Mailbox]] | ||
</noinclude> | </noinclude> | ||
Latest revision as of 10:00, 17 September 2018
To set up a new Exchange user with a meaningful name, e.g. journal, please proceed as follows:
- Log on to the Exchange admin center of your Microsoft Exchange environment as an Exchange administrator.
- Choose the recipients menu item.
- In the mailboxes section, click on + (New) and choose User mailbox.
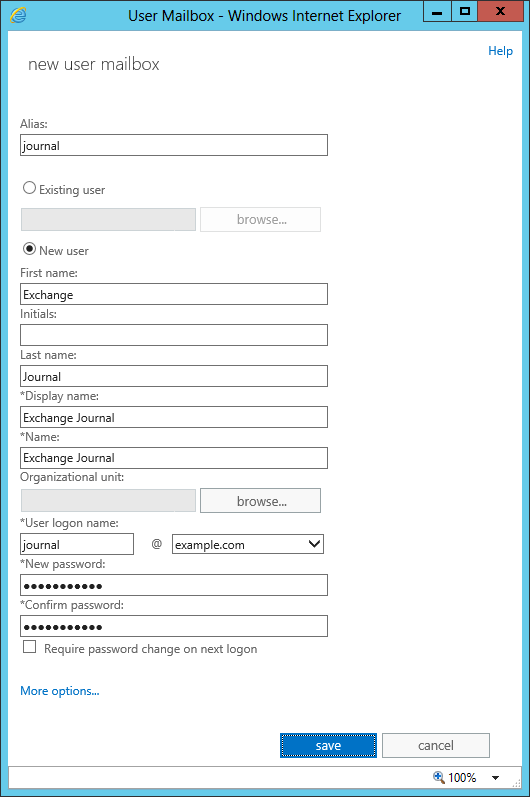
- Enter a valid Alias (e.g. journal).
- Select the option New user.
- Enter the necessary data to create a new user.
- Click on More options...
- Click on Browse to select a mailbox database.
- Click on save. The new user as well as the corresponding mailbox are created.

