Difference between revisions of "Administration"
| [unchecked revision] | [unchecked revision] |
| Line 492: | Line 492: | ||
More information about this topic is available in chapter Managing Storage Locations. | More information about this topic is available in chapter Managing Storage Locations. | ||
| + | |||
| + | == Managing Storage Locations == | ||
| + | |||
| + | In Storage Locations Management, the location of the master database can be viewed and the file groups of the archive can be managed. The file groups contain the actual data, the archived emails; by creating new file groups the complete archive can be distributed among different storage locations (e.g. different hard drives); existing file groups can always be moved at a later time. | ||
| + | |||
| + | Learn more about the master database, file groups and the differences between these types of storage in chapter Structure of the MailStore Database. | ||
| + | |||
| + | == Accessing Storage Locations Management == | ||
| + | |||
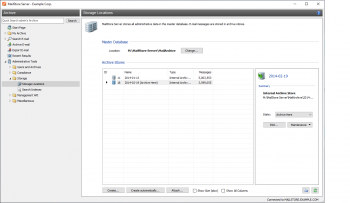
| + | Log on to MailStore Client as administrator. Click on ''Administrative Tools'' and then on ''Storage Locations''. | ||
| + | |||
| + | [[File:tech_storageloc_01.png|center|350px]] | ||
| + | |||
| + | == Changing the Storage Location of the Master Database == | ||
| + | |||
| + | Here, the storage location of the master database can only be viewed. By clicking on Change, only a summary of the steps (as described below) required to change the location is displayed: | ||
| + | |||
| + | Start the MailStore Server Base Configuration which is located in the MailStore Server program folder in the Windows Start menu (on the MailStore Server PC). Select the storage location of an existing master database (e.g. to restore a backup). If an empty directory is chosen, a new master database will be created. After each change, restart the MailStore Server Windows service by clicking on Restart in the same window. | ||
| + | |||
| + | == Store Newly Archived Email In... == | ||
| + | |||
| + | Below File groups, there is the option to Store Newly Archived Emails In. Select the file group into which new emails are to be archived. Only file groups that are not write-protected can be chosen; their status can be changed at runtime. | ||
| + | |||
| + | == Creating a New File Group == | ||
| + | |||
| + | To create a new file group, click on New in the menu bar at the bottom of the window. Select an empty directory and click on OK. | ||
| + | |||
| + | == Write-Protecting a File Group == | ||
| + | |||
| + | Select a file group from the list and, in the menu bar on the bottom of the window, click on Write Protect. | ||
| + | |||
| + | The emails stored in a write-protected file group remain fully available to MailStore users and can be located through the folder structure or by running a search. However, neither can new emails be archived into this file group nor can existing ones be deleted from it. Please keep in mind that the file system still requires write access to the file group. | ||
| + | |||
| + | After a file group has been write-protected, it is marked in the list with a lock symbol next to it. | ||
| + | |||
| + | To remove the write-protection, select the appropriate file group and click on Write Protect again. | ||
| + | |||
| + | == Attaching and Detaching File Groups == | ||
| + | |||
| + | Existing file groups can be detached from the archive: Simply select a file group from the list and click on Detach in the menu bar on the bottom of the window. Once detached, the file group and the emails contained therein are no longer available in the archive. This feature can be used for taking old parts of the archive out of storage, for example. | ||
| + | |||
| + | A detached file group can be reattached to the archive at any time: by clicking Attach, the file group becomes fully available again. Please note: Only file groups which originated from the same archive can be attached; file groups from external archives cannot be integrated. | ||
| + | |||
| + | == Moving File Groups == | ||
| + | |||
| + | To move a file group, please proceed as follows: | ||
| + | |||
| + | *Detach the file group to be moved: Select the appropriate group from the list and click on ''Detach''. | ||
| + | *Use Windows Explorer to move the file group to a different directory on any local(!) network. | ||
| + | *Reattach the file group: Click on ''Attach'' and select the new storage location of the file group. Click on ''OK'' to confirm. | ||
| + | |||
| + | == Maintenance of the Storage Locations == | ||
| + | |||
| + | The following features are available through Maintenance in the menu bar on the bottom of the window: | ||
| + | |||
| + | *Master Database - Cleanup (FB Sweep) | ||
| + | Simple cleanup of the master database. | ||
| + | *Master Database - Rebuild (FB Backup+Restore) | ||
| + | Complete rebuilding of the master database (e.g. if structural problems occur). | ||
| + | *File Group - Free Unused Disk Space | ||
| + | *File Group - Check Data Integrity | ||
| + | *File Group - Cleanup (FB Sweep) | ||
| + | Simple cleanup of a file group database. | ||
| + | *File Group - Rebuild (FB Backup+Restore) | ||
| + | Complete rebuilding of a file group database (e.g. if structural problems occur). | ||
| + | *File Group - Recalculate Statistics of all File Groups | ||
| + | |||
| + | == Creating File Groups Automatically == | ||
| + | |||
| + | MailStore Server can be configured to create and activate new file groups in regular intervals, e.g. monthly or quarterly. Please proceed as follows: | ||
| + | |||
| + | *Start MailStore Client and log on as MailStore administrator (admin). | ||
| + | *Click on Management Shell. | ||
| + | *Enter the following: | ||
| + | schedule filegroup-create-auto --basedir="D:\FileGroups" | ||
| + | Instead of "D:\FileGroups" enter the directory in which new file groups are to be created. File groups, including subdirectories, that are created automatically by MailStore are named using the format Year-Month, for example 2009-04. | ||
| + | *A dialog window appears. | ||
| + | *Click on ''Other Trigger''. | ||
| + | *Click on ''OK''. | ||
| + | *In the window ''Schedule'' click on ''New''. | ||
| + | *Under ''Schedule Task'' select ''Monthly''. | ||
| + | *If new file groups are to be created quarterly, click on ''Schedule Task Monthly'' and select ''only January, April, July and October'', for example. | ||
| + | *Click on ''OK'' and follow the directions on the screen. | ||
| + | |||
| + | == Storage Strategies == | ||
| + | |||
| + | '''Performance:''' For every 500,000 emails, a new file group should be created. This ensures a consistently high access speed when searching emails. | ||
| + | |||
| + | '''One-time backup:''' Older file groups can be write-protected (see above). These file groups remain available to users (with the exception of moving or deleting emails) but do no longer have to be backed up constantly. Write-protected file groups can be kept on cost-efficient storage media without any risks. | ||
= Other = | = Other = | ||
Revision as of 11:52, 23 June 2010
Base Configuration
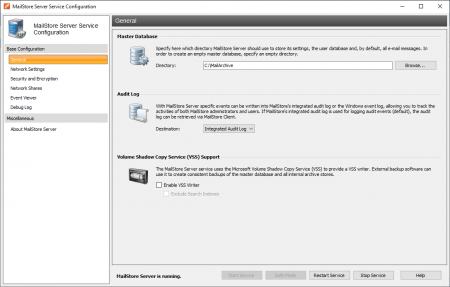
MailStore Server Base Configuration
Basic administrative functions are available in the MailStore Server Base Configuration which can be accessed from the MailStore Server program folder in the Window start menu.
The following functions and settings are available:
Master Database Under Directory, select the storage location of an existing master database. If an empty directory is chosen, a new master database is created therein. Additional information about master databases is available in chapter Structure of the MailStore Database.
IP Address and Port These settings can be adjusted as needed.
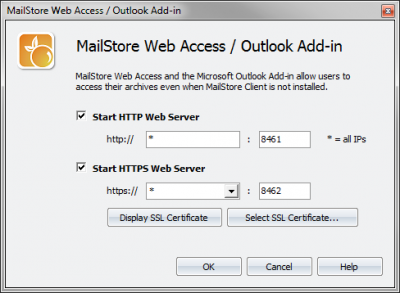
Web Access The Web Access configuration dialog will be opened. Additional information is available in chapter Web Access Configuration.
Debug Log Activate this setting if problems or errors have occurred while operating MailStore Server. After restarting the server service by clicking on Restart in the same window, a detailed log file is written. This file can be evaluated by the MailStore support team, for example.
Locksmith With this function, the user admin with the password admin can be restored.
Windows Service With this function, the MailStore Server service can be stopped and restarted. This may become necessary after certain changes to the configuration have been made or before performing a Backup.
MailStore Web Access Configuration
MailStore Web Access is a limited web version of MailStore Client. It provides access to the archived emails using an internet browser; an installation of MailStore Client is not required.
Users can use the following internet addresses to access their archives. A detailed description is available in chapter Using MailStore Web Access.
Please note: By default, the setup of MailStore Web Access is completed. This chapter only provides information about the settings and how they may be adjusted.
Summary for Experts
- MailStore Web Access requires MailStore Server to run on Windows XP starting with SP2, Windows Vista, or Windows Server 2003 or 2008.
- By default, MailStore Web Access is activated. The preset URLs are http://servername:8461 and https://servername:8462 respectively.
- Using the MailStore Server Base Configuration, MailStore Web Access can be activated and deactivated, and HTTP and HTTPS ports as well as SSL certificates can be specified if a secure connection is required.
- To use the function Open in Microsoft Outlook, MAPI must be installed. If neither Outlook nor Exchange Server 2003 or lower are installed on the server, MAPI must be installed separately using the following download: http://www.mailstore.com/?mapi.
- To use the function Restore to Mailbox, the SMTP access data must be specified once through administrative tools.
System Requirements
In order to be able to use MailStore Web Access, MailStore Server must be installed on one of the following operating systems:
- Microsoft Windows XP Service Pack 2 or higher
- Microsoft Windows Vista
- Microsoft Windows Server 2003
- Microsoft Windows Server 2008
- each including Small Business Edition
Users may use any operating system because MailStore Web Access is accessed using an internet browser. MailStore officially supports the following browsers:
- Microsoft Internet Explorer 6
- Microsoft Internet Explorer 7
- Microsoft Internet Explorer 8
- Mozilla Firefox
- Google Chrome
- Opera
- Apple Safari
- Apple Safari on iPhone or iPod touch (special interface)
Windows authentication (single sign-on; login without entering the password) requires Microsoft Internet Explorer because it is the only browser capable of sending the appropriate information.
Accessing MailStore Web Access
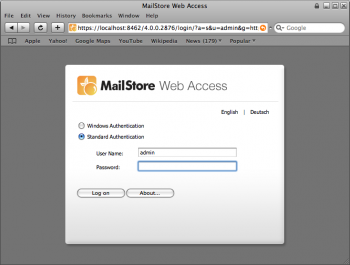
Unless MailStore Server is configured otherwise, users can access MailStore Web Access with the following internet addresses:
Detailed instructions for the web access are available in chapter Using MailStore Web Access. Instructions for the special iPhone/iPod touch version is available in chapter Access Using iPhone and iPod touch. Activating and Deactivating MailStore Web Access
By default, MailStore Web Access is activated. To deactivate or reactivate it, please proceed as follows:
- Start the MailStore Server Base Configuration using the appropriate desktop icon.
- Click on Configure HTTP/HTTPS Access.
- Remove/add both checkmarks.
- Click on OK to save the settings.
- To apply the settings, restart MailStore Server by clicking on Restart.
Specifying Standard Ports for MailStore Web Access
If, besides MailStore Web Access, no other web server is installed (e.g. an IIS website, Microsoft Outlook Web Access or SharePoint), the standard ports HTTP and HTTPS can be specified. This way, users can access MailStore Web Access directly (without having to enter the port numbers) using the addresses http://servername or https://servername. Please proceed as follows:
- Start the MailStore Server Base Configuration using the appropriate desktop icon.
- Click on Configure HTTP/HTTPS Access.
- Specify port 80 as HTTP port (upper right field).
- Specify port 443 as HTTPS port (lower right field).
- Click on OK to save the settings.
- To apply the new settings, restart MailStore Server by clicking on Restart.
Specifying an SSL Certificate for MailStore Web Access
In order to provide encrypted access (HTTPS) via MailStore Web Access, MailStore Server automatically generates a test certificate with the installation. One disadvantage of using test certificates is that, depending on which internet browser is used, a lot of warning messages are displayed. If you own an official SSL certificate for the server, it can be used for MailStore Web Access as follows:
- Install the certificate into the certificate store (local system).
- Start the MailStore Server Base Configuration using the appropriate desktop icon.
- Click on Configure HTTP/HTTPS Access.
- Click on Select SSL Certificate and select the certificate that was saved in the certificate store.
- Click on OK.
- Click on OK once more to save the settings.
- To apply the new settings, restart MailStore Server by clicking on Restart.
Setting Up the "Open in Outlook (MSG)" Function
To enable users to use the Open in Outlook function, MAPI must be installed on the machine on which MailStore Server is installed. This is the case whenever one of the following software products is installed:
- Microsoft Outlook 2000
- Microsoft Outlook XP
- Microsoft Outlook 2003
- Microsoft Outlook 2007
- Microsoft Exchange Server 2000
- Microsoft Exchange Server 2003
If none of the above products is installed, or if Microsoft Exchange Server 2007 is installed, which does not include MAPI in its installation, MAPI must be installed separately. Please proceed as follows:
- Download Microsoft Exchange Server MAPI Client and Collaboration Data Objects from the Microsoft website. You can enter the following email address which will redirect you to the appropriate Microsoft download page:
http://www.mailstore.com/?mapi
- Execute the downloaded file ExchangeMapiCdo.exe
- Specify any directory, e.g. C:\MAPI
- The directory will now contain the following subfolder: ExchangeMapiCdo. Open it.
- Execute the installer file ExchangeMapiCdo.msi.
- If the message "Messaging API and Collaboration Data Objects 1.2.1 cannot be installed with Microsoft Outlook / Microsoft Exchange Server." appears, MAPI is already installed. No additional installation is needed.
- After the installation, the installation directory (e.g. C:\MAPI) can be removed again from the hard drive.
Setting Up the "Restore to Mailbox" Function
To set up the Restore to Mailbox function, please proceed as follows:
- Start MailStore Client and log on as MailStore administrator (admin).
- Under Administrative Tools -> SMTP Settings, specify the access data of your SMTP server. MailStore Server needs this data in order to be able to deliver the emails which are to be restored to the appropriate user. Detailed instructions are available in section SMTP Settings.
- Make sure that the field Email Address is filled out for every MailStore user. This prevents users from having to enter their email address each time they use the restore function.
SMTP Settings
To be able to send emails, MailStore Server requires SMTP access data. Email is used to send important administrative notifications or email copies for the recovery from MailStore Web Access.
Specifying the Settings
To specify the SMTP settings, please proceed as follows:
- Start MailStore Client and log on as MailStore administrator (admin).
- Click on Administrative Tools.
- Click on SMTP Settings.
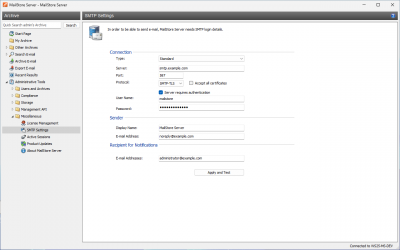
- The following dialog window appears:
- Under Server, enter the host name of the SMTP server or its IP address.
- If a non-standard port is to be used, enter the port number in the Server field as well, separated by a colon. For example: smtp.deepinvent.com:587
- In the field Protocol, select SMTP if the connection to the SMTP server is to remain unencrypted.
- If the connection to the SMTP server is to be encrypted, select SMTP-TLS or SMTP-SSL under Protocol. If the SMTP server does not have an official or installed SSL certificate, mark the checkbox Ignore SSL Warnings; if it is unchecked, the sending process will fail.
- Especially SMTP servers which are accessible through the internet require a login (SMTP authentication). Mark the corresponding checkbox and enter the appropriate access data. Often times, the POP3 access data of any user on the email server can be used.
- Under Sender, enter the display name and the email address of the email sender. Many SMTP servers require an existing email address to be entered. The display name can be chosen freely; ideally the name indicates that the email was sent by MailStore Server.
- Under Recipient for Notifications, enter the email address of the recipient for administrative notifications of MailStore Server.
Verifying the Settings
Once all settings have been specified, MailStore Server can be instructed to send a test email to the email address entered for notifications; simply click on Test. If an error message appears or the recipient specified does not receive the email, the following hints for troubleshooting may be helpful:
Troubleshooting
- If no error occurs upon sending but the email does not arrive, please check the spam or junk mail folder of the mailbox. Perhaps the email was filtered out.
- If an error message appears because of an invalid certificate ("Server's certificate was rejected by the verifier because of an unknown certificate authority."), mark the checkbox Ignore SSL Warnings and try again.
- If an error message appears indicating that "One or more recipients rejected", the SMTP server probably requires authentication. Enter the appropriate access data as described above.
- If an error message appears because of invalid access data ("Incorrect authentication data"or "Authentication failed"), verify the data entered. Often times, the access data match those of the corresponding POP3 server.
- If further error messages appear or other problems arise, please check your entries for possible mistakes.
Users, Folders and Settings
The MailStore Folder Structure
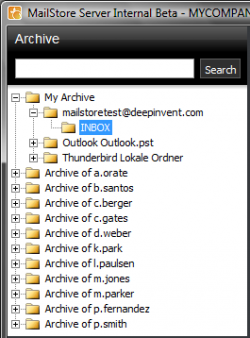
For each user, MailStore creates a folder on the highest level of the folder structure which corresponds to the archive of the respective user. It contains all emails that were archived for this user and is labeled My Archive.
If the user has access to the archives of other MailStore users (as MailStore administrator, for example), their folders are listed as Archive of <User Name>.
Below these main folders, the individual email sources (e.g. Microsoft Outlook or Exchange mailboxes) and their folder structures (e.g. Inbox) are listed.
Deleting Folders
Folders and the emails contained therein can only be deleted after the appropriate user privileges have been assigned explicitly by the administrator. If the folder to be deleted contains any subfolders, they will be deleted as well.
Moving, Renaming, and Creating Folders Manually
Within MailStore, folders cannot be moved or renamed. During the archiving process, MailStore adopts the folder structure and the folder names of the source (e.g. Microsoft Outlook).
Deleting Emails
Highlight the emails to be deleted by clicking on the emails while holding down the control (Ctrl)key. Holding down the Ctrl key and pressing A will highlight all emails. Right-click on the highlighted item(s) and select Delete. Users are only allowed to delete emails if they have received this privilege from the administrator.
Please keep in mind that allowing users to delete emails is not recommended; assigning such privileges makes it difficult, if not impossible, to comply with legal requirements regarding the storage of emails.
Moving Emails
Highlight the emails to be moved by clicking on the emails while holding down the control (Ctrl) key. Holding down the Ctrl key and pressing A will highlight all emails. Right-click on the highlighted item(s), select Move To Folder and select a destination folder. Emails can only be moved within a user archive.
User Management
When emails are archived, they are always assigned to individual users (the original owners of the emails). Every MailStore user has his or her own user archive which is created automatically upon setting up the new user account. For this reason, before any emails can be archived, the appropriate user accounts have to be created first. Options for the Setup of New User Accounts
- Adding users manually (described here)
- Synchronizing User Accounts with Active Directory
Opening User Management
Log on to MailStore Client as administrator. Click on Administrative Tools and then on Users.
Creating a New User
Click on Create New and enter a login name for the new user. This could be a combination of first and last name, for example. Click on OK to confirm. In the next window, additional settings may be specified. Again, click on OK to confirm the new settings.
The user is added to the list of users and can be edited at any time, as described in the following section.
Please note: The emails for a new user can be archived right away, no additional settings have to be specified. However, for the user to be able to log on to MailStore Client, a password has to be created (in the case of MailStore integrated authentication).
Editing an Existing User Account
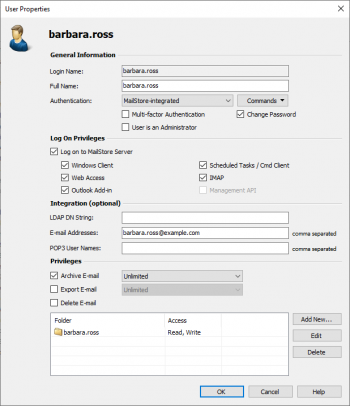
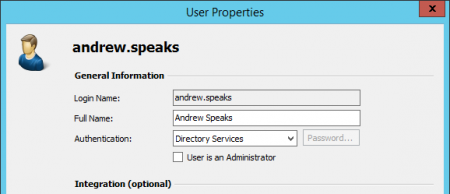
Select a user from the list and click on Properties.
In the next window, the following settings can be specified:
- Full Name: Enter first and last name of the user.
- Authentication: If choosing the setting MailStore-integrated, users have to use the password specified in user management when logging on to MailStore Client. Click on Password to set the password. Users can later change their passwords through Administrative Tools in their installation of MailStore Client.
Alternatively, the authentication LDAP (Active Directory) can be used. In this case, users can log on to MailStore using their Active Directory access data. Please refer to chapter MailStore and Active Directory for more information.
- User is an Administrator: Only administrators have access to the administrative functions found in MailStore Client's Administrative Tools and in the Management Shell.
- Integration - Windows User Name: This information is only needed if single sign-on is to be available to the user. In this case, after logging on to Windows, no additional login is required for starting MailStore Client.
- Integration - Email Addresses: This information is only needed for the following archiving options: MailStore Proxy Server, Microsoft Exchange Journaling, and archiving multiple Exchange mailboxes synchronously.
- Integration - POP3 User Names: This information is only needed for archiving tasks using MailStore Proxy. If the POP3 user name does not match the user's email address, the user name has to be specified here.
- Privileges: Privileges are described separately in chapter Specifying Privileges. As long as the appropriate privileges are not set, users are not able to delete any emails from the archive (even their own).
Click on OK to apply the new settings.
Deleting Users
Click on Administrative Tools and then on Users. Select the appropriate user from the list and click on Delete.
Deleting a user does not delete the emails that were archived for that user. The corresponding user archive, including all emails, is still available in MailStore and can be accessed by the administrator.
Deleting a user releases the corresponding user license (despite the remaining user archive). This license can be used to create a new user account.
Specifying Privileges
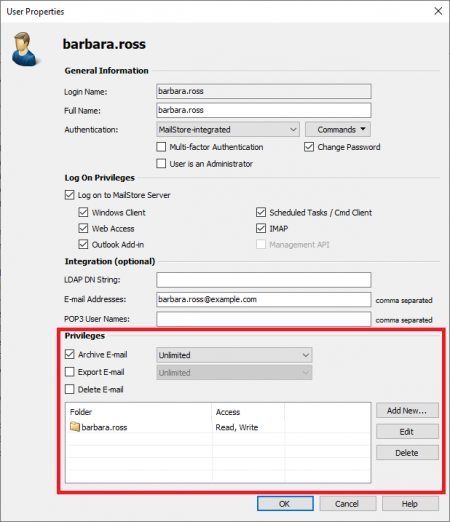
To specify the privileges for a user, click on Administrative Tools and then on Users. Select the appropriate user from the list and click on Properties.
The Following Privileges can be Assigned:
Log on to MailStore Server Only users with this privilege can log on to MailStore Server through MailStore Client. Please note: Without this privilege, emails can still be archived for the respective user.
Archive Email Only users with this privilege can execute archive profiles independently and thereby archive emails to MailStore Server. Please note: An administrator can always archive emails for the user regardless of this setting. Please keep in mind that users can archive emails only if they have write-access to their MailStore user folders. This setting can be specified under Folder Access (described below).
Export Email Only users with this privilege can export emails from MailStore. Please see chapter Exporting Emails for a description of the many options MailStore offers for email export.
Delete Email Only users with this privilege can delete emails from their user archives. Please keep in mind that this privilege should only be granted with great care, because legal requirements are hard, if not impossible, to meet if users are allowed to delete their emails independently. Once deleted, emails can only be recovered by restoring a MailStore backup.
Change Password Only users with this privilege can change their passwords independently in MailStore's Administrative Tools under Change Password. Users without this privilege must use the password created by the administrator in user management (relevant with MailStore-integrated authentication).
Add, Modify and Delete Archive Profiles Users with this privilege can create and edit archiving profiles. Otherwise, users can only execute already existing archiving profiles. Additional information about this topic is available in the chapter Working with Archiving Profiles.
Add, Modify and Delete Export Profiles Users with this privilege can create and edit export profiles. Otherwise, users can only execute already existing export profiles.
Folder Access (e.g. Access to the Emails of Other Users)
All main folders, which the current user has access to, are listed here. These folders correspond to the archives of individual MailStore users and contain all their archived emails. By default, users have only access to their own archives (to read and write, but not to delete). By clicking on Add New, the main folder of another user can be added to the list of folders accessible by the current user. Then the type of access to be permitted has to be specified.
The following options are available:
- Full Access
- Read
- Write
- Delete
From the users' perspective, the folders they have access to appear as entries in the folder structure of MailStore Client. Please refer to chapter The MailStore Folder Structure for more information.
Please keep in mind that users can archive emails independently only if they have write-access to their own folders.
Overview of all Privileges Regarding Folder Access
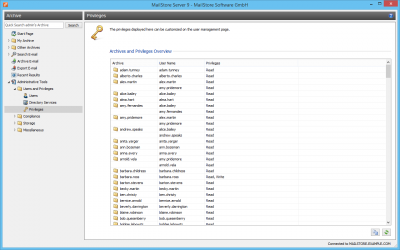
To view all privileges regarding folder access, click on Administrative Tools and then on Privileges.
The first column shows all user archives, the second column shows the MailStore users that have access to the respective user archive, and the third column lists the type of access privilege (e.g. Read, Write).
Active Directoy-Integration
Synchronizing User Accounts with Active Directory
In addition to adding users manually (as described in chapter "User Management"), MailStore can synchronize its internal user database with the Active Directory of your company.
During synchronization, user information and email addresses are gathered from Active Directory and recorded in MailStore; no changes are made to Active Directory.
Accessing Active Directory Integration
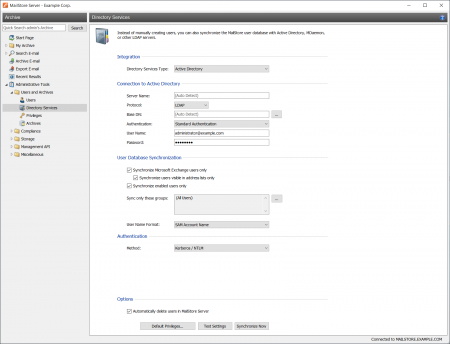
Log on to MailStore Client as administrator. Click on Administrative Tools and then on Active Directory Integration.
Specifying Connection Settings
Before the synchronization can be started, MailStore requires information on how to connect to the Active Directory server. In most cases it should be sufficient to click on Auto-Detect All Settings. If successful, the following fields are filled out automatically.
Under Authentication, specify which user identification is to be used to access Active Directory.
Executing the Synchronization
Under User Database Synchronization, after the connection settings have been specified (as described above), the MailStore user list can be synchronized with the Active Directory user list.
The following options are available:
- Automatically create new users in MailStore
Clear this checkbox if, during Active Directory synchronization, no new users are to be created in MailStore. In this case, only the data of already existing MailStore users is updated.
- Synchronize Microsoft Exchange users only
Clear this checkbox only if all Active Directory users are to be created in MailStore as well.
- Synchronize only members of a group
Clear this Checkbox and enter a group name, if you want only members of that Active Directory group to be synchronized with you Mailstore Server.
To start, click on Synchronize Now.
Click on Simulate Only to see what would happen during actual synchronization. Background: Which Information is Copied?
If a user who does not yet exist in MailStore is located in Active Directory, the following steps are executed:
- A new MailStore user is created with the login name (SAM account name) of the Active Directory user.
- LDAP Authentication is configured for the new MailStore user. Additional information about this topic is available in section Login with Window Access Data.
- The MailStore user has the following privileges: Logging on to MailStore Server through MailStore Client, archiving new emails for his or her own user archive, browsing his or her archive and viewing the emails contained therein. The user does not have the privilege to delete emails from the archive.
The following steps are executed for all users (new and existing) during synchronization:
- The full name of the MailStore user is replaced with the full name of the Active Directory user.
- All email addresses assigned to the MailStore user are replaced with the email addresses entered in Active Directory:
If the user is a Microsoft Exchange user, this concerns all his or her SMTP addresses. If the user is not a Microsoft Exchange user, this concerns the address entered under Email Address.
Synchronizing Small Business Server Users Only
When using Microsoft's Small Business Server, Windows system users are added to MailStore's user management along with the settings that are automatically specified. In most cases, adding Windows system users to MailStore is undesirable.
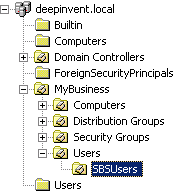
To limit the synchronization process to the users created with the Small Business Server Assistant, specify the organizational unit SBUsers as base DN:
Simply add the corresponding branches to the left of the automatically recognized base DN:
OU=SBSUsers,OU=Users,OU=MyBusiness,DC=deepinvent,DC=local
Automating the Synchronization with ADS_SYNC
To automate the synchronization, the command ads-sync can be used in MailStore's Management Shell. Information about how to use and automatically execute management shell commands is available in chapter The MailStore Management Shell.
ads-sync has the following parameters:
--server=<ldap-server> Indicates the LDAP-Server (Active Directory) to be contacted
--domain=<netbiosdomain> Indicates the NETBIOS domain name (prior to Windows 2000) --user=<username> Indicates the user to be used in the LDAP connection
--pass=<password> Indicates the password to be used in the LDAP connection
--allow-create Use the allow-create switch if new users are to be created in MailStore. If this switch is not set, only the information of already existing users will be updated.
Login with Windows Credentials
By default, each MailStore user has a password exclusively for MailStore which the administrator can specify during creation of a new user account. In MailStore Client's Administrative Tools, the respective user can later change his or her password.
Alternatively, if Active Directory is available, MailStore can be configured to allow users to log on to MailStore Server through MailStore Client using their Active Directory password.
Procedure for Users Created During Synchronization with Active Directory
If the MailStore users were created using Active Directory Synchronization, as described in the previous section, no further action is required. In this case, MailStore has already specified all necessary settings automatically. Procedure for Manually Created Users
If MailStore users who were created manually are to be able to log on using their Active Directory password, please proceed as follows:
- Configure the Active Directory Integration as described in chapter Synchronizing User Accounts with Active Directory.
- Verify that the names of the MailStore users match those of the corresponding Active Directory users.
- In the User Properties window under Authentication, select LDAP (Active Directory).
Background: How MailStore Proceeds Internally when Using LDAP Authentication
The following section describes how MailStore proceeds during LDAP authentication. This description is addressed to users interested in technical details.
- The user logs on; access data is sent to MailStore Server.
- MailStore Server verifies that this is a user for whom LDAP-Authentication is configured.
- MailStore establishes a secure LDAP connection to the Active Directory Server configured in Active Directory Integration. MailStore uses a user name consisting of the Domain (NetBIOS), also specified under Active Directory Integration, and the MailStore user name (DOMAIN\user).
- If the connection can be opened, MailStore Server searches for the user name (sAMAccountName) under Base DN which is configured in Active Directory Integration. If the name is found, MailStore Server regards the access data as being correct.
- If the LDAP authentication was successful, the user is logged on to MailStore Server as usual.
MailStore Client Single Sign-On
For using the single sign-on functionality in Active Directory environments, MailStore Server provides an ADM template.
The MailStore Client ADM Template (administrative template) makes it possible to configure the MailStore Client login using the group policy editor. The ADM template is located in the Support subfolder of the MailStore Server program folder
Using a group policy, the ADM template can be distributed among all Windows clients in your Active Directory network who are to use the single sign-on functionality.
The Group Policy Management Console
The distribution of group policies among online clients is a basic function offered by every Active Directory-based network. Setup of a group policy for single sign-on is described based on the Group Polity Management Console (GPMC). Starting with Windows Server 2007, the management console is an optional component of the server installation; the installation routine for Windows 2003 can be downloaded under http://www.mailstore.com/?gpmc.
Installing the ADM Template in Active Directory
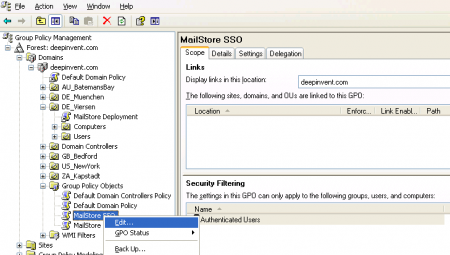
- Open the group policy management console.
- Right-click on the administrative folder Group Policy Objects, select New and create a new group policy object called MailStore SSO.
- Highlight the new object and click on Edit.
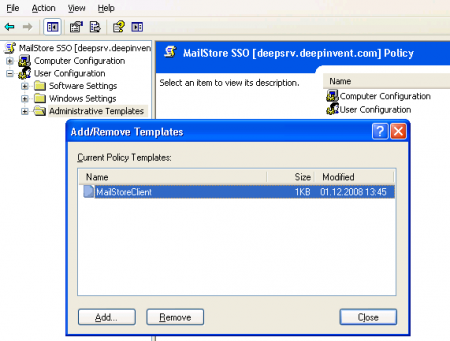
- Expand User Configuration and highlight Administrative Templates. Click on Add/Remove Templates.
- Click on Add and select the administrative template MailStoreClient.adm. It can be found in the Support subfolder of the MailStore Server program folder. Remove all policy templates that may still be listed and close the window.
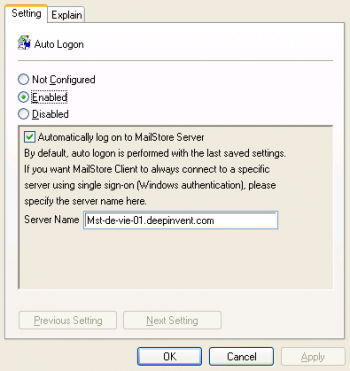
- Expand Administrative Templates, click on MailStore Client and edit the entry Auto Logon.
- Enable the setting, check the option to Automatically log on to MailStore Server and in the field Server Name, enter the DNS name of the MailStore Server computer
Please note: If single sign-on does not work with these settings, please enter the IP address of MailStore Server instead of the name.
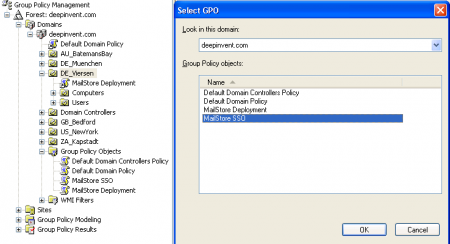
- Click on OK and close the group policy editor. The group policy is now configured and can be linked to the corresponding user objects. This is done using organizational units (OU).
- Highlight and then right-click on the organizational unit which contains the desired user objects (DE_Viersen in the example above) and select the option Link an Existing GPO. In the dialog window Select GPO, highlight the MailStore SSO policy and confirm by clicking OK.
- The group policy does now exist and will become active the next time users log on to the Windows clients.
Storage Locations
Structure of the MailStore Database
A MailStore database consists of the following:
The Master Database
Every MailStore Server installation has exactly one master database where general information such as users, email folders and settings are stored. Compared with file groups (see below), the master database has a very small storage space requirement.
The master database is included in the setup of MailStore Server and is installed and set up automatically. Through the MailStore Server Configuration, the storage location of the master database can be determined and changed, if desired. Please keep in mind that the database has to be stored on a local drive; network drives on other computers are not supported.
The master database is integrated in MailStore Server (embedded database) and can be run concurrently with other database systems.
File Groups
The actual data - the archived emails - is stored in file groups. During the initial installation of MailStore Server, a first file group is created automatically. To distribute the archive among several storage locations, any number of additional file groups can be added at any time. In addition to allowing for flexible management of the storage space, the creation of new file groups has a positive influence on the performance of the archive.
A file group consists of:
Database - The database stores a list of the individual emails, including header information, as well as a list of indexes.
Content - The actual email content is stored in .DAT files. Generally, these files have a manageable size of approximately 8 MB each, but individual files can vary considerably in size.
Index - One index per user is created, which makes extremely fast searches possible within MailStore. In addition, indexes are used for navigation within the tree structure.
More information about this topic is available in chapter Managing Storage Locations.
Managing Storage Locations
In Storage Locations Management, the location of the master database can be viewed and the file groups of the archive can be managed. The file groups contain the actual data, the archived emails; by creating new file groups the complete archive can be distributed among different storage locations (e.g. different hard drives); existing file groups can always be moved at a later time.
Learn more about the master database, file groups and the differences between these types of storage in chapter Structure of the MailStore Database.
Accessing Storage Locations Management
Log on to MailStore Client as administrator. Click on Administrative Tools and then on Storage Locations.
Changing the Storage Location of the Master Database
Here, the storage location of the master database can only be viewed. By clicking on Change, only a summary of the steps (as described below) required to change the location is displayed:
Start the MailStore Server Base Configuration which is located in the MailStore Server program folder in the Windows Start menu (on the MailStore Server PC). Select the storage location of an existing master database (e.g. to restore a backup). If an empty directory is chosen, a new master database will be created. After each change, restart the MailStore Server Windows service by clicking on Restart in the same window.
Store Newly Archived Email In...
Below File groups, there is the option to Store Newly Archived Emails In. Select the file group into which new emails are to be archived. Only file groups that are not write-protected can be chosen; their status can be changed at runtime.
Creating a New File Group
To create a new file group, click on New in the menu bar at the bottom of the window. Select an empty directory and click on OK.
Write-Protecting a File Group
Select a file group from the list and, in the menu bar on the bottom of the window, click on Write Protect.
The emails stored in a write-protected file group remain fully available to MailStore users and can be located through the folder structure or by running a search. However, neither can new emails be archived into this file group nor can existing ones be deleted from it. Please keep in mind that the file system still requires write access to the file group.
After a file group has been write-protected, it is marked in the list with a lock symbol next to it.
To remove the write-protection, select the appropriate file group and click on Write Protect again.
Attaching and Detaching File Groups
Existing file groups can be detached from the archive: Simply select a file group from the list and click on Detach in the menu bar on the bottom of the window. Once detached, the file group and the emails contained therein are no longer available in the archive. This feature can be used for taking old parts of the archive out of storage, for example.
A detached file group can be reattached to the archive at any time: by clicking Attach, the file group becomes fully available again. Please note: Only file groups which originated from the same archive can be attached; file groups from external archives cannot be integrated.
Moving File Groups
To move a file group, please proceed as follows:
- Detach the file group to be moved: Select the appropriate group from the list and click on Detach.
- Use Windows Explorer to move the file group to a different directory on any local(!) network.
- Reattach the file group: Click on Attach and select the new storage location of the file group. Click on OK to confirm.
Maintenance of the Storage Locations
The following features are available through Maintenance in the menu bar on the bottom of the window:
- Master Database - Cleanup (FB Sweep)
Simple cleanup of the master database.
- Master Database - Rebuild (FB Backup+Restore)
Complete rebuilding of the master database (e.g. if structural problems occur).
- File Group - Free Unused Disk Space
- File Group - Check Data Integrity
- File Group - Cleanup (FB Sweep)
Simple cleanup of a file group database.
- File Group - Rebuild (FB Backup+Restore)
Complete rebuilding of a file group database (e.g. if structural problems occur).
- File Group - Recalculate Statistics of all File Groups
Creating File Groups Automatically
MailStore Server can be configured to create and activate new file groups in regular intervals, e.g. monthly or quarterly. Please proceed as follows:
- Start MailStore Client and log on as MailStore administrator (admin).
- Click on Management Shell.
- Enter the following:
schedule filegroup-create-auto --basedir="D:\FileGroups"
Instead of "D:\FileGroups" enter the directory in which new file groups are to be created. File groups, including subdirectories, that are created automatically by MailStore are named using the format Year-Month, for example 2009-04.
- A dialog window appears.
- Click on Other Trigger.
- Click on OK.
- In the window Schedule click on New.
- Under Schedule Task select Monthly.
- If new file groups are to be created quarterly, click on Schedule Task Monthly and select only January, April, July and October, for example.
- Click on OK and follow the directions on the screen.
Storage Strategies
Performance: For every 500,000 emails, a new file group should be created. This ensures a consistently high access speed when searching emails.
One-time backup: Older file groups can be write-protected (see above). These file groups remain available to users (with the exception of moving or deleting emails) but do no longer have to be backed up constantly. Write-protected file groups can be kept on cost-efficient storage media without any risks.
