Difference between revisions of "Archiving Emails from Microsoft Exchange 2013"
| [unchecked revision] | [unchecked revision] |
| Line 107: | Line 107: | ||
* Click on ''save'' to activate the rule. Please keep in mind that in complex Microsoft Exchange environments it may take several minutes until the new rule becomes effective. | * Click on ''save'' to activate the rule. Please keep in mind that in complex Microsoft Exchange environments it may take several minutes until the new rule becomes effective. | ||
| − | Once the new configuration has come into effect, a copy of all incoming and outgoing emails | + | Once the new configuration has come into effect, a copy of all incoming and outgoing emails that adhere to the rule's parameters is stored in the Journal mailbox (along with a report called ''Envelope''). MailStore can now be configured to archive the Journal mailbox in regular intervals as described below. |
== Step 3: Configuration of MailStore Server == | == Step 3: Configuration of MailStore Server == | ||
Revision as of 16:22, 14 February 2013
DRAFT
Please note: This tutorial only covers the specifics of archiving a Microsoft Exchange 2013 server. It is assumed that you already have a MailStore Server installation or test installation and are familiar with the fundamentals of MailStore Server. Please refer to the Manual or the Quick Start Guide for more information.
MailStore Server offers several ways to archive emails from a Microsoft Exchange 2013 server, which are described below. If you are not sure which archiving method best suits your company, please refer to chapter Choosing the Right Archiving Strategy.
Synchronizing Users
As Microsoft Exchange requires the existence of an Active Directory, it is recommended to set up a synchronization as described in chapter Active Directory Integration of the MailStore Server manual.
Archiving Individual Mailboxes
Includes:Archiving an Exchange Mailbox
Archiving Multiple Exchange Mailboxes Centrally
With MailStore, some or all mailboxes of an Exchange server can be archived in a single step. All necessary preparations, such as creating MailStore users, can be made automatically. The archiving process can be executed manually or automatically according to a schedule.
Step 1: Setting up a central user for accessing mailboxes
Before the archiving process can be set up in MailStore, a user with access to all mailboxes to be archived has to be created. The corresponding method is called impersonation in Microsoft Exchange.
The following preconditions have to be met to be able to configure Exchange Impersonation:
- Administrative access to the Microsoft Exchange 2007 system on which the Client Access Role is installed
- Domain Administrator privileges
- An installation of Remote PowerShell on the machine which is used to execute the commands or access to the Exchange 2013 Server via Remote Desktop.
The following commands are executed in the Microsoft Exchange Management Shell:
Add access privileges
 New-ManagementRoleAssignment -Name:"MailStore Impersonation" `
   -Role:ApplicationImpersonation -User:[email protected]
Important notice: [email protected] is the user account in UPN (User Principal Name) notation which you will use to access the mailboxes from MailStore. Please make sure that this user is not a member of any Exchange or Windows administrative group.
Check access privileges
 Get-ManagementRoleAssignment -Role:ApplicationImpersonation -RoleAssigneeType:User `
   | Format-List *

 Get-ManagementRoleAssignment -Identity:"MailStore Impersonation" `
   | Format-List *
Remove access privileges
The following command is only to be used, if you want to remove access privileges from [email protected]
Remove-ManagementRoleAssignment "MailStore Impersonation"
Step 2: Configuration of MailStore Server
Includes:Centrally Archiving Multiple Exchange Mailboxes
Archiving Incoming and Outgoing Emails Directly
With the support of the Exchange Server Journaling functionality, MailStore can archive the incoming and outgoing emails of all users automatically. This is the only way to ensure that all emails are archived in their entirety
Basic Functionality
Microsoft Exchange Server provides the option to take down all incoming, outgoing and internal email traffic. At the time of sending and receiving, a copy of the respective email is created and stored in a mailbox called Journal Mailbox. Additionally, the email is provided with a Journal report containing information about the actual senders and recipients.
MailStore can be configured to archive this Journal mailbox at regular intervals. During this process, the emails from the Journal mailbox will be assigned to their respective MailStore users (i.e. their user archives) automatically. This means that all users are able to view only their own emails.
Before the archiving process can be set up in MailStore, Journaling has to be set up for the Exchange Server. Please proceed as follows:
Step 1: Creating a Mailbox for Journaling
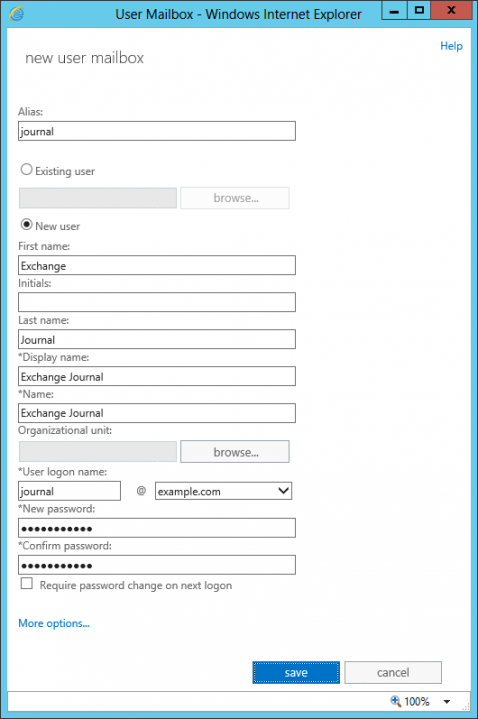
To set up a new Exchange user with a meaningful name, e.g. journal, please proceed as follows:
- Start the Exchange admin center and click log on.
- In the recipients\mailboxes section click on the plus sign ('New').
- Enter journal as Alias.
- Select the option New user.
- Enter the data as shown below:
- Click on More options...
- Click on Browse to select a mailbox database.
- Click on save. The user journal is created.
Step 2: Configuring Exchange Journaling
Two types of journaling are available in Exchange 2013: standard and premium journaling. While standard journaling always includes all send and received emails of a mailbox database, premium journaling can be limited to particular recipients or distribution lists and the scope (internal, external, global) of the journal rule can be defined. Additionally premium journaling rules can be replicated throughout the whole Exchange organization.
Notice: Premium journaling requires Exchange Enterprise CALs.
Configure Standard Journaling
Log on to the Exchange admin center and select the databases tab in the servers section.
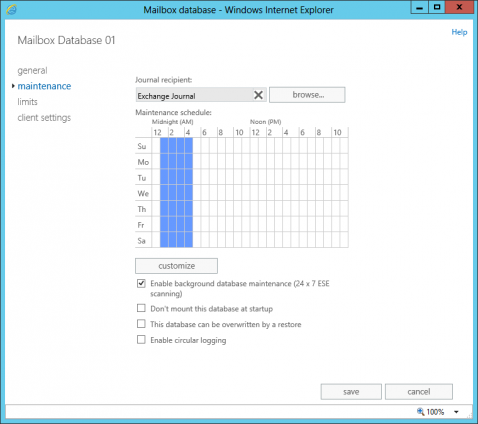
- Doubleclick on the mailbox database for which you want to set up standard journaling and select the Maintenance tab.
- Below Journal recipient: click on browse
- Select the user from the recipient list that was created in step 1 and confirm with OK
- The following screenshot shows an example of a standard journaling configuration:
- To confirm the changes and active the journaling, click on OK.
Once the new configuration has come into effect, a copy of all incoming and outgoing emails is stored in the Journal mailbox (along with a report). MailStore can now be configured to archive the Journal mailbox in regular intervals as described below.
Configure Premium Journaling
Log on to the Exchange admin center and select the journal rules tab in the compliance management section.
Click on + (New)
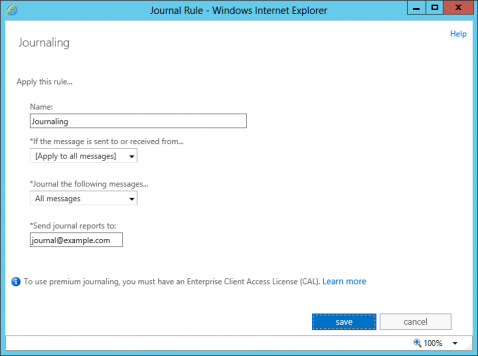
- The dialog window New Journal Rule opens:
- Enter a name for the journal rule, e.g. Journaling.
- In the If the message is sent to or received from... section select whether the rule should apply to all messages or to specific users or groups.
- Under Journal the following messages..., choose whether to capture all messages, internally sent messages only, or only those messages with an external sender or recipient.
- Enter the email address of the previously created journal user in the Send journal reports to: box.
- Click on save to activate the rule. Please keep in mind that in complex Microsoft Exchange environments it may take several minutes until the new rule becomes effective.
Once the new configuration has come into effect, a copy of all incoming and outgoing emails that adhere to the rule's parameters is stored in the Journal mailbox (along with a report called Envelope). MailStore can now be configured to archive the Journal mailbox in regular intervals as described below.
Step 3: Configuration of MailStore Server
Includes:Archiving an Exchange Journal Mailbox
Public Folders
MailStore Server can archive the emails from the public folders of Microsoft Exchange servers and make them available to some or all MailStore users. The archiving process can be executed manually or automatically according to a schedule.
Preparation
During archiving, emails are always assigned to individual users. Even when archiving a public folder, the user (or the user archive), for whom the emails are to be archived, has to be specified.
For this reason, first create a MailStore user for whom the public folder is to be archived. This user can be called publicfolder, for example. Next, all other users can be given access to the archive of the user publicfolder. This way, the archived content of the public folder is available to all MailStore users.
If MailStore users are not to have access to the archived public folder, skip this step and simply archive the emails to the user archive of the administrator (admin).
Information about how to create a new user in MailStore is available in the chapter User Management.
To be able to access all objects stored in all public folders without any problems, it is recommended to execute the following commands on the Exchange 2013 server hosting the respective public folders.
- First, add the role Public Folder Management to a [email protected]
Add-Rolegroupmember -Identity "Public Folder Management" -Member serviceAccount
- Next, use the PowerShell Script AddUsersToPfRecursive.ps1 to add "Editor" permissions for all public folders. Execute it within the Exchange Management Shell.
.\AddUsersToPfRecursive.ps1 -TopPublicFolder "\" -User [email protected] -Permission Editor
[email protected] is now able to read, write and delete all objects stored in public folders. Don't forger to substitute [email protected] with the Windows Useraccount in UPN (User Principle name) notation you want to use for archiving.
Includes:Archiving an Exchange Public Folder
Shared mailboxes are not primarily associated with individual users and are generally configured to allow logon access for multiple users.
Although it is possible to grant additional users the logon rights to any mailbox type, shared mailboxes are dedicated for this functionality. The Active Directory user associated with a shared mailbox must be a disabled account. After you create a shared mailbox, you must grant permissions to all users that require access to the shared mailbox.
As the active directory account of a shared mailbox is disabled, neither the Multiple Mailboxes nor the Single Mailbox archiving profiles can be used in MailStore.
In order to archive emails from a shared mailbox you must grant a user account full access to that mailbox (either by delegated access or impersonation). This can be the service account you created in Archiving Multiple Exchange Mailboxes Centrally.
Once you have created the service account, setup a new Single Mailbox archiving profile. Enter the credentials of the service account and fill the optional Mailbox field with the e-mail address of your shared mailbox.
Further steps are analogue to the archiving of individual Exchange mailboxes, except that you have to point the target archive to a separate dummy user in order to grant other MailStore users access to that archive.
Throttling in Exchange 2013 SP1
Exchange 2013 supports throttling since the RTM version. With throttling you can control, on the server side, the speed as well as the amount of emails individual users can download from the server. Since SP1 for Exchange 2013 this is a standard feature. When installing SP1 an experimental throttling policy may be activated which is unsuitable for productive operations.
Please note: Always enter the UPN (User Principal Name) of the Window user used for archiving as serviceaccount.
Determining the Throttling Policy Applied to the MailStore serviceaccount
You can use the following Powershell script to check if the serviceaccount that MailStore uses for archiving is slowed down by a throttling policy:
 $policy = $null
 $policyLink = (Get-Mailbox serviceaccount).ThrottlingPolicy
 if ($policyLink -eq $null)
 {
   $policy = Get-ThrottlingPolicy | where-object {$_.IsDefault -eq $true}
 }
 else
 {
   $policy = $policyLink | Get-ThrottlingPolicy
 }

 $result = $policy | format-list -property Name, IsDefault, EWS*
 $result
To use the script, please copy the entire content into a .TXT file, change serviceaccount to the UPN (User Principal Name) of the Windows user who is used for archiving, and save the script as policycheck.ps1 (on the desktop of the Exchange server, for example).
The script can now be executed from the Exchange Management Shell. Since, in the context of MailStore Server, only the EWS* values are of any interest, the following result may be displayed:
 [PS] C:\users\Administrator\Desktop>.\policycheck.ps1

 Name                          : DefaultThrottlingPolicy_8c5771...
 IsDefault                     : True
 EWSMaxConcurrency             : 100
 EWSPercentTimeInAD            : 50
 EWSPercentTimeInCAS           : 90
 EWSPercentTimeInMailboxRPC    : 60
 EWSMaxSubscriptions           : 5000
 EWSFastSearchTimeoutInSeconds : 60
 EWSFindCountLimit             : 1000
In this case, no separate policy exists for the serviceaccount. Since the property IsDefault is true, the default throttling policy of the system applies to the serviceaccount. If the value was false, an individual policy would already have been applied to the serviceaccount whose name would be listed under Name.
Creating and Assigning an Individual Throttling Policy
To avoid interfering with the overall stability of the Exchange 2013 system by using a too liberal policy definition of the default throttling policy, it is advisable to create a separate policy for the serviceaccount. Only three lines are necessary to create a throttling policy for the serviceaccount which is customized for MailStore:
 New-ThrottlingPolicy MailStore

 Get-ThrottlingPolicy MailStore | Set-ThrottlingPolicy -EWSFindCountLimit 2500 '
 -EWSPercentTimeInAD 70 -EWSPercentTimeInCAS 120 -EWSPercentTimeInMailboxRPC 80

 Set-Mailbox "servcieaccount" -ThrottlingPolicy MailStore
In line 1, a new throttling policy is created, line 2 defines the desired values for the policy, and in line 3, the individual throttling policy is assigned to the serviceaccount.
Important: Please note that a mailbox must be set up for the serviceaccount in order to be able to assign a policy to it.
Removing and Deleting an Individual Throttling Policy
To delete an individual throttling policy from a mailbox or user account, execute the following command in the Exchange Management Shell:
Set-Mailbox "Serviceaccount" -ThrottlingPolicy $null
This ends the assignment of a throttling policy. To delete the throttling policy from the Exchange system, execute the following command in the Exchange Management Shell:
Remove-ThrottlingPolicy MailStore
Confirm this by entering "Y". The policy is now completely deleted from the system.


