Exporting Email
MailStore provides several functions regarding the export of archived emails. Emails can be exported directly into server mailboxes, or to the file system as individual email files (EML or MSG format), for example.
Please note: Backup strategies (a backup of the entire archive) are discussed separately in the article Backup and Restore.
Available Export Destinations
Email Server
- Exchange mailbox - A folder named MailStore Export is created in the Exchange mailbox into which emails are copied.
- IMAP mailbox - A folder named MailStore Export is created in an IMAP mailbox into which emails are copied.
- Email address using SMTP- Emails are forwarded to a specified email address using SMTP, the standard protocol for sending emails.
Email Clients
- Microsoft Outlook - A folder named MailStore Export is created in Microsoft Outlook into which emails are copied.
- Windows Mail - A folder named MailStore Export is created in Windows Mail into which emails are copied.
- Mozilla Thunderbird - A folder named MailStore Export is created in Mozilla Thunderbird into which emails are copied.
- Mozilla SeaMonkey - A folder named MailStore Export is created in Mozilla SeaMonkey into which emails are copied.
Email Files
- Directory (File System) - Either EML or MSG files are created (one per email).
- Outlook PST File - A folder named MailStore Export is created in a Microsoft Outlook PST file into which emails are copied.
- CD/DVD - Either EML or MSG files (one per email) are burned to CD or DVD. MailStore can also distribute the backup among several storage media; CDs and DVDs can be used interchangeably. Rewritable disks (CD-RW or DVD-/+RW) can be used as well.
Please note: EML files can be opened independently from MailStore by double-clicking and moving to applications such as Outlook Express via drag & drop. Outlook MSG files can be opened or archived directly with all versions of Microsoft Outlook (except Outlook Express).
Starting an Export
Using the email preview - To export an email currently displayed in the Email Preview, click on Export in the menu bar above the preview and select the export destination. A window appears in which additional settings may have to be specified.
Using the list of emails (folder contents or search results) - Highlight the emails to be exported by holding down the control key (Ctrl) and right-clicking onto the emails. Pressing Ctrl and A highlights all emails. Click Export To and select the export destination. A window appears in which additional settings may have to be specified.
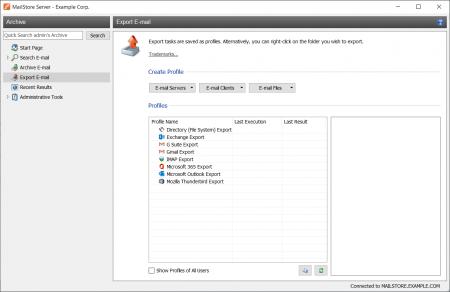
Using the page "Export Email" - On this page, exporting tasks can be created and executed as export profiles (just like archiving profiles). Export profiles hold information about which emails will be exported to which destination. Each profile (i.e. the exporting task) can be executed manually or regularly according to a schedule. To learn more, please read on in the next section.
Working with Exporting Profiles
In MailStore, every exporting task is stored as an exporting profile. The exporting process is started by executing such a profile.
Such an exporting profile could contain the following information:
- WHAT: Mailbox [email protected]
- TO: Exchange server EXCHANGE01
- SCOPE: All folders except drafts
Creating an Export Profile
To create a new export profile, please proceed as follows:
- Start MailStore Client on the computer which is to execute the export. Log on as administrator if the emails of other users are to be exported as well. Only a MailStore administrator is allowed to export the emails of others.
- In MailStore, click on Export Email.
- From the lists in the upper Create Profile area, select the destination to which emails are to be exported.
- A wizard opens to assist in specifying the export settings.
- At the first step, specify which folder is to be exported (subfolders are always included). Depending on the export destination, the file format to be used (e.g. EML , MSG or database backup) can be selected as well. Click on Next.
Please note: Below the list of folders, a saved search can also be selected. MailStore runs the search before executing the actual export procedure; all emails returned by the search will be exported. - At the second step, specify the exact target location to which emails are to be exported. For example, if Exchange Mailbox was selected as export destination earlier, the access data for the target mailbox can be specified and verified by clicking on Test. Then click on Next.
- Depending on the export destination specified, additional settings can be selected at the next step. For example, if IMAP mailbox was selected as the destination, a timeout value can be set, if needed.
- At the last step, a name for the export profile can be specified. After clicking on Finish, the profile will be listed under Saved Profiles and can be run immediately, if desired.
Just like archiving profiles, already existing export profiles can be executed, edited or deleted at any time. Additional information is available in chapter Working with Archiving Profiles.
Executing an Export Profile
On the start page of MailStore Client, click on Export Email. From the list under Saved Profiles, select the profile to be executed and click on Run. After the export process has finished, a message appears containing information about any errors that may have occurred.
Automating the Export Process
With MailStore, every exporting task (every export profile) can be executed automatically according to specified points in time.
Procedure
- Start MailStore Client on the computer on which the exporting task is to be executed according to a schedule. Please keep in mind that, if a full backup is to be performed, this has to be the computer on which MailStore Server is installed. If the emails of other users are to be exported, log on as administrator.
- On the start page of MailStore Client, click on Export Email.
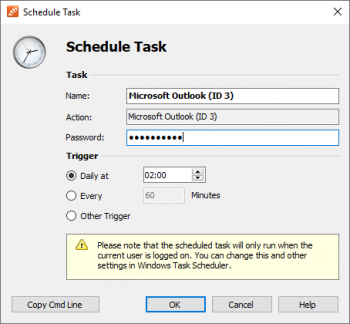
- Right-click on an existing profile and select Schedule....
In the next window "Schedule Task", the following settings of the planned task can be specified:
Task - Name: The task name can be chosen freely. By default, the name of the export profile and its internal MailStore ID are used.
Trigger: A time for daily execution (the task is executed once a day) or a time time interval (e.g. every 60 minutes) can be specified.
If the option Other Trigger is chosen, the exporting task is created as Windows task but execution times still have to be specified. This has to be done using the Windows task planner and is described in Windows Help. All options offered by your current Windows version can be used.
Windows Account: Specify here which user account is to be used when executing the scheduled task. The option Local System Account can be used for exports with destination Directory (File System) or CD/DVD, for example, and has the advantage that no password is required to execute the task. If the emails are to be archived from the applications of the current user (e.g. from Microsoft Outlook), the corresponding user account must be selected. In such cases, the option Local System Account is deactivated.
Log Messages - File Name: If a log file is to be created, the name for that file can be specified here. The placeholders {DATE} and {TIME} can be used in the file name which will be replaced by the actual date and time during the archiving process. If desired, the log file can also be created on a network drive.
Copy Cmd Line - By clicking this button the command line to execute this scheduled task is copied to the clipboard, so that you may paste it into batch script files. Detailed instructions can be found at the end of this chapter.
After all settings have been specified, the task can be created by clicking on OK. Confirm the following safety prompt by clicking OK again. If any account other than the Local System Account has been selected under Windows Account, the Windows password of the currently logged on user has to be entered.
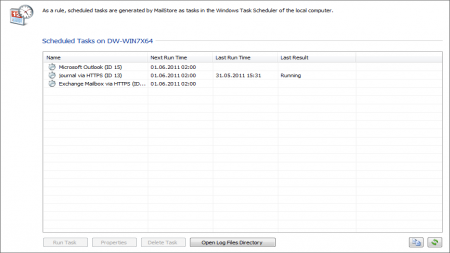
A list of scheduled tasks is displayed in MailStore's Administrative Tools, showing all tasks created on the current computer up to this point.
Managing Scheduled Tasks
Scheduled tasks created on the current computer are managed in Administrative Tools under Scheduled Tasks.
The list shows all scheduled tasks for archiving and export processes that were created on the current computer.
Run Task: The selected task is executed immediately regardless of its scheduled runtime.
Properties: The Windows task planner is opened for the selected task; all options offered by the current Windows version can be used.
Delete Task: The selected task is deleted. This does not affect the underlying archiving profile or any of the archived emails.
Open Log Files Directory: The directory containing the protocols for the selected task is opened.
Viewing the Command Line
If desired, the export process can be incorporated into a larger procedure, such as one run by a batch file (.bat). To simplify this process, MailStore offers the option Copy Cmd Line in the Schedule Task window (see above). Click on it to view a command line that can be incorporated into the desired procedure. For example:
REM *** Microsoft Outlook (ID 77) ***

"C:\Program Files\deepinvent\MailStore Server\MailStoreCmd.exe"
--h="localhost" --pkv3="16:0e:95:b0:79:d2:e8:e0" -u="admin" --p="admin"
--o="C:\ProgramData\MailStore\TaskLog\77_{DATE}-{TIME}.log"
-c export-execute --id=77 --user="admin" --verbose
The command line is to be read as follows:
"...\MailStoreCmd.exe" - MailStoreCmd.exe is the MailStore Management Shell. It was developed for the automated execution of certain processes in MailStore. Additional information about MailStoreCmd is available in chapter The MailStore Management Shell.
--h="localhost" - The computer name of the MailStore server to which MailStoreCmd.exe is to connect.
--pkv3="..." - Public Key Fingerprint. It ensures that the MailStore server at the time of archiving is the same as it was at the time when the scheduled task was created (optimal safety feature).
--u="admin" - User name.
--p="admin" - Password.
-c - The actual command follows (non-interactive mode).
import-execute --id=77 --user="admin" - Execute the archiving profile of user admin with the internal ID 77.


