Difference between revisions of "Accessing the Archive with the Microsoft Outlook integration"
| [unchecked revision] | [unchecked revision] |
| (87 intermediate revisions by 5 users not shown) | |||
| Line 1: | Line 1: | ||
| − | MailStore | + | MailStore users can access their archives using a convenient add-in for Microsoft Outlook. A list of supported Microsoft Outlook versions can be found under [[System_Requirements#MailStore_Outlook_Add-in|System Requirements]]. |
| − | + | == Requirements == | |
| − | + | MailStore Server should be in use and the add-in for Microsoft Outlook should be installed on the appropriate machine. In this case, a toolbar (up to 2007) or a tab (Outook 2010 or later) labeled "MailStore" will be visible in Microsoft Outlook. | |
| − | |||
| − | |||
| − | |||
| − | + | [[File:Outlook2019RibbonTabEN.PNG|center|550px]] | |
| − | + | == Installation & Update == | |
| + | The MailStore Outlook Add-In setup file that matches your MailStore Server version is stored on the MailStore Server machine. Follow the ''Install MailStore Client on other Computers'' link on your desktop and copy the corresponding setup file to the client computer. | ||
| − | + | It is a regular Windows setup program, that can by executed on the appropriate client computer by double-clicking on the setup file. Just follow on-screen instructions. | |
| − | |||
| − | |||
| − | + | <p class="msnote">'''Notice:''' Alternatively to installing the MailStore Outlook Add-In application manually, you can also deploy it to the client computer though the Active Directories Group Policy feature. More information on that can be found in the article [[MailStore Outlook Add-in Deployment]]</p> | |
| − | '' | ||
| − | </ | ||
| − | + | If an update is installed on the MailStore Server computer, MailStore Outlook Add-In usually stays compatible with MailStore Server. Therefore a re-installation of MailStore Outlook Add-In is usually not required. | |
| − | + | == Login to MailStore Server == | |
| + | If the MailStore Outlook Add-in is not pre-configured, you will be asked to log in to MailStore Server as soon as you click any button in the MailStore Outlook Add-in. Please refer to your system administrator for the server name and your access data. | ||
| − | [[File:OutlookAddinLoginEN.png|center]] | + | [[File:OutlookAddinLoginEN.png|center|350px]] |
| − | == | + | === Deleting Saved Access Data === |
| + | If you would like to log in to a different server or use different access data, you may have to delete the existing access information saved in Microsoft Outlook. | ||
| + | Please proceed as follows: | ||
| − | + | * Click on ''Settings'' in the MailStore Outlook Add-in | |
| + | * Click on ''Clear Cached Credentials''. | ||
| + | * Click on ''OK''. | ||
| + | * Click on any button in the add-in to go back to the login window. | ||
| − | * | + | === Technical Considerations === |
| − | * ''' | + | * The MailStore Outlook Add-in uses the HTTP server integrated in MailStore Server to access the archive. |
| − | + | * The option ''Secure Connection'' is enabled by default in the settings of the Outlook Add-in, to use encrypted HTTPS connections instead of unencrypted HTTP. Thus using a valid TLS certificate is recommended. It is highly disadvisable to use unencrypted HTTP connections to access the archive. | |
| − | + | * If you have changed the configuration of the HTTP/HTTPS ports within the MailStore Server Service Configuration (the default HTTP port is 8461, the default HTTPS port is 8462), you must include the port number when logging in. Simply append the port number to the server name, separated by a colon (for example: <code>mailstore:443</code>) | |
| − | * | ||
| − | == | + | == Search by Archive Folder == |
| − | + | === Display of the Archive Folder === | |
| − | |||
| − | |||
| − | |||
| − | |||
| − | = | ||
| − | |||
| − | == | ||
[[File:WebArchiveFolders.png|right]] | [[File:WebArchiveFolders.png|right]] | ||
| − | + | In the MailStore Outlook Add-in, click on ''Browse Archive'' to display the part of the archive that is visible to you. | |
| − | == | + | === User Archives === |
| + | The folder ''My Archive'' contains all emails that were archived from your mailboxes. If you have read-access to the archives of additional users, their emails are located in the folders labeled ''Archive of <user name>''. | ||
| − | + | === Display of Emails in a Folder === | |
| + | To view the emails of a specific folder, simply click on the folder name. The emails are listed below the tree structure. | ||
| + | {{Quick Search|Outlook Add-In|left}} | ||
| + | {{Advanced Search|Outlook Add-In}} | ||
| + | == Email Display == | ||
| + | To view an email which was returned by one of the search functions described above, simply click on it. A preview of the email is displayed on the right side of the screen. | ||
| − | + | Please keep in mind that images and any formatting will not be displayed in the preview for security reasons. Emails cannot be forwarded or replied to within the preview, either. | |
| − | + | For a comprehensive view of an archived email and the ability to use all the Microsoft Outlook features such as printing, forwarding and replying, click on ''Open Email'' in the MailStore Outlook Add-in. The email will be loaded from the archive and displayed, either immediately or after a few seconds depending on size. | |
| − | = | + | <br style="clear: both;"/> |
| − | |||
| − | |||
| − | |||
| − | |||
| − | |||
| − | |||
| − | |||
| − | |||
| − | |||
| − | |||
| − | |||
| − | |||
| − | + | == Restoring Emails to the Application == | |
| + | [[File:OutlookAddinRestore.png|right]] | ||
| − | + | To restore an archived email which is no longer in your mailbox to Outlook, please proceed as follows: | |
| − | + | * Locate the email within the archive and select it, so that it is shown in the preview area. | |
| + | * In the MailStore Outlook Add-in, click on ''Restore Message''. | ||
| + | * Drag and drop the envelope icon into an Outlook email folder or a Windows Explorer file system folder. | ||
| + | * The email is restored immediately or after a few seconds, depending on its size. The email is restored as ''read''. | ||
| − | + | <br style="clear: both;" /> | |
| − | + | == Printing Emails == | |
| + | To quickly print an archived email on the current default printer, please proceed as follows: | ||
| − | + | * Locate the email within the archive and select it, so that it is shown in the preview area. | |
| + | * In the MailStore Outlook Add-in, click on ''Print Message''. | ||
| + | * The email is immediately printed. | ||
| − | + | To print the message on a different than the default printer, use Outlook's built-in function accessible after you opened the message via ''Open Message'' from the add-in. | |
| − | + | <br style="clear: both;" /> | |
| − | |||
| − | |||
| − | |||
| − | |||
| − | |||
| − | |||
| − | |||
| − | |||
| − | |||
| − | |||
| − | |||
| − | |||
| − | |||
| − | |||
| − | |||
| − | |||
| − | |||
| − | |||
| − | |||
| − | |||
| − | |||
| − | |||
| − | |||
| − | |||
| − | |||
| − | |||
| − | |||
| − | |||
| − | |||
| − | |||
| − | |||
| − | |||
| − | |||
| − | |||
| − | |||
| − | |||
| − | |||
| − | |||
| − | |||
| − | |||
| − | |||
| − | |||
| − | |||
| − | |||
| − | |||
| − | |||
| − | |||
| − | |||
| − | |||
| − | |||
| − | |||
| − | |||
| − | |||
| − | |||
| − | |||
| − | |||
| − | |||
| − | |||
| − | |||
| − | |||
| − | |||
| − | |||
| − | |||
| − | |||
| − | |||
| − | |||
| − | |||
| − | |||
| − | |||
| − | |||
| − | |||
| − | |||
| − | |||
| − | |||
| − | |||
| − | |||
| − | |||
| − | |||
| − | |||
| − | |||
| − | |||
| − | |||
| − | |||
| − | |||
| − | |||
| − | |||
| − | |||
| − | |||
| − | |||
| − | |||
| − | |||
| − | |||
| − | <br style="clear: both;"/> | ||
| + | == Changing Regional Settings == | ||
| + | By default the MailStore Outlook Add-in uses the same regional settings as Microsoft Outlook. The regional settings can also be set manually in the MailStore Outlook Add-in settings dialog. | ||
[[de:Zugriff_über_die_Microsoft_Outlook-Integration]] | [[de:Zugriff_über_die_Microsoft_Outlook-Integration]] | ||
| + | [[en:Accessing the Archive with the Microsoft Outlook integration]] | ||
Revision as of 17:00, 4 December 2019
MailStore users can access their archives using a convenient add-in for Microsoft Outlook. A list of supported Microsoft Outlook versions can be found under System Requirements.
Requirements
MailStore Server should be in use and the add-in for Microsoft Outlook should be installed on the appropriate machine. In this case, a toolbar (up to 2007) or a tab (Outook 2010 or later) labeled "MailStore" will be visible in Microsoft Outlook.
Installation & Update
The MailStore Outlook Add-In setup file that matches your MailStore Server version is stored on the MailStore Server machine. Follow the Install MailStore Client on other Computers link on your desktop and copy the corresponding setup file to the client computer.
It is a regular Windows setup program, that can by executed on the appropriate client computer by double-clicking on the setup file. Just follow on-screen instructions.
Notice: Alternatively to installing the MailStore Outlook Add-In application manually, you can also deploy it to the client computer though the Active Directories Group Policy feature. More information on that can be found in the article MailStore Outlook Add-in Deployment
If an update is installed on the MailStore Server computer, MailStore Outlook Add-In usually stays compatible with MailStore Server. Therefore a re-installation of MailStore Outlook Add-In is usually not required.
Login to MailStore Server
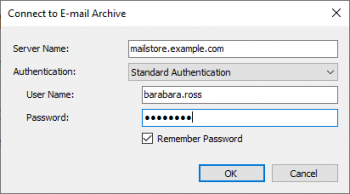
If the MailStore Outlook Add-in is not pre-configured, you will be asked to log in to MailStore Server as soon as you click any button in the MailStore Outlook Add-in. Please refer to your system administrator for the server name and your access data.
Deleting Saved Access Data
If you would like to log in to a different server or use different access data, you may have to delete the existing access information saved in Microsoft Outlook. Please proceed as follows:
- Click on Settings in the MailStore Outlook Add-in
- Click on Clear Cached Credentials.
- Click on OK.
- Click on any button in the add-in to go back to the login window.
Technical Considerations
- The MailStore Outlook Add-in uses the HTTP server integrated in MailStore Server to access the archive.
- The option Secure Connection is enabled by default in the settings of the Outlook Add-in, to use encrypted HTTPS connections instead of unencrypted HTTP. Thus using a valid TLS certificate is recommended. It is highly disadvisable to use unencrypted HTTP connections to access the archive.
- If you have changed the configuration of the HTTP/HTTPS ports within the MailStore Server Service Configuration (the default HTTP port is 8461, the default HTTPS port is 8462), you must include the port number when logging in. Simply append the port number to the server name, separated by a colon (for example:
mailstore:443)
Search by Archive Folder
Display of the Archive Folder
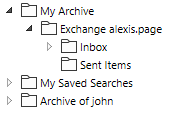
In the MailStore Outlook Add-in, click on Browse Archive to display the part of the archive that is visible to you.
User Archives
The folder My Archive contains all emails that were archived from your mailboxes. If you have read-access to the archives of additional users, their emails are located in the folders labeled Archive of <user name>.
Display of Emails in a Folder
To view the emails of a specific folder, simply click on the folder name. The emails are listed below the tree structure.
Quick Search
With quick search you can browse all emails located in the archives you have access to. This feature is especially suitable for simple queries; alternatively, the advanced search can be used.
Using Quick Search
The input field is located in the left part of the MailStore Outlook Add-In. Simply enter one or more keywords and press ENTER. The search results are displayed. Keywords which appear in the header or the subject line are highlighted.
Searching for Word Fragments
To display all emails containing a word with a particular fragment, use the wildcard character (*). For example:
auto*
will return auto, automatic, automobile etc.
*example.com
will return all email addresses and domains of example.com.
firstname.lastname*
will return all email addresses of firstname.lastname.
Searching for Words with unknown letters
To view all emails containing a word where you do not know how to spell it correctly, you can use the question mark (?). For example
Me?er
would locate Meier and Meyer, but not Maier.
The question mark (?) cannot be used at the beginning of a word or at the end of a word, use the wildcard character (*) instead.
Searching for Phrases
To search for words appearing consecutively and in a specific order, use quotation marks (""). For example:
"Microsoft Windows"
will return the text Microsoft Windows but not Microsoft Works or Windows 95.
Narrowing by Fields
A search for keywords or phrases can be limited to specific fields. For example:
subject:News                  only in Subject
from:[email protected]       only in From
to:[email protected]      only in To
cc:[email protected]         only in Cc
bcc:[email protected]   only in Bcc
bcontent:billing              only in Body of message
acontent:billing              only in Attachments of message
Excluding Words
To narrow a search, you may want to specify words which must not be present in the emails. To exclude words from the search results, prepend the word with the minus character (-). For example:
ZDNet -download-tip
returns all emails from ZDNet which do not contain download-tip.
Combining Search Options
Any of the search options described above can be combined. For example:
ZDNET -"Daily Update"
returns all emails from ZDNet which do not contain the consecutive words Daily Update.
from:ZDNET bcontent:MailStore
returns all emails from ZDNET which have MailStore somewhere in their message body.
from:[email protected] acontent:bill
returns all emails from [email protected] which have bill in any attachment.
to:[email protected] -sales
returns all emails to [email protected] which do not have sales in any part of the email.
from:[email protected] to:[email protected] acontent:bill -subject:admonition
returns all message from [email protected] to [email protected] which have bill in any attachment but do not have admonition in the subject.
About Special Characters
Words inside indexed emails or attachments which are a combination of alphanumeric (letters, digits) and non-alphanumeric characters (white space, line break, delimiter or other control characters), may be returned in search results when searching for the alphanumerical part only.
For instance, when searching for firstname, firstname.lastname and lastname, e-mails containing the word firstname.lastname will be returned.
Commonly occurring characters are:
- Period (.)
- Comma (,)
- Semicolon (;)
- Hyphen (-)
- Underscore (_)
- AT-Sign (@)
- Slash & Backslash (/,\)
- Null character (NUL)
Advanced Search
With the advanced search, you can execute complex queries through the MailStore Outlook Add-in.
Queries can be scoped to certain archive folders and may not only refer to the email content but also include fields such as email date, archiving date or email size.
Email attachments can be searched specifically, too if search indexing has been configured appropriately.
Our Tech Tip video provides an overview.
Using the Advanced Search
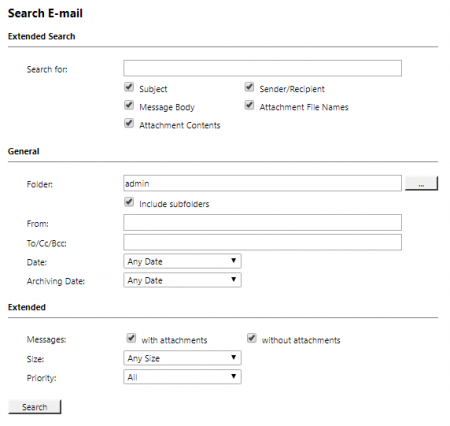
In the MailStore Outlook Add-In, click on Advanced Search and enter the search parameters. The criteria are AND-combined, i.e. the search returns only those emails that satisfy all criteria. Click on Search to start the search.
Search Criteria under "Extended Search"
Enter a keyword or phrase into the text field and specify where MailStore is to conduct the search. The following options are available:
- Subject - The subject line of the email is searched.
- Sender/Recipient - The fields "From", "To", "Cc", and "Bcc" are searched.
- Message body - The text-only or HTML sections of the email are searched (depending on availability).
- Attachments File Names - The file names of the email attachments are searched.
- Attachment Contents - The contents of the email attachments are searched. If and to what extent attachments can be searched depends on the specified indexing options.
All options described in section Quick Search, such as phrases and wildcards, are available in the textfield Search for as well.
Search Criteria under "General"
Under General, the following options are available:
- Folder - The folder to be searched by MailStore can be selected here. By default, all folders readable by the current user are selected. By clicking the button next to the text field, folders can also be selected using the folder structure.
- Include subfolder - If selected, MailStore not only searches the selected folder (e.g. Inbox), but all subfolders created therein (e.g. Inbox / Projects 2008 / Profit Optimization) as well.
- From - Any keywords or email addresses entered here are searched for within the email's sender field only.
- To/Cc/Bcc - Any keywords or email addresses entered here are searched for within the email's recipient fields only.
- Date - The time frame the search is to cover can be selected here. Either a predefined range, such as Yesterday or This year, can be selected or, by choosing Custom, a specific period can be specified manually. In this case, the start and end dates will be included.
- Archiving Date - The archiving time frame the search is to cover can be selected here. Either a predefined range, such as Yesterday or This year, can be selected or, by choosing Custom, a specific period can be specified manually. In this case, the start and end dates will be included.
All options described in section Quick Search, such as phrases and wildcards, are available in the fields From and To/Cc/Bcc as well.
Search Criteria under "Extended"
Under Extended, the following options are available:
- Messages with/without attachments - By default, all messages are searched, regardless of whether or not they have any file attachments. Clear one of the check boxes to remove certain emails, such as those without attachments, from the results.
- Important: These searches can be imprecise at times because items like background pictures could be regarded as attachments.
- Size - By default, all messages are searched regardless of their size. Use the appropriate fields provided to limit the search according to the size of the emails, e.g. at least 5 MB or between 400 and 600 KB.
- Priority - Emails are searched according to the priority level of the email as assigned by the sender. When choosing Low, all emails with a priority level lower than Normal are returned, when choosing High, all emails with a priority level higher than Normal are returned. Emails not containing any information regarding priority are assumed to have a priority level of Normal.
Starting a Search
Click on Search to start the search. The results are displayed in a list.
Refining the Search Results
To narrow the results after a search has been executed, click on Advanced Search again, enter additional search criteria and click on Search.
Starting a New Search
To start a new search, click on New Query. All search criteria will be reset to their default values (i.e. no restrictions; the search covers all folders readable by the current user).
Saving a Search
Search criteria that are used repeatedly (such as "all receipts from the last month") can be saved and reused at any time. Click on Save As... and choose a meaningful name for the search. Click on Open to access, edit or restart the search.
About Special Characters
Words inside indexed emails or attachments which are a combination of alphanumeric (letters, digits) and non-alphanumeric characters (white space, line break, delimiter or other control characters), may be returned in search results when searching for the alphanumerical part only.
For instance, when searching for firstname, firstname.lastname and lastname, e-mails containing the word firstname.lastname will be returned.
Commonly occurring characters are:
- Period (.)
- Comma (,)
- Semicolon (;)
- Hyphen (-)
- Underscore (_)
- AT-Sign (@)
- Slash & Backslash (/,\)
- Null character (NUL)
Email Display
To view an email which was returned by one of the search functions described above, simply click on it. A preview of the email is displayed on the right side of the screen.
Please keep in mind that images and any formatting will not be displayed in the preview for security reasons. Emails cannot be forwarded or replied to within the preview, either.
For a comprehensive view of an archived email and the ability to use all the Microsoft Outlook features such as printing, forwarding and replying, click on Open Email in the MailStore Outlook Add-in. The email will be loaded from the archive and displayed, either immediately or after a few seconds depending on size.
Restoring Emails to the Application
To restore an archived email which is no longer in your mailbox to Outlook, please proceed as follows:
- Locate the email within the archive and select it, so that it is shown in the preview area.
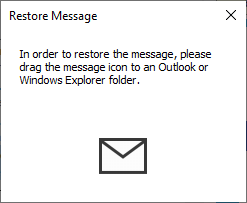
- In the MailStore Outlook Add-in, click on Restore Message.
- Drag and drop the envelope icon into an Outlook email folder or a Windows Explorer file system folder.
- The email is restored immediately or after a few seconds, depending on its size. The email is restored as read.
Printing Emails
To quickly print an archived email on the current default printer, please proceed as follows:
- Locate the email within the archive and select it, so that it is shown in the preview area.
- In the MailStore Outlook Add-in, click on Print Message.
- The email is immediately printed.
To print the message on a different than the default printer, use Outlook's built-in function accessible after you opened the message via Open Message from the add-in.
Changing Regional Settings
By default the MailStore Outlook Add-in uses the same regional settings as Microsoft Outlook. The regional settings can also be set manually in the MailStore Outlook Add-in settings dialog.

