Difference between revisions of "Archiving Emails Without Your Own Emailserver"
| [unchecked revision] | [checked revision] |
Ltalaschus (talk | contribs) |
|||
| (118 intermediate revisions by 5 users not shown) | |||
| Line 1: | Line 1: | ||
| − | '''Please note:''' This article only addresses archiving methods in an | + | '''Please note:''' This article only addresses archiving methods in environments without an email server. It is assumed that you already have a MailStore Server installation or [https://www.mailstore.com/en/products/mailstore-server/mailstore-server-trial-download/ test installation] and are familiar with the basic functionality of MailStore Server. Please refer to the [[MailStore_Help|Manual]] or the [[Quick Start Guide]] for more information. |
| − | MailStore Server offers several methods for archiving emails from an email server | + | MailStore Server offers several methods for archiving emails from an email server; they are described in the following. If you are not sure which archiving method is best for your company, please refer to chapter [[Choosing the Right Archiving Strategy]]. |
| − | = Creating and Synchronizing User Accounts = | + | == Creating and Synchronizing User Accounts == |
| − | + | When emails are archived, they are always assigned to individual users. For each user, whose emails will be archived with MailStore, a user account has to be created in MailStore. In addition to [[Quick_Start_Guide#Adding_New_Users|manually setting up new users]], MailStore Server provides several options for importing existing user data. | |
| − | = | ||
| − | |||
| − | When emails are archived, they are always assigned to individual users. For each user, whose emails will be archived with MailStore, a user account has to be created in MailStore. In addition to | ||
| − | |||
| − | |||
| + | === Active Directory Synchronization === | ||
Within an Active Directory Domain Service environment, MailStore's internal user database can be synchronized with the active directory of your company. A description of this feature is available in the article [[Active Directory Integration]]. | Within an Active Directory Domain Service environment, MailStore's internal user database can be synchronized with the active directory of your company. A description of this feature is available in the article [[Active Directory Integration]]. | ||
| − | == Generic LDAP Server Synchronization == | + | === Generic LDAP Server Synchronization === |
| − | |||
MailStore Server offers support for generic LDAP servers, which is described in detail in the article [[Generic LDAP Integration]]. | MailStore Server offers support for generic LDAP servers, which is described in detail in the article [[Generic LDAP Integration]]. | ||
| − | == Using a CSV File == | + | === Using a CSV File === |
| + | In relation with IMAP batch archiving, using a CSV file constitutes another option for importing user data. Detailed information about this topic is available in the article [[Batch-archiving_IMAP_Mailboxes|Batch Archiving IMAP Mailboxes]]. | ||
| − | + | == Archiving Individual Mailboxes == | |
| − | = Archiving | + | === Archiving Local Email Programs === |
| + | MailStore supports archiving emails from locally installed email applications such as Microsoft Outlook or Mozilla Thunderbird. This archiving method is especially useful for archiving historic data and is generally executed only once for each user. The emails located in the users' local profiles are placed in the central MailStore archive on the server. A detailed description of how to set up this archiving method is available in the article [[Archiving_Email_from_Outlook,_Thunderbird_and_others|Archiving Email from Outlook, Thunderbird and others]]. | ||
| − | + | Once the dispersed inventory data has been stored in the MailStore archive, we recommend setting up central archiving profiles directly on the MailStore server for regularly archiving the user mailboxes. These are described below. | |
| − | |||
| − | |||
| − | |||
| − | Once the dispersed inventory data has been stored in the MailStore archive, we recommend setting up central archiving profiles directly on the MailStore server for regularly archiving the user mailboxes. | ||
| − | |||
| − | |||
| + | === IMAP / POP3 === | ||
Archiving individual mailboxes on any email server can be done using the IMAP or POP3 protocols. Information about setting up the archiving process is available in the article [[Archiving Server Mailboxes]]. | Archiving individual mailboxes on any email server can be done using the IMAP or POP3 protocols. Information about setting up the archiving process is available in the article [[Archiving Server Mailboxes]]. | ||
| − | == | + | === Microsoft Office 365 === |
| − | + | If you are using Microsoft Office 365, please follow the instructions in our article [[Archiving_Emails_from_Microsoft_365_(Modern_Authentication)|Archiving Emails from Microsoft 365]]. | |
| − | |||
| − | |||
| − | |||
| − | |||
| − | |||
| − | |||
| − | |||
| − | |||
| − | |||
| − | |||
| − | |||
| − | |||
| − | |||
| − | + | === Hosted Exchange === | |
| + | For archiving a Hosted Exchange mailbox, MailStore requires the access data for the email account made available by the provider. This includes user name (usually the email address), password as well as the (Exchange) server name. | ||
| − | + | Generally, the email application identifies the name of the Exchange server automatically using the autodiscover function (if supported by the service provider). This is why the server name is typically unknown to the user. | |
| − | + | The server can be detected manually using the ''Exchange Proxy Settings'' in Microsoft Outlook. They can be found at ''Tools | Account Settings | Change| More Settings | Connection | Exchange Proxy Settings'' | |
| − | + | [[File:He_serversetting_en.png|600px|center]] | |
| − | + | The setup of the archiving process for a Hosted Exchange mailbox is the same as the setup for a single Exchange mailbox on a local Exchange server. Additional information is available at [http://en.help.mailstore.com/Archiving_Emails_from_Microsoft_Exchange_2007#Archiving_Individual_Mailboxes| Archiving Individual Exchange Server Mailboxes]. | |
| − | + | == Archiving Multiple Mailboxes in One Step == | |
| − | == | + | === Batch Archiving of IMAP Mailboxes === |
| + | Instructions for setting up [[Batch-archiving_IMAP_Mailboxes|Batch Archiving Of IMAP Mailboxes]] using a CSV file are available in the corresponding article. | ||
| − | + | === Microsoft Office 365 === | |
| + | If you are using Microsoft Office 365 or Microsoft Exchange Online, please follow the instructions in our article [[Archiving_Emails_from_Microsoft_365_(Modern_Authentication)|Archiving Emails from Microsoft 365]]. | ||
| − | = | + | === Hosted Exchange === |
| + | If your Hosted Exchange service provider offers setting up a "service account", this account can be used to archive multiple mailboxes in MailStore Server centrally. A "service account" is a user account with extended access privileges to multiple Exchange mailboxes. Additional information as well as detailed instructions for setting the appropriate privileges is available in our Exchange implementation guides: | ||
| + | {{Hosted_Exchange_Versions|Archiving_Multiple_Exchange_Mailboxes_Centrally|Exchange Server}} | ||
| + | == Archiving Incoming and Outgoing Emails Directly == | ||
| + | To implement the archiving of all incoming and outgoing emails directly without using a local email server, several methods are available, depending on which features are provided by your email service provider. | ||
| − | + | === IMAP-Multidrop Mailbox === | |
| + | If your email service provider supports setting up and using an IMAP or POP3 multidrop mailbox, it can also be used to archive all incoming and outgoing emails in MailStore. Setup procedures are described in the article [[Archiving IMAP and POP3 Multidrop Mailboxes]]. | ||
| − | == | + | === Microsoft Office 365 === |
| + | If you are using Microsoft Office 365, please follow the instructions in our article [[Archiving_Emails_from_Microsoft_365_(Modern_Authentication)|Archiving Emails from Microsoft 365]]. | ||
| − | + | === Hosted Exchange === | |
| + | In order to archive all incoming and outgoing emails in a hosted Microsoft Exchange environment, it is required to set up journaling for all users or just a specific a distribution group of Exchange users. Please contact your hosting provider if this is possible. Information on how to archive emails from a journal mailbox can be found in our Exchange implementation guides: | ||
| + | {{Hosted_Exchange_Versions|Step_3:_Configuration_of_MailStore_Server|Exchange Server}} | ||
| − | + | === MailStore Gateway === | |
| + | If none of the previous options are available and sending and receiving emails is done via SMTP/POP3, the free program MailStore Gateway can be used as it provides SMTP and POP3 proxy functionality. Technically, MailStore Gateway is placed between the local email clients (e.g. Thunderbird, Outlook, etc.) and the email server of the email service provider. Email clients are reconfigured to send and receive emails via MailStore Gateway, instead of the email service provider's server. | ||
| − | = | + | <p class="msnote">'''Please note:''' MailStore Gateway only supports encrypted connections to protect login information and the transferred email content. The inbound connection parameters (e.g. port, encryption type) are used for the outbound connection to the email service provider's server as well.</p> |
| − | + | ==== Setup MailStore Gateway ==== | |
| + | The following are general steps to setup MailStore Gateway for the SMTP/POP3 proxy archiving scenario. Please refer to the [https://help.mailstore.com/en/gateway/ MailStore Gateway Manual] for detailed instructions about: | ||
| − | + | * Installation and setup | |
| − | + | * Logging on to the management console | |
| + | * Creating mailboxes | ||
| − | + | After these steps, a mailbox with a unique ID (i.e. mbx-dead1234beef5678) should exist. | |
| − | + | Once a new MailStore Gateway mailbox has been created, the configuration of the email clients must be changed. On the ''SMTP Proxy'' and ''POP3 Proxy'' tabs in the MailStore Gateway Management Console, the generic client configuration is shown. The example below demonstrates which particular settings need to be modified, followed by instructions on how to configure them in well known email clients. | |
| − | |||
| − | |||
| − | |||
| − | |||
| − | |||
| − | |||
| − | + | <p class=msnote>'''In environments with branch- or home offices, please note:''' Please keep in mind that all email clients have to be set up for using the MailStore Gateway. Because of this, the email clients in branch- or home offices have to be routed through the main office for sending or receiving emails. This can be done by using a VPN connection, for example.</p> | |
| − | + | '''Example''' | |
| + | {| | ||
| + | ! Email Service Provider Domain | ||
| + | | example.net | ||
| + | |- | ||
| + | ! Local Domain | ||
| + | | example.com | ||
| + | |- | ||
| + | ! MailStore Gateway Server Name | ||
| + | | gateway.example.com | ||
| + | |- | ||
| + | ! Mailbox ID | ||
| + | | mbx-dead1234beefdead5678beef | ||
| + | |} | ||
| − | + | '''SMTP Settings''' | |
| − | |||
| − | |||
| − | |||
| − | |||
| − | |||
| − | + | {| class="wikitable" | |
| + | ! | ||
| + | !Old Value | ||
| + | !New Value | ||
| + | |- | ||
| + | !Server Name | ||
| + | |smtp.example.net | ||
| + | |gateway.example.com | ||
| + | |- | ||
| + | !Port | ||
| + | |587 | ||
| + | |587 | ||
| + | |- | ||
| + | !Security | ||
| + | |STARTTLS | ||
| + | |STARTTLS | ||
| + | |- | ||
| + | !User Name | ||
| + | |john.doe | ||
| + | |john.doe%smtp.example.net%mbx-dead1234beefdead5678beef | ||
| + | |} | ||
| − | = | + | '''POP3 Settings''' |
| + | {| class="wikitable" | ||
| + | ! | ||
| + | !Old Value | ||
| + | !New Value | ||
| + | |- | ||
| + | !Server Name | ||
| + | |pop.example.net | ||
| + | |gateway.example.com | ||
| + | |- | ||
| + | !Port | ||
| + | |995 | ||
| + | |995 | ||
| + | |- | ||
| + | !Security | ||
| + | |SSL/TLS | ||
| + | |SSL/TLS | ||
| + | |- | ||
| + | !User Name | ||
| + | |john.doe | ||
| + | |john.doe%pop.example.net%mbx-dead1234beefdead5678beef | ||
| + | |} | ||
| − | + | ==== Setup of Email Clients ==== | |
| + | Next, configure your email clients to use MailStore Gateway. | ||
'''Mozilla Thunderbird:''' | '''Mozilla Thunderbird:''' | ||
| − | * | + | * In Mozilla Thunderbird, open the mailbox settings via ''Thunderbird Menu > Options > Account Settings''. |
| − | * | + | * Under ''Outgoing Mail Server (SMTP)'', select your current SMTP server and click on ''Edit''. |
| − | + | *: [[File:Client_settings_smtp.png|350px|center]] | |
| − | : [[File: | + | * Change the ''Server Name'' to the host name or the IP address of the MailStore Gateway computer. |
| + | * Adjust the ''User Name'' field to match the format ''remote_username%target_server%mailbox_id'' where | ||
| + | ** ''remote_username'' is the user name (e.g. john.doe) to login to a mailbox on ''target_server'', | ||
| + | ** ''target_server'' is the host name of the email service provider's server (e.g. smtp.example.net), | ||
| + | ** ''mailbox_id'' is the unique identifier of the MailStore Gateway mailbox into which copies of the sent emails are to be stored, | ||
| + | ** ''%'' is the percent character that is used as separator between the parameters. | ||
| + | * Click on ''OK'' to save the changes. | ||
| + | * To change the POP3 server, click on ''Server Settings'' under the corresponding account. | ||
| + | *: [[File:Client_settings_pop3.png|350px|center]] | ||
| + | * Change the ''Server Name'' to the host name or the IP address of the MailStore Gateway computer. | ||
| + | * Adjust the user name to match the format ''remote_username%target_server%mailbox_id'' where | ||
| + | ** ''remote_username'' is the user name (e.g. john.doe) to login to a mailbox on ''target_server'', | ||
| + | ** ''target_server'' is the host name of the email service provider's server (e.g. pop.example.net), | ||
| + | ** ''mailbox_id'' is the unique identifier of the MailStore Gateway mailbox into which copies of the received emails are to be stored, | ||
| + | ** ''%'' is the percent character that is used as separator between the parameters. | ||
| + | * Click ''OK'' to save the settings. | ||
| − | + | Send a test email to verify the new settings. If they are correct, the email will be sent to the mailbox of the recipient and a copy is stored in the MailStore Gateway mailbox with the given ID. | |
| − | |||
| − | |||
| − | |||
| − | |||
| − | |||
| − | |||
| − | |||
| − | |||
| − | |||
'''Microsoft Outlook''' | '''Microsoft Outlook''' | ||
| − | * | + | * Open the mailbox settings by clicking on ''File > Info > Account Settings > Manage Profiles > Email Accounts...'' |
| − | * | + | * Select the appropriate account and click on ''Change''. |
| − | + | *: [[File:Client_Settings_Outlook.png|350px|center]] | |
| − | : [[File: | + | * Change the SMTP server as well as the POP3 server being used and enter the host name or the IP address of the MailStore Gateway computer. |
| − | + | * Adjust the user name to match the format ''remote_username%target_server%mailbox_id'' where | |
| − | * | + | ** ''remote_username'' is the user name (e.g. john.doe) to login to a mailbox on ''target_server'', |
| − | * | + | ** ''target_server'' is the host name of the email service provider's server (e.g. pop.example.net), |
| − | + | ** ''mailbox_id'' is the unique identifier of the MailStore Gateway mailbox into which copies of the received emails are to be stored, | |
| − | + | ** ''%'' is the percent character that is used as separator between the parameters. | |
| − | + | * Click on ''More Settings ...'' | |
| − | ''' | + | * Open the tab ''Outgoing Server''. |
| + | *: [[File:Outlook08_client_settings_en.png|350px|center]] | ||
| + | * Check the box ''My outgoing server (SMTP) requires authentication''. | ||
| + | * Select the option ''Log on using''. | ||
| + | * Adjust the user name to match the format ''remote_username%target_server%mailbox_id'' where | ||
| + | ** ''remote_username'' is the user name (e.g. john.doe) to login to a mailbox on ''target_server'', | ||
| + | ** ''target_server'' is the host name of the email service provider's server (e.g. smtp.example.net), | ||
| + | ** ''mailbox_id'' is the unique identifier of the MailStore Gateway mailbox into which copies of the sent emails are to be stored, | ||
| + | ** ''%'' is the percent character that is used as separator between the parameters. | ||
| + | * Enter the password for the outgoing server. | ||
| + | * Click ''OK''. | ||
| + | * Save the changes by clicking on ''Next > Finish''. | ||
| − | + | Send a test email to verify the new settings. If they are correct, the email will be sent to the mailbox of the recipient and a copy is stored in the MailStore Gateway mailbox with the given ID. | |
| − | + | ==== Setup of MailStore ==== | |
| + | {{Archiving MailStore Gateway Mailbox|''E-mail Client''|Arch_MailStore_Gateway_Client_01.png|Arch_MailStore_Gateway_Client_02.png|DSLink=[[#Creating_and_Synchronizing_User_Accounts|directory synchronization]]}} | ||
| − | + | [[de:E-Mail-Archivierung_ohne_eigenen_E-Mail-Server]] | |
| − | + | [[en:Archiving_Emails_Without_Your_Own_Emailserver]] | |
Latest revision as of 09:32, 8 May 2023
Please note: This article only addresses archiving methods in environments without an email server. It is assumed that you already have a MailStore Server installation or test installation and are familiar with the basic functionality of MailStore Server. Please refer to the Manual or the Quick Start Guide for more information.
MailStore Server offers several methods for archiving emails from an email server; they are described in the following. If you are not sure which archiving method is best for your company, please refer to chapter Choosing the Right Archiving Strategy.
Creating and Synchronizing User Accounts
When emails are archived, they are always assigned to individual users. For each user, whose emails will be archived with MailStore, a user account has to be created in MailStore. In addition to manually setting up new users, MailStore Server provides several options for importing existing user data.
Active Directory Synchronization
Within an Active Directory Domain Service environment, MailStore's internal user database can be synchronized with the active directory of your company. A description of this feature is available in the article Active Directory Integration.
Generic LDAP Server Synchronization
MailStore Server offers support for generic LDAP servers, which is described in detail in the article Generic LDAP Integration.
Using a CSV File
In relation with IMAP batch archiving, using a CSV file constitutes another option for importing user data. Detailed information about this topic is available in the article Batch Archiving IMAP Mailboxes.
Archiving Individual Mailboxes
Archiving Local Email Programs
MailStore supports archiving emails from locally installed email applications such as Microsoft Outlook or Mozilla Thunderbird. This archiving method is especially useful for archiving historic data and is generally executed only once for each user. The emails located in the users' local profiles are placed in the central MailStore archive on the server. A detailed description of how to set up this archiving method is available in the article Archiving Email from Outlook, Thunderbird and others.
Once the dispersed inventory data has been stored in the MailStore archive, we recommend setting up central archiving profiles directly on the MailStore server for regularly archiving the user mailboxes. These are described below.
IMAP / POP3
Archiving individual mailboxes on any email server can be done using the IMAP or POP3 protocols. Information about setting up the archiving process is available in the article Archiving Server Mailboxes.
Microsoft Office 365
If you are using Microsoft Office 365, please follow the instructions in our article Archiving Emails from Microsoft 365.
Hosted Exchange
For archiving a Hosted Exchange mailbox, MailStore requires the access data for the email account made available by the provider. This includes user name (usually the email address), password as well as the (Exchange) server name.
Generally, the email application identifies the name of the Exchange server automatically using the autodiscover function (if supported by the service provider). This is why the server name is typically unknown to the user.
The server can be detected manually using the Exchange Proxy Settings in Microsoft Outlook. They can be found at Tools | Account Settings | Change| More Settings | Connection | Exchange Proxy Settings

The setup of the archiving process for a Hosted Exchange mailbox is the same as the setup for a single Exchange mailbox on a local Exchange server. Additional information is available at Archiving Individual Exchange Server Mailboxes.
Archiving Multiple Mailboxes in One Step
Batch Archiving of IMAP Mailboxes
Instructions for setting up Batch Archiving Of IMAP Mailboxes using a CSV file are available in the corresponding article.
Microsoft Office 365
If you are using Microsoft Office 365 or Microsoft Exchange Online, please follow the instructions in our article Archiving Emails from Microsoft 365.
Hosted Exchange
If your Hosted Exchange service provider offers setting up a "service account", this account can be used to archive multiple mailboxes in MailStore Server centrally. A "service account" is a user account with extended access privileges to multiple Exchange mailboxes. Additional information as well as detailed instructions for setting the appropriate privileges is available in our Exchange implementation guides:
Archiving Incoming and Outgoing Emails Directly
To implement the archiving of all incoming and outgoing emails directly without using a local email server, several methods are available, depending on which features are provided by your email service provider.
IMAP-Multidrop Mailbox
If your email service provider supports setting up and using an IMAP or POP3 multidrop mailbox, it can also be used to archive all incoming and outgoing emails in MailStore. Setup procedures are described in the article Archiving IMAP and POP3 Multidrop Mailboxes.
Microsoft Office 365
If you are using Microsoft Office 365, please follow the instructions in our article Archiving Emails from Microsoft 365.
Hosted Exchange
In order to archive all incoming and outgoing emails in a hosted Microsoft Exchange environment, it is required to set up journaling for all users or just a specific a distribution group of Exchange users. Please contact your hosting provider if this is possible. Information on how to archive emails from a journal mailbox can be found in our Exchange implementation guides:
MailStore Gateway
If none of the previous options are available and sending and receiving emails is done via SMTP/POP3, the free program MailStore Gateway can be used as it provides SMTP and POP3 proxy functionality. Technically, MailStore Gateway is placed between the local email clients (e.g. Thunderbird, Outlook, etc.) and the email server of the email service provider. Email clients are reconfigured to send and receive emails via MailStore Gateway, instead of the email service provider's server.
Please note: MailStore Gateway only supports encrypted connections to protect login information and the transferred email content. The inbound connection parameters (e.g. port, encryption type) are used for the outbound connection to the email service provider's server as well.
Setup MailStore Gateway
The following are general steps to setup MailStore Gateway for the SMTP/POP3 proxy archiving scenario. Please refer to the MailStore Gateway Manual for detailed instructions about:
- Installation and setup
- Logging on to the management console
- Creating mailboxes
After these steps, a mailbox with a unique ID (i.e. mbx-dead1234beef5678) should exist.
Once a new MailStore Gateway mailbox has been created, the configuration of the email clients must be changed. On the SMTP Proxy and POP3 Proxy tabs in the MailStore Gateway Management Console, the generic client configuration is shown. The example below demonstrates which particular settings need to be modified, followed by instructions on how to configure them in well known email clients.
In environments with branch- or home offices, please note: Please keep in mind that all email clients have to be set up for using the MailStore Gateway. Because of this, the email clients in branch- or home offices have to be routed through the main office for sending or receiving emails. This can be done by using a VPN connection, for example.
Example
| Email Service Provider Domain | example.net |
|---|---|
| Local Domain | example.com |
| MailStore Gateway Server Name | gateway.example.com |
| Mailbox ID | mbx-dead1234beefdead5678beef |
SMTP Settings
| Old Value | New Value | |
|---|---|---|
| Server Name | smtp.example.net | gateway.example.com |
| Port | 587 | 587 |
| Security | STARTTLS | STARTTLS |
| User Name | john.doe | john.doe%smtp.example.net%mbx-dead1234beefdead5678beef |
POP3 Settings
| Old Value | New Value | |
|---|---|---|
| Server Name | pop.example.net | gateway.example.com |
| Port | 995 | 995 |
| Security | SSL/TLS | SSL/TLS |
| User Name | john.doe | john.doe%pop.example.net%mbx-dead1234beefdead5678beef |
Setup of Email Clients
Next, configure your email clients to use MailStore Gateway.
Mozilla Thunderbird:
- In Mozilla Thunderbird, open the mailbox settings via Thunderbird Menu > Options > Account Settings.
- Under Outgoing Mail Server (SMTP), select your current SMTP server and click on Edit.
- Change the Server Name to the host name or the IP address of the MailStore Gateway computer.
- Adjust the User Name field to match the format remote_username%target_server%mailbox_id where
- remote_username is the user name (e.g. john.doe) to login to a mailbox on target_server,
- target_server is the host name of the email service provider's server (e.g. smtp.example.net),
- mailbox_id is the unique identifier of the MailStore Gateway mailbox into which copies of the sent emails are to be stored,
- % is the percent character that is used as separator between the parameters.
- Click on OK to save the changes.
- To change the POP3 server, click on Server Settings under the corresponding account.
- Change the Server Name to the host name or the IP address of the MailStore Gateway computer.
- Adjust the user name to match the format remote_username%target_server%mailbox_id where
- remote_username is the user name (e.g. john.doe) to login to a mailbox on target_server,
- target_server is the host name of the email service provider's server (e.g. pop.example.net),
- mailbox_id is the unique identifier of the MailStore Gateway mailbox into which copies of the received emails are to be stored,
- % is the percent character that is used as separator between the parameters.
- Click OK to save the settings.


Send a test email to verify the new settings. If they are correct, the email will be sent to the mailbox of the recipient and a copy is stored in the MailStore Gateway mailbox with the given ID.
Microsoft Outlook
- Open the mailbox settings by clicking on File > Info > Account Settings > Manage Profiles > Email Accounts...
- Select the appropriate account and click on Change.
- Change the SMTP server as well as the POP3 server being used and enter the host name or the IP address of the MailStore Gateway computer.
- Adjust the user name to match the format remote_username%target_server%mailbox_id where
- remote_username is the user name (e.g. john.doe) to login to a mailbox on target_server,
- target_server is the host name of the email service provider's server (e.g. pop.example.net),
- mailbox_id is the unique identifier of the MailStore Gateway mailbox into which copies of the received emails are to be stored,
- % is the percent character that is used as separator between the parameters.
- Click on More Settings ...
- Open the tab Outgoing Server.
- Check the box My outgoing server (SMTP) requires authentication.
- Select the option Log on using.
- Adjust the user name to match the format remote_username%target_server%mailbox_id where
- remote_username is the user name (e.g. john.doe) to login to a mailbox on target_server,
- target_server is the host name of the email service provider's server (e.g. smtp.example.net),
- mailbox_id is the unique identifier of the MailStore Gateway mailbox into which copies of the sent emails are to be stored,
- % is the percent character that is used as separator between the parameters.
- Enter the password for the outgoing server.
- Click OK.
- Save the changes by clicking on Next > Finish.


Send a test email to verify the new settings. If they are correct, the email will be sent to the mailbox of the recipient and a copy is stored in the MailStore Gateway mailbox with the given ID.
Setup of MailStore
Setting up archiving processes for MailStore Gateway mailboxes is done using archiving profiles. General information about archiving profiles is available in chapter Working with Archiving Profiles.
Before configuring MailStore Server, please make sure that a MailStore Server user account exists for each user whose emails are to be archived with the MailStore Gateway. Please refer to chapter User Management for more information.
Important notice: It is imperative that, in user management under Properties, the email address is specified for each user. This is the only way to make sure that the emails in the archive are assigned to the appropriate users. If the POP3 user name does not match the user's email address, the user name has to be added separately.
Please proceed as follows:
- Log on as MailStore Server administrator using MailStore Client.
- In MailStore Server, click on Archive Email.
- To create a new archiving profile, select MailStore Gateway Mailbox from the Email Server list in the Create Profile area of the application window.
- A wizard opens that guides you through the setup process.
- Select E-mail Client and click OK.
Please note: To be able to archive a MailStore Gateway mailbox, MailStore Server users along with their email addresses must exist in the MailStore Server user management. If this is not the case, MailStore Server will offer to set up and run the directory synchronization at this point. Once completed, the wizard will resume.
Alternatively, you can cancel the wizard and create users manually as described the in chapter User Management.
- Fill out the fields Host, Mailbox ID and Password. Click on Test to verify the data entered.
If MailStore Gateway uses a TLS certificate from a certificate authority that is not trusted by the MailStore Server computer, the option Accept all certificates must be checked.
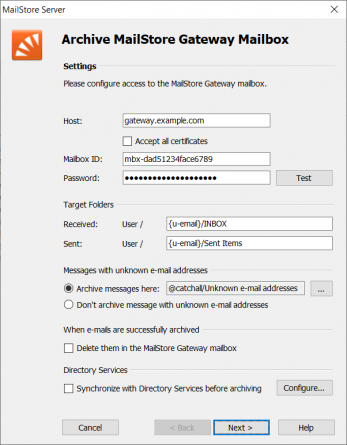
- Adjust any further settings such as how to handle emails with unknown addresses or asking MailStore Server to delete emails after they have been archived.
Please note: If you are additionally archiving messages from the users mailboxes, you have to set the target folder names here to the folder names that match the names that were created by the user mailbox archiving profiles. Otherwise, additional or similar folders could be created in the users' archives. The folder names are case-sensitive.
- If the option Synchronize with Directory Services before archiving is enabled, the MailStore Server user list will be synchronized with the configured directory service before the archiving process actually runs. This has the advantage that, for example, new employees will be created as MailStore Server users before archiving which enables MailStore Server to sort their emails into the correct archives.
- Click on Next.
- The timeout value only has to be adjusted on a case-by-case basis (e.g. with very slow servers or network connections).
- Click on Next.
- At the last step, select a name for the new archiving profile. After clicking on Finish, the archiving profile will be listed under Saved Profiles and can be run immediately or automatically, if desired.


