Archiving Emails from Kerio Connect
This implementation guide covers the specifics of archiving Kerio Connect Server mailboxes. It is assumed that you already have a MailStore Server installation or test installation and are familiar with the fundamentals of MailStore Server. Please refer to the Manual or the Quick Start Guide for more information.
MailStore Server offers several ways to archive emails from Kerio Connect Server mailboxes, which are described below. If you are not sure which archiving method best suits your company, please refer to the chapter Choosing the Right Archiving Strategy.
Synchronizing Users
MailStore Server offers special support for synchronizing users with an Kerio Connect server. Information about setup is available in chapter Kerio Connect Integration of the manual.
Archiving Individual Mailboxes
In MailStore Server Kerio Connect Server archiving tasks are stored in archiving profiles. By following the procedure described here you can archive a single Kerio Connect Server mailbox for a specific MailStore user. The archiving process can be executed manually or automatically. You can find further information about executing archiving profiles in chapter Email Archiving with MailStore Basics.
- Users can only archive their own mailboxes to their personal user archive. To archive the emails of other users, you have to be logged on to MailStore Client as MailStore administrator. Only MailStore administrators can archive the emails of other users.
- In MailStore, click on Archive Email.
- To create a new archiving profile, select Kerio Connect from the Email Servers list in the Create Profile area of the application window.
- A wizard opens guiding you through the setup process.
- Select Single Mailbox and click on OK.
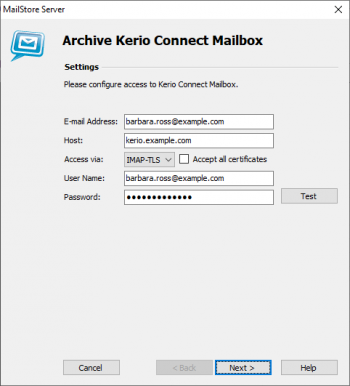
- Fill out the fields Email Address, Host, Access via, User Name and Password. The Email Address is used to label the folder that is created in the archive by this profile. Click on Test to verify the data entered.
- For the IMAP-TLS and IMAP-SSL protocols only: If the certificate provided by the remote host cannot be verified (e.g. self-signed or signed by an unknown certificate authority), enable the option Accept all certificates to allow MailStore to establish a connection. As this option leads to an insecure configuration, warnings may appear in the summary and/or the dashboard.
- Click on Next.
- Customize the list of folders to be archived, the filter and the deletion rules. By default, no emails will be deleted from a mailbox. The timeout value only has to be adjusted as needed (e.g. with very slow servers).


- Click on Next.
- If logged on to MailStore Server as administrator, the target archive can be specified at the next step. Select the archive of the user for whom the mailbox is to be archived.
- At the last step, a name for the new archiving profile can be specified. After clicking on Finish, the archiving profile will be listed under Saved Profiles and can be run immediately, if desired.

Hint: If MailStore Server is configured to automatically delete successfully archived emails from the mailboxes and you do not want these emails moved to the "Deleted Items" folder by Kerio Connect, follow the instructions under Permanently Deleting Successfully Archived Emails in the Archiving Incoming and Outgoing Emails Directly section of this document.
Archiving Multiple Mailboxes in One Step
Kerio Connect allows to access the mailboxes of other users via IMAP by using a master password.
Step 1: Defining a Master Password
- Log on to Kerio Connect Administration with an administrative user.
- Click on Configuration > Advanced Options and open the Master Authentication tab.
- Set the Enable master authentication on this server option.
- Adjust the Allow master authentication only from IP address group to your needs.
- Enter a complex password in the field Master password and confirm the password by entering it again in the Confirm password field.
- Click on Apply to save changes.

Step 2: Configuration of MailStore Server
- Log on to MailStore Client as MailStore administrator.
- Click on Archive Email.
- From the list E-Mail-Server under Create Profile select Kerio Connect to create a new archiving profile.
- A wizard opens to help specify the archiving settings.
- Select Multiple Mailboxes.
- To be able to archive multiple mailboxes, MailStore users along with their email addresses have to be set up in the MailStore user management.
- Under Server Name enter the name of your Kerio Connect server.
- Under Access via select the protocol to be used to access the Kerio Connect server. Wherever possible, you should always choose IMAP-TLS or IMAP-SSL.
- Please note: If you would like to automate the archiving process and access the Kerio Connect server using IMAP-TLS or IMAP-SSL, you should enable the option Ignore SSL Security Warnings. Otherwise, if an unofficial or self-signed certificate is used on the Kerio Connect server, the automatic execution of the archiving process will fail.
- Under Password enter the master password defined in step one.
- Click on Next to continue.
- Customize the list of folders to be archived, the filter and the deletion rules as needed. By default, no emails will be deleted from the mailbox. The timeout value only has to be adjusted if necessary (e.g. with very slow servers). Please keep in mind that these settings apply to all mailboxes to be archived.
- Click on Next to continue.
- Select the users whose mailboxes are to be archived.
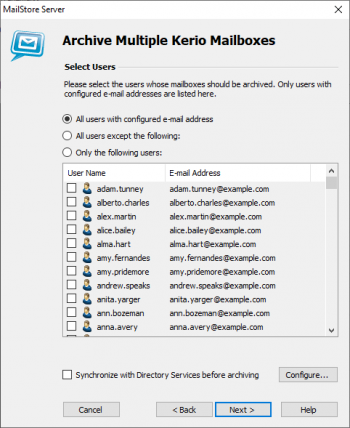
- The following options are available:
- All users with configured email address
Choose this option to archive the mailboxes of all users who are set up, along with their email addresses, in MailStore's user management. - All users except the following
Choose this option to exclude individual users (and thereby their Kerio mailboxes) from the archiving process, using the list of users below. - Only the following users
Choose this option to include individual users (and thereby their Kerio mailboxes) in the archiving process, using the list of users below. Only the mailboxes of those users explicitly specified will be archived. - Synchronize with Directory Services before archiving
If selected, the MailStore user list will be synchronized with the configured directory service before any archiving process is executed. This has the advantage that, for example, new employees will be created as MailStore users before archiving, so once the archiving process is executed, their Kerio mailbox is archived automatically as well. This option is especially recommended when the archiving process is to be executed automatically.
- Click on Next.
- In the last step, a name for the archiving profile can be specified. After clicking Finish, the archiving profile will be listed under Saved Profiles and can be run immediately or automatically, if desired.


Hint: If MailStore Server is configured to automatically delete successfully archived emails from the mailboxes and you do not want these emails moved to the "Deleted Items" folder by Kerio Connect, follow the instructions under Permanently Deleting Successfully Archived Emails in the Archiving Incoming and Outgoing Emails Directly section of this document.
Archiving Incoming and Outgoing Emails Directly
The Kerio Connect server offers an easy way to deliver all emails to a Kerio Connect specific archiving mailbox. MailStore Server archives this mailbox by means of an archiving task of type Archiving IMAP and POP3 Multidrop Mailboxes.
Step 1: Setting up a Kerio Connect Archiving Mailbox
- Click on Configuration and then on Archiving and Backup.
- Open the Archiving tab.
- Select the checkbox Enable email archiving.
- Select the checkbox Archive to the remote email address and enter the email address of the archive mailbox (e.g. [email protected]) into the text field. Please note, that this email address must not be assigned to any MailStore user.
- Select all four options under Archive:
- Local messages
- Incoming messages
- Outgoing messages
- Relayed messages

Step 2: Permanently Deleting Successfully Archived Emails
To enable the automatic expunge feature, you need to manually edit the mailserver.cfg file by following these steps:
- Stop the Kerio Connect Service
- Navigate to the install directory and locate the mailserver.cfg file
- Open the file in a text editor and search for the string AutoExpungeOnDelete
- Change the value from 1 to 0
- Once Kerio Connect is completely stopped, save your changes to the file
- Start the Kerio Connect Service
Step 3: Configuration of MailStore Server
Setting up archiving processes for multidrop mailboxes is done using archiving profiles. General information about archiving profiles is available in chapter Working with Archiving Profiles.
Please proceed as follows:
- Log on as MailStore administrator using MailStore Client.
- In MailStore, click on Archive Email.
- To create a new archiving profile, select Kerio Connect from the Email Server list in the Create Profile area of the application window.
- A wizard opens guiding you through the setup process.
- Select Multidrop Mailbox and click OK.
- Please note: To be able to archive a multidrop mailbox, MailStore Server users along with their email addresses must exist in the MailStore Server user management. If this is not the case, MailStore Server will offer to set up and run the Kerio_catchall_02.png at this point. Once completed, the wizard will resume.
Alternatively, you can cancel the wizard and create users manually as described the in chapter User Management.
- Please note: To be able to archive a multidrop mailbox, MailStore Server users along with their email addresses must exist in the MailStore Server user management. If this is not the case, MailStore Server will offer to set up and run the Kerio_catchall_02.png at this point. Once completed, the wizard will resume.
- Fill out the fields Access via, Host, Username and Password. Click on Test to verify the data entered.
- For the TLS and SSL protocols only: If the certificate provided by the remote host cannot be verified (e.g. self-signed or signed by an unknown certificate authority), enable the option Accept all certificates to allow MailStore to establish a connection. As this option leads to an insecure configuration, warnings may appear in the summary and/or the dashboard.

- Adjust any further settings such as how to handle emails with unknown addresses or asking MailStore to delete emails after they have been archived. The latter option is especially sensible when dealing with mailboxes that are exclusively used for archiving.
- The placeholders {u-email} or {h-email} can be used under Target Folders. {u-email} represents a user's primary email address and {h-email} is the email address found in the email header. Should a user have multiple aliases, using {h-email} will result in emails sent to different aliases of a user being archived in different folders, while using {u-email} will file all emails below the primary email address.
- Notice: If you are additionally archiving messages from the users mailboxes, you have to set the target folder names here to the folder names that match the names that were created by the user mailbox archiving profiles. Otherwise, additional or similar folders could be created in the users' archives. The folder names are case-sensitive.
- If the option Synchronize with Directory Services before archiving is enabled, the MailStore user list will be synchronized with configured directory service before the archiving process actually runs. This has the advantage that, for example, new employees will be created as MailStore users before archiving which enables MailStore to sort their emails into the correct archives.
- Click on Next.
- The timeout value only has to be adjusted on a case-by-case basis (e.g. with very slow servers).
- Click on Next.
- At the last step, select a name for the new archiving profile. After clicking on Finish, the archiving profile will be listed under Saved Profiles and can be run immediately or automatically, if desired.


