Archiving Emails from Microsoft 365 - Basic Authentication
Please note: This tutorial only covers the specifics of archiving from Microsoft Office 365 mailboxes. It is assumed that you already have a MailStore Server installation or test installation and are familiar with the fundamentals of MailStore Server. Please refer to the Manual or the Quick Start Guide for more information.
MailStore Server offers several ways to archive emails from Microsoft Office 365 mailboxes, which are described below. If you are not sure which archiving method best suits your company, please refer to chapter Choosing the Right Archiving Strategy.
Important notice: Dependent on your Office 365 plan, some archiving methods might not be usable in MailStore. The methods described under Archiving Multiple Office 365 Mailboxes Centrally and Archiving Incoming and Outgoing Emails Directly require functions that are only available in certain Office 365 plans.
Synchronizing Users
If you synchronize your Office 365 environment with an on premise Active Directory, it is recommended to set up a synchronization as described in chapter Active Directory Integration of the MailStore Server manual.
Archiving Individual Office 365 Mailboxes
Setting Up the Archiving Process
For each mailbox, please proceed as follows:
- Unless the mailbox of the current user is to be archived into his or her own user archive, log on to MailStore Client as MailStore administrator. Only an administrator can archive emails for other users.
- Click on Archive Email.
- From the Email Servers list in the Create Profile area of the window, select Microsoft Exchange to create a new archiving profile.
- A wizard opens to assist in specifying the archiving settings.
- Select Single Mailbox.
- Under Access via, select HTTPS.
- Please note: As Office 365 uses trusted certificates, the option Ignore SSL Warnings can be deselected.
- Under Host, enter the name of the Office 365 Exchange server, usually outlook.office365.com.
- Please note: If you do not know the host name, you can find it out by using the MailStore Exchange Autodiscover Tool.
- Under User Name, enter the Office 365 user name of the user whose emails are to be archived.
- Please note: Alternatively, any user with the appropriate access permissions for the mailbox to be archived can be specified. In this case, it is imperative that this mailbox is specified under Mailbox (see below).
- Under Password, enter the user's Office 365 password.
- As long as the user's email address matches his or her Office 365 user name, the field Mailbox must be left blank. Otherwise, the user's primary email address has to be entered here.
- Click on Test to verify that MailStore can access the mailbox.
- Click on Next.
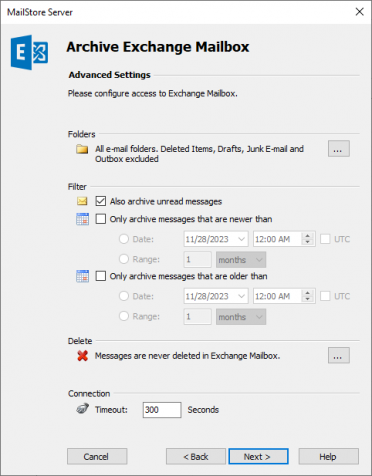
- If needed, adjust the settings for the List of Folders to be Archived, the filter and the Deletion Rules. By default, no emails will be deleted from the mailbox. The Timeout value only has to be adjusted in specific cases (e.g. with a very slow Internet connection).
Important notice: Did you specify IMAP as the protocol and have also defined a deletion rule? If so, empty folders (folders containing no emails, such as Deleted Items or Contacts) have to be added to the list of excluded folders manually. This is the only way to avoid these folders being archived and deleted according to the deletion rule specified. Please read more in chapter Archiving Specific Folders.
- Click on Next to continue.
- If logged on to MailStore Server as MailStore administrator, the Target Archive can be specified. Select the archive of the user for whom the selected mailbox is to be archived. If the user does not exist yet, click on Create a New User.
- Click on Next.
- In the last step, a name for the archiving profile can be specified. After clicking Finish, the archiving profile will be listed under Saved Profiles and can be run immediately, if desired.


More information on how to execute archiving profiles can be found under the topic Email Archiving with MailStore Basics
Archiving Multiple Office 365 Mailboxes Centrally
With MailStore, some or all mailboxes of Microsoft Office 365 can be archived in a single step. All necessary preparations, such as creating MailStore users, can be made automatically. The archiving process can be executed manually or automatically according to a schedule.
Important notice: Please make sure that the feature ApplicationImpersonation, which is required in order to archive multiple Office 365 mailboxes in a single step, is available in your Office 365 plan.
Step 1: Setting up a central user for accessing mailboxes
Before the archiving process can be set up in MailStore, you have to create a user that has access to all mailboxes. Afterwards follow these steps, to grant access permissions to the newly created user on all mailboxes:
- Log into Microsoft's Online Portal with your Office 365 admin account.
- Click on Admin and select Exchange from the drop down menu.
- Navigate to Permissions.
- Under admin roles select + (New).
- Enter a meaningful name and description for the new role group.
- Under Roles add the role ApplicationImpersonation.
- Under Members add the user you want to give permission to access all mailboxes.
- Click on Save to create a new role group.

Step 2: Configuration of MailStore Server
Includes:Centrally Archiving Multiple Exchange Mailboxes
Archiving Incoming and Outgoing Emails Directly
With the support of Office 365 Exchange's journal function, MailStore can archive the incoming and outgoing emails of all users automatically. This is the only way to ensure that all emails are archived in their entirety
Important notice: The Office 365 Exchange's journal function, which is required to archive incoming and outgoing emails directly, is only available in certain Office 365 plans.
Basic Functionality
Microsoft Office 365 Exchange provides the option to take down all incoming, outgoing and internal email traffic. At the time of sending and receiving, a copy of the respective email is created and stored in a mailbox called Journal Mailbox. Additionally, the email is provided with a Journal report containing information about the actual senders and recipients.
MailStore can be configured to archive this Journal mailbox at regular intervals. During this process, the emails from the Journal mailbox will be assigned to their respective MailStore users (i.e. their user archives) automatically. This means that all users are able to view only their own emails.
Before the archiving process can be set up in MailStore, journaling has to be set up for the Office 365 Exchange environment. Please proceed as follows:
Step 1: Creating a Mailbox for Journaling
The following steps describe how to set up journaling for your Microsoft Office 365 account.
- Log into Microsoft's Online Portal with your Office 365 admin account.
- Click on Admin and select Exchange from the drop down menu.
- Click on compliance management and then on journal rules.
Click on + (New)
- The dialog window New Journal Rule opens:
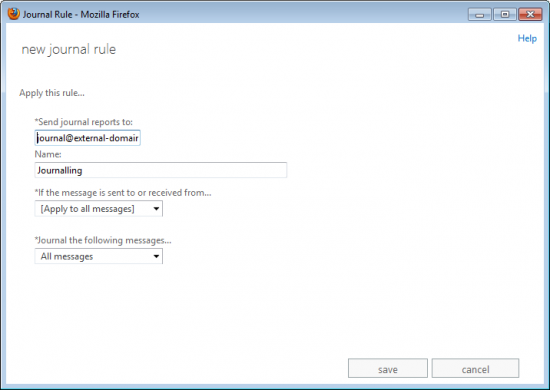
- Enter a name for the journal rule, e.g. Journaling.
- In the If the message is sent to or received from... section select whether the rule should apply to all messages or to specific users or groups.
- Under Journal the following messages..., choose whether to capture all messages, internally sent messages only, or only those messages with an external sender or recipient.
- Enter the email address of the previously created journal user in the Send journal reports to: box.
- Click on save to activate the rule.
- If you have not set up a recipient for None Delivery Reports (NDRs) for undeliverable journal reports yet, you are asked to do it now. Just follow the onscreen instructions.

Step 2: Configuration of MailStore Server
Setting up the archiving profile is very similar to a non-hosted Exchange 2010 environment.
Important notice: Office 365 currently supports only external, that is Non-Office 365 mailboxes as journal mailbox. In case the journal mailbox is a regular IMAP mailbox, you still have to select Microsoft Exchange > In- and Outbound E-mail Automatically under Archive E-mail in order to ensure that MailStore processes the journal reports correctly. Access via usually needs to be set to IMAP, IMAP-TLS or IMAP-SSL.
Please note that MailStore Server is not able to delete Exchange journal emails from GMail mailboxes and that the provider of that IMAP mailbox must not remove the X-MS-Journal-Report header from the journal emails.
Includes:Archiving an Exchange Journal Mailbox
Troubleshooting
The settings described above work in most cases. Yet, depending on the configuration of Microsoft Exchange Server, it is possible that a connection or registration fails even if all data has been entered correctly. If the suggestions in the corresponding error messages do not eliminate the problem, please try one or more of these alternative settings:
- Use HTTP instead of HTTPS.
- Make sure that the field Mailbox (opt.) contains the user's email address if it is different from the user's Windows login name.
- Use IMAP (unencrypted), IMAP-TLS or IMAP-SSL (both encrypted) instead of HTTP(S). To use IMAP, it has to be activated in Exchange.
