Difference between revisions of "Archiving Emails from Microsoft Exchange 2003"
| [unchecked revision] | [unchecked revision] |
| Line 39: | Line 39: | ||
{{:Centrally_Archiving_Multiple_Exchange_Mailboxes}} | {{:Centrally_Archiving_Multiple_Exchange_Mailboxes}} | ||
| + | |||
| + | <p class="msnote"> '''Important notice for Microsoft Exchange 2003:''' A newly created mailbox, that has never been accessed with Outlook Web Access, may be in a state that MailStore Server is unable to archive email from. In that case it is required that you (or the mailbox owner) logs into the mailbox at least one time using Outlook Web Access in order to correctly initialize the WebDAV interface for that mailbox.</p> | ||
= Archiving Incoming and Outgoing Emails Directly = | = Archiving Incoming and Outgoing Emails Directly = | ||
Revision as of 14:14, 6 June 2011
Please note: This tutorial only covers the specifics of archiving a Microsoft Exchange 2003 server. It is assumed that you already have a MailStore Server installation or test installation and are familiar with the fundamentals of MailStore Server. Please refer to the Manual or Quick Start Guide for more information.
MailStore Server offers several ways to archive emails from a Microsoft Exchange 2003 server, which are described below. If you are not sure which archiving method best suits your company, please refer to chapter Choosing the Right Archiving Strategy.
Synchronizing Users
As Microsoft Exchange requires the existence of an Active Directory, it is recommended to set up a synchronization as described in chapter Active Directory Integration of the MailStore Server manual.
Archiving Individual Mailboxes
Important notice for Microsoft Exchange 2003: A newly created mailbox, that has never been accessed with Outlook Web Access, may be in a state that MailStore Server is unable to archive email from. In that case it is required that you (or the mailbox owner) logs into the mailbox at least one time using Outlook Web Access in order to correctly initialize the WebDAV interface for that mailbox.
Archiving Multiple Mailboxes Centrally
MailStore can archive some or all Exchange mailboxes in one step either manually or according to a schedule. All necessary preparations, such as adding MailStore users, can be made automatically.
Before the archiving process can be set up in MailStore, a user with access to all mailboxes to be archived has to be added.
Please note: To be able to archive multiple mailboxes of an Exchange 2003 server in one step, Service Pack 2 must be installed.
Step 1: Preparation: Setting up a central user for accessing mailboxes
- Add a new user with full access to all mailboxes. This user does not need to have an Exchange mailbox.
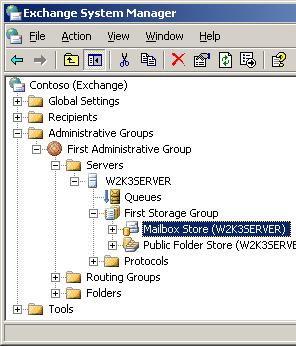
- Start Microsoft Exchange System Manager. It is generally located in the Start menu under Microsoft Exchange | System-Manager.
- From the tree structure, select the appropriate Exchange server, the storage group (e.g. First Storage Group) and the mailbox store.
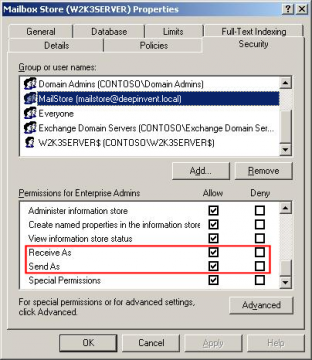
- Right-click onto the mailbox store and select Properties. Click on the Security tab.
- Click on Add to add the new MailStore user and grant the Send As and the Receive As Privileges.
Step 2: Setting Up the Archiving Process
Centrally Archiving Multiple Exchange Mailboxes
Important notice for Microsoft Exchange 2003: A newly created mailbox, that has never been accessed with Outlook Web Access, may be in a state that MailStore Server is unable to archive email from. In that case it is required that you (or the mailbox owner) logs into the mailbox at least one time using Outlook Web Access in order to correctly initialize the WebDAV interface for that mailbox.
Archiving Incoming and Outgoing Emails Directly
With the support of the Exchange Server Journaling functionality, MailStore can archive the incoming and outgoing emails of all users automatically. This is the only way to ensure that all emails are archived in their entirety.
Basic Functionality
Microsoft Exchange Server provides the option to take down all incoming, outgoing and internal email traffic. At the time of sending and receiving, a copy of the respective email is created and stored in a mailbox called Journal Mailbox. Additionally, the email is provided with a Journal report containing information about the actual senders and recipients.
MailStore can be configured to archive this Journal mailbox at regular intervals. During this process, the emails from the Journal mailbox will be assigned to their respective MailStore users (i.e. their user archives) automatically. This means that each user is able to view only their own emails.
Before the archiving process can be set up in MailStore, Journaling has to be set up for the Exchange server. Please proceed as follows:
Step 1: Activating Envelope Journaling
Please note: Envelope Journaling is first available for Exchange 2000 Server with Post-Service Pack 3 and Exchange Server 2003 with Service Pack 1.
Start MailStore Client and log on as MailStore administrator. Click on Management Shell and enter the following command:
exejcfg
The Envelope Journaling feature in Microsoft Exchange is now activated. After pressing Enter, a success message should appear on the screen:
Successfully ENABLED Envelope Journaling for COMPANY
Step 2: Creating a Mailbox for Journaling
Create a new user whose Exchange mailbox is to be used for Journaling. Through the console Active Directory Users and Computers, add a new user with a meaningful name, e.g. journal.
Step 3: Configuring the New Mailbox as Journal Mailbox
Open the Exchange System Manager. In the tree Server, open the server name as well as the First Storage Group. Right-click on Mailbox Store and select Properties.
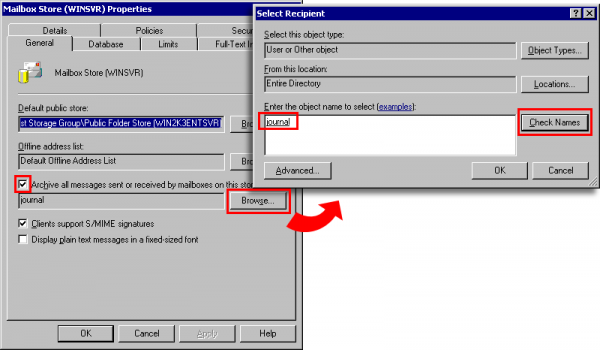
The dialog window Mailbox Store Properties opens:
- Mark the checkbox Archive all messages sent or received by mailboxes on this store.
- Click on Browse.
- Enter the name of the new user, e.g. journal.
- Click on Check Names. The name will be underlined and provided with additional information.
- Click on OK.
- In the Properties dialog window, click on OK again.
Please keep in mind that in complex Microsoft Exchange environments it may take a few minutes until the Journaling settings become active.
Step 4: Setting up the Archiving Process
Archiving an Exchange Journal Mailbox
Public Folders
MailStore Server can archive the emails from the public folders of Microsoft Exchange servers and make them available to some or all MailStore users. The archiving process can be executed manually or automatically according to a schedule.
Preparation
During archiving, emails are always assigned to individual users. Even when archiving a public folder, the user (or the user archive), for whom the emails are to be archived, has to be specified.
For this reason, first create a MailStore user for whom the public folder is to be archived. This user can be called publicfolder, for example. Next, all other users can be given access to the archive of the user publicfolder. This way, the archived content of the public folder is available to all MailStore users.
If MailStore users are not to have access to the archived public folder, skip this step and simply archive the emails to the user archive of the administrator (admin).
Information about how to create a new user in MailStore is available in the chapter User Management.
Archiving an Exchange Public Folder
Troubleshooting
The settings described above work in most cases. Yet, depending on the configuration of Microsoft Exchange Server, it is possible that a connection or registration fails even if all data has been entered correctly. If the suggestions in the corresponding error messages do not eliminate the problem, please try one or more of these alternative settings:
- Use HTTP instead of HTTPS.
- Make sure that the field Mailbox (opt.) contains the user's email address if it is different from the user's Windows login name.
- Use IMAP (unencrypted), IMAP-TLS or IMAP-SSL (both encrypted) instead of HTTP(S). To use IMAP, it has to be activated in Exchange.


