Difference between revisions of "Archiving Emails from Microsoft Exchange 2007"
| [unchecked revision] | [checked revision] |
| (52 intermediate revisions by 5 users not shown) | |||
| Line 1: | Line 1: | ||
| − | + | {{Multiline_Notices|Heading=Important Notice|{{3rd_Party_Product_EOL_Notice|Exchange 2007|Microsoft}}}} | |
| − | |||
| − | + | {{Implementation Guide Preamble|Exchange 2007 server}} | |
| − | |||
| − | = Archiving Multiple Exchange Mailboxes Centrally = | + | == Synchronizing Users == |
| − | + | {{Archiving Exchange Synchronizing Users|Microsoft Exchange 2007}} | |
| + | == Archiving Individual Mailboxes == | ||
| + | {{Archiving Single Mailbox Preamble|Microsoft Exchange 2007}} | ||
| + | {{Archiving Exchange Single Mailbox}} | ||
| + | == Archiving Multiple Exchange Mailboxes Centrally == | ||
| + | {{Archiving Multiple Mailboxes Preamble|Microsoft Exchange 2007}} | ||
| − | == Step 1: Setting up a | + | === Step 1: Setting up a service account for accessing mailboxes === |
| + | To archive multiple mailboxes at once, a service account with access access to all mailboxes to be archived needs to be created first. To be able to set up such an account, you must be a member of the ''Exchange Organization Administrators'' security group. | ||
| − | + | ==== Setting up the service account through the ''Exchange Management Shell'' ==== | |
| + | * Create an unprivileged domain user (e.g. ''[email protected]''). | ||
| + | * Open a Microsoft Exchange Management Shell session on the Microsoft Exchange 2007 Server. | ||
| + | * Run the following commands in the Microsoft Exchange Management Shell | ||
| + | <div style="margin-left: 2.5em;"> | ||
| + | <source lang="powershell" smart-tabs="true" toolbar="false" gutter="false"> | ||
| + | Get-ClientAccessServer | Add-AdPermission -User mailstore@example.com -ExtendedRights ms-Exch-EPI-Impersonation | ||
| − | + | Get-MailboxDatabase | Add-AdPermission -User [email protected] -ExtendedRights ms-Exch-EPI-May-Impersonate | |
| + | </source> | ||
| + | </div> | ||
| + | * ''Optional:'' To check the permission assignment, run the following commands: | ||
| + | <div style="margin-left: 2.5em;"> | ||
| + | <source lang="powershell" smart-tabs="true" toolbar="false" gutter="false"> | ||
| + | Get-ClientAccessServer | Get-Adpermission -User [email protected] | Format-List * | ||
| − | * | + | Get-MailboxDatabase | Get-Adpermission -User [email protected] | Format-List * |
| − | + | </source> | |
| + | </div> | ||
| + | * ''Notice:'' To remove the permission assignment, run the following commands: | ||
| + | <div style="margin-left: 2.5em;"> | ||
| + | <source lang="powershell" smart-tabs="true" toolbar="false" gutter="false"> | ||
| + | Get-ClientAccessServer | Remove-AdPermission -User [email protected] -ExtendedRights ms-Exch-EPI-Impersonation | ||
| − | + | Get-MailboxDatabase | Remove-AdPermission -User [email protected] -ExtendedRights ms-Exch-EPI-May-Impersonate | |
| + | </source> | ||
| + | </div> | ||
| − | + | === Step 2: Configuration of MailStore Server === | |
| + | {{Archiving Exchange Multiple Mailboxes}} | ||
| + | == Archiving Incoming and Outgoing Emails Directly == | ||
| + | {{Archiving Exchange Journal Mailbox Preamble|Microsoft Exchange 2007}} | ||
| − | + | === Step 1: Creating a Mailbox for Journaling === | |
| − | + | {{Archiving Exchange Create Journal Mailbox|2007}} | |
| + | === Step 2: Configuring Exchange Journaling === | ||
| + | {{Configuring Exchange Journaling Preamble|Microsoft Exchange 2007}} | ||
| + | ==== Alternative 1: Configuring Standard Journaling ==== | ||
| + | * Open the Exchange Management Console. | ||
| + | * In the ''Server Configuration'' section of the menu tree, select ''Mailbox''. | ||
| + | * Click on the ''Database Management'' tab. | ||
| + | * Click on the mailbox database for which you want to set up journaling and select ''Properties'' from the action or the context menu. | ||
| + | * Click on the ''Maintenance'' tab. | ||
| + | * Activate the ''Journal Recipient'' option and click on ''Browse...''. | ||
| + | * Select the user that was created in step 1 from the recipient list and confirm with ''OK''. | ||
| + | *:[[File:Xchg_jour_2007_02a.png|center]] | ||
| + | * Click on ''OK'' to accept the changes. | ||
| − | + | ==== Alternative 2: Configuring Premium Journaling ==== | |
| − | + | * Open the Exchange Management Console. | |
| + | * In the ''Organization Configuration'' section of the menu tree, select ''Hub Transport''. | ||
| + | * Click on the ''Journal Rules'' tab and select ''New Journal Rule'' from the action or the context menu. | ||
| + | * The dialog window ''New Journal Rule'' opens. | ||
| + | *:[[File:Xchg_jour_2007_02b.png|center|480px]] | ||
| + | * Enter a name for the journal rule, e.g. ''Journaling''. | ||
| + | * Click on ''Browse...'' and select the user that was created in step 1. | ||
| + | * Under ''Scope'', choose whether to capture all messages, or only internal or only external messages. | ||
| + | * With the ''Journal messages for recipient'' option you can limit the journal rule to messages of certain recipients or groups. | ||
| + | * Make sure that the option ''Enable Rule'' is enabled. | ||
| + | * Click on ''New'' to activate the rule. Please keep in mind that in complex Microsoft Exchange environments it may take several minutes until the new rule becomes effective. | ||
| − | + | === Step 3: Configuration of MailStore Server === | |
| + | {{Archiving Exchange Journal Mailbox}} | ||
| − | |||
| − | + | == Public Folders == | |
| − | + | {{Archiving Exchange Public Folders Preamble|Exchange 2007}} | |
| + | * Open a Microsoft Exchange Management Shell session on the Microsoft Exchange 2007 Server. | ||
| + | * Run the following command in the Microsoft Exchange Management Shell | ||
| + | <div style="margin-left: 2.5em;"> | ||
| + | <source lang="powershell" smart-tabs="true" toolbar="false" gutter="false"> | ||
| + | Get-PublicFolder -GetChildren | Get-PublicFolder -Recurse | Get-PublicFolderClientPermission -User [email protected] | Remove-PublicFolderClientPermission | ||
| − | + | Get-PublicFolder -GetChildren | Get-PublicFolder -Recurse | Add-PublicFolderClientPermission -User [email protected] -AccessRights @("ReadItems", "DeleteAllItems") | |
| − | + | </source> | |
| + | </div> | ||
| + | === Step 3: Setting up the Archiving Process === | ||
| + | {{Archiving Exchange Public Folder}} | ||
| − | + | == Shared Mailboxes == | |
| − | + | {{Archiving Exchange Shared Mailbox}} | |
| − | + | == Weblinks == | |
| − | + | * {{MailStore Support}} | |
| − | |||
| − | |||
| − | |||
| − | |||
| − | |||
| − | |||
| − | |||
| − | == | ||
| − | |||
| − | |||
| − | MailStore | ||
| − | |||
| − | |||
| − | |||
| − | |||
| − | |||
| − | |||
| − | |||
| − | |||
| − | |||
| − | |||
| − | |||
| − | |||
| − | |||
| − | |||
| − | |||
| − | |||
| − | |||
| − | |||
| − | |||
| − | |||
| − | |||
| − | |||
| − | |||
| − | |||
| − | |||
| − | |||
| − | |||
| − | |||
| − | |||
| − | |||
| − | |||
| − | |||
| − | |||
| − | |||
| − | |||
| − | |||
| − | |||
| − | |||
| − | |||
| − | |||
| − | |||
| − | |||
| − | |||
| − | |||
| − | |||
[[de:E-Mail-Archivierung von Microsoft Exchange 2007]] | [[de:E-Mail-Archivierung von Microsoft Exchange 2007]] | ||
| + | [[en:Archiving Emails from Microsoft Exchange 2007]] | ||
Latest revision as of 15:05, 19 July 2018
This implementation guide covers the specifics of archiving Exchange 2007 server mailboxes. It is assumed that you already have a MailStore Server installation or test installation and are familiar with the fundamentals of MailStore Server. Please refer to the Manual or the Quick Start Guide for more information.
MailStore Server offers several ways to archive emails from Exchange 2007 server mailboxes, which are described below. If you are not sure which archiving method best suits your company, please refer to the chapter Choosing the Right Archiving Strategy.
Synchronizing Users
As Microsoft Exchange 2007 requires the existence of an Active Directory, it is recommended to set up a synchronization as described in chapter Active Directory Integration of the MailStore Server manual.
Archiving Individual Mailboxes
In MailStore Server Microsoft Exchange 2007 archiving tasks are stored in archiving profiles. By following the procedure described here you can archive a single Microsoft Exchange 2007 mailbox for a specific MailStore user. The archiving process can be executed manually or automatically. You can find further information about executing archiving profiles in chapter Email Archiving with MailStore Basics.
For each mailbox, please proceed as follows:
- Unless the mailbox of the current user is to be archived into his or her own user archive, log on to MailStore Client as MailStore administrator. Only an administrator can archive emails for other users.
- Click on Archive Email.
- From the Email Servers list in the Create Profile area of the window, select Microsoft Exchange to create a new archiving profile.
- A wizard opens to assist in specifying the archiving settings.
- Select Single Mailbox.
- Under Access via, select the protocol to be used to access the Exchange server. Whenever possible, HTTPS should be used.
- Please note: If the certificate provided by the remote host cannot be verified (e.g. self-signed or signed by an unknown certificate authority), enable the option Accept all certificates to allow MailStore to establish a connection. As this option leads to an insecure configuration, warnings may appear in the summary and/or the dashboard.
- Under Host, enter the name of your Exchange server.
- Under User Name, enter the Windows login name of the user whose emails are to be archived (e.g. [email protected] or [email protected]).
- Please note: Alternatively, any user with the appropriate access permissions for the mailbox to be archived can be specified. In this case, it is imperative that this mailbox is specified under Mailbox (see below).
- Under Password, enter the user's password.
- The field Mailbox must be left blank if a user, whose Windows login name and password is being used, wants to archive his own mailbox. Otherwise, the primary email address of the user whose mailbox you want to archive has to be entered here.
- Click on Test to verify that MailStore can access the mailbox.
- Click on Next.
- If needed, adjust the settings for the List of Folders to be Archived, the filter and the Deletion Rules. By default, no emails will be deleted from the mailbox. The Timeout value only has to be adjusted in specific cases (e.g. with very slow servers).
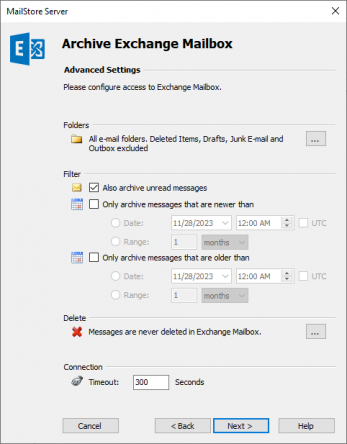
Important notice: Did you specify IMAP as the protocol and have also defined a deletion rule? If so, folders containing no emails, such as Tasks, Calendar or Contacts have to be added to the list of excluded folders manually. This is the only way to avoid these folders being archived and deleted according to the deletion rule specified. Please read more in chapter Archiving Specific Folders.
- Click on Next to continue.
- If logged on to MailStore Server as MailStore administrator, the Target Archive can be specified. Select the archive of the user for whom the selected mailbox is to be archived. If the user does not exist yet, click on Create a New User.
- Click on Next.
- In the last step, a name for the archiving profile can be specified. After clicking Finish, the archiving profile will be listed under Saved Profiles and, if desired, can be run immediately or automatically.


Archiving Multiple Exchange Mailboxes Centrally
With MailStore, some or all Microsoft Exchange 2007 mailboxes can be archived in a single step.
Step 1: Setting up a service account for accessing mailboxes
To archive multiple mailboxes at once, a service account with access access to all mailboxes to be archived needs to be created first. To be able to set up such an account, you must be a member of the Exchange Organization Administrators security group.
Setting up the service account through the Exchange Management Shell
- Create an unprivileged domain user (e.g. [email protected]).
- Open a Microsoft Exchange Management Shell session on the Microsoft Exchange 2007 Server.
- Run the following commands in the Microsoft Exchange Management Shell
Get-ClientAccessServer | Add-AdPermission -User mailstore@example.com -ExtendedRights ms-Exch-EPI-Impersonation

Get-MailboxDatabase | Add-AdPermission -User mailstore@example.com -ExtendedRights ms-Exch-EPI-May-Impersonate
- Optional: To check the permission assignment, run the following commands:
Get-ClientAccessServer | Get-Adpermission -User mailstore@example.com | Format-List *

Get-MailboxDatabase | Get-Adpermission -User mailstore@example.com | Format-List *
- Notice: To remove the permission assignment, run the following commands:
Get-ClientAccessServer | Remove-AdPermission -User mailstore@example.com -ExtendedRights ms-Exch-EPI-Impersonation

Get-MailboxDatabase | Remove-AdPermission -User mailstore@example.com -ExtendedRights ms-Exch-EPI-May-Impersonate
Step 2: Configuration of MailStore Server
Please proceed as follows:
- Log on to MailStore Client as MailStore administrator.
- Click on Archive Email.
- From the Email Servers list in the Create Profile area of the window, select Microsoft Exchange to create a new archiving profile.
- A wizard opens to assist in specifying the archiving settings.
- Select Multiple Mailboxes and click OK.
- Please note: To be able to archive multiple mailboxes, MailStore Server users along with their email addresses must exist in the MailStore Server user management. If this is not the case, MailStore Server will offer to set up and run the directory synchronization at this point. Once completed, the wizard will resume.
Alternatively, you can cancel the wizard and create users manually as described the in chapter User Management. 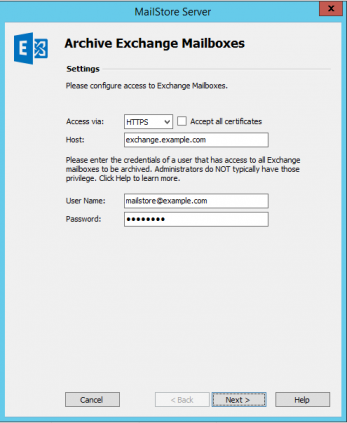
- Please note: To be able to archive multiple mailboxes, MailStore Server users along with their email addresses must exist in the MailStore Server user management. If this is not the case, MailStore Server will offer to set up and run the directory synchronization at this point. Once completed, the wizard will resume.
- Under Access via, select the protocol to be used to access the Exchange server. Whenever possible, HTTPS should be used.
- Please note: If the certificate provided by the remote host cannot be verified (e.g. self-signed or signed by an unknown certificate authority), enable the option Accept all certificates to allow MailStore to establish a connection. As this option leads to an insecure configuration, warnings may appear in the summary and/or the dashboard.
- Under Host, enter the name of your Exchange server.
- Under User Name and Password, enter the access data of the service account that has access to all mailboxes to be archived.
- Click on Next to continue.
- If needed, adjust the settings for the List of Folders to be Archived, the filter and the Deletion Rules. By default, no emails will be deleted from the mailbox. The Timeout value only has to be adjusted in specific cases (e.g. with very slow servers). Please keep in mind that these settings apply to all mailboxes to be archived, as specified in the next step.
- Select the users whose mailboxes are to be archived.
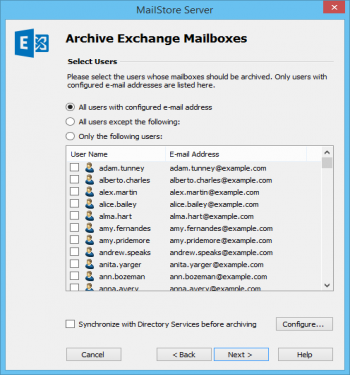
- The following options are available:
- All users with configured email address
Choose this option to archive the mailboxes of all users who are set up, along with their email addresses, in MailStore's user management. - All users except the following
Choose this option to exclude individual users (and thereby their Exchange mailboxes) from the archiving process, using the list of users below. - Only the following users
Choose this option to include individual users (and thereby their Exchange mailboxes) in the archiving process, using the list of users below. Only the mailboxes of those users explicitly specified will be archived. - Synchronize with Directory Services before archiving
If selected, the MailStore user list will be synchronized with the configured directory service before any archiving process is executed. This has the advantage that, for example, new employees will be created as MailStore users before archiving, so once the archiving process is executed, their Exchange mailbox is archived automatically as well. This option is especially recommended when the archiving process is to be executed automatically.
- Click on Next.
- In the last step, a name for the archiving profile can be specified. After clicking Finish, the archiving profile will be listed under Saved Profiles and can be run immediately or automatically, if desired.


Archiving Incoming and Outgoing Emails Directly
Together with the Microsoft Exchange 2007 journal function, MailStore can archive the incoming and outgoing emails of all users automatically. This is the only way to ensure that all emails are archived entirely.
Basic Functionality
The Microsoft Exchange 2007 journal function makes it possible to record all incoming, outgoing and internal email traffic. At the time of sending and receiving, a copy of the respective email is created by Microsoft Exchange 2007. The copy is then attached to a so-called journal report and stored in a special journal mailbox. The journal report contains information about the actual senders and recipients; Microsoft Exchange 2007 also resolves BCC recipients and distribution lists.
With the corresponding archiving profile MailStore can archive the journal mailbox automatically. During this process, MailStore parses the information in the journal reports and assigns the emails to their respective MailStore archives. Therefore even with journal archiving all users have access to their own emails only.
Step 1: Creating a Mailbox for Journaling
To set up a new Exchange user with a meaningful name, e.g. journal, please proceed as follows:
- Start the Exchange Management Console
- Click on Recipient Configuration.
- Select New Mailbox from the action or context menu.
- Select User Mailbox and click on Next.
- Select New User and click on Next.
- Enter the necessary data to create a new user.

- Confirm by clicking Next.
- Click on Browse to select a mailbox database and click on Next.
- Confirm the summary by clicking on New. The new user as well as the corresponding mailbox are created.
Step 2: Configuring Exchange Journaling
Two types of journaling are available in Microsoft Exchange 2007, standard and premium journaling:
- Standard journaling is configured on mailbox database level and records all sent and received emails of that database.
- Premium journaling allows to limit journaling to particular recipients or distribution lists through rules; furthermore, internal and external emails can be treated differently. Additionally, premium journaling rules are replicated throughout the whole Exchange organization.
Notice: Premium journaling requires Exchange Enterprise CALs.
Alternative 1: Configuring Standard Journaling
- Open the Exchange Management Console.
- In the Server Configuration section of the menu tree, select Mailbox.
- Click on the Database Management tab.
- Click on the mailbox database for which you want to set up journaling and select Properties from the action or the context menu.
- Click on the Maintenance tab.
- Activate the Journal Recipient option and click on Browse....
- Select the user that was created in step 1 from the recipient list and confirm with OK.
- Click on OK to accept the changes.

Alternative 2: Configuring Premium Journaling
- Open the Exchange Management Console.
- In the Organization Configuration section of the menu tree, select Hub Transport.
- Click on the Journal Rules tab and select New Journal Rule from the action or the context menu.
- The dialog window New Journal Rule opens.
- Enter a name for the journal rule, e.g. Journaling.
- Click on Browse... and select the user that was created in step 1.
- Under Scope, choose whether to capture all messages, or only internal or only external messages.
- With the Journal messages for recipient option you can limit the journal rule to messages of certain recipients or groups.
- Make sure that the option Enable Rule is enabled.
- Click on New to activate the rule. Please keep in mind that in complex Microsoft Exchange environments it may take several minutes until the new rule becomes effective.

Step 3: Configuration of MailStore Server
Please proceed as follows:
- Log on to MailStore Client as MailStore administrator.
- Click on Archive Email.
- From the Email Servers list in the Create Profile area of the window, select Microsoft Exchange to create a new archiving profile.
- A wizard opens to assist in specifying the archiving settings.
- Select In- and Outbound Email Automatically.
- Please note: To be able to archive from a journal mailbox, MailStore Server users along with their email addresses must exist in the MailStore Server user management. If this is not the case, MailStore Server will offer to set up and run the directory synchronization at this point. Once completed, the wizard will resume.
Alternatively, you can cancel the wizard and create users manually as described the in chapter User Management. 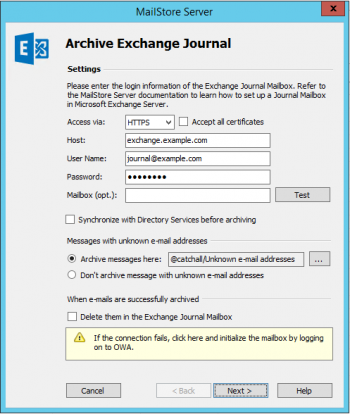
- Please note: To be able to archive from a journal mailbox, MailStore Server users along with their email addresses must exist in the MailStore Server user management. If this is not the case, MailStore Server will offer to set up and run the directory synchronization at this point. Once completed, the wizard will resume.
- Under Access via, select the protocol to be used to access the Exchange server. Whenever possible, HTTPS should be used.
- Please note: If the certificate provided by the remote host cannot be verified (e.g. self-signed or signed by an unknown certificate authority), enable the option Accept all certificates to allow MailStore to establish a connection. As this option leads to an insecure configuration, warnings may appear in the summary and/or the dashboard.
- Under Host enter the name of the Exchange server.
- Under User Name and Password enter the credentials for the Exchange journal mailbox.
- If you want to access the journal mailbox through HTTP/HTTPS with credentials that are not those of the mailbox owner, you have to specify the primary email address of the journal mailbox in the field Mailbox (opt.).
- Click on Test to verify that MailStore can access the mailbox.
- Synchronize with Directory Services before archiving
If this option is enabled, the MailStore user list will be synchronized with configured directory service before the archiving process actually runs. This has the advantage that, for example, new employees will be created as MailStore users before archiving which enables MailStore to sort their emails into the correct archives. This option is recommended if you want to have the journal archiving job run automatically. - Messages with unknown e-mail addresses
In this section you can configure whether to archive messages that contain only email addresses which do not belong to any MailStore user. By default, such emails will be archived into a catchall folder but you can select another folder through the Ellipsis (…).
Alternatively, you can opt not to archive these emails at all. - When e-mails are successfully archived
Enabling the option Delete them in origin mailbox will delete emails automatically in the journal mailbox after they have been archived successfully by MailStore. The option has no effect whatsoever on the emails in the users' mailboxes. - Click on Next to continue.
- A Timeout value can be specified. Change this value only in case of definite need (e.g. with very slow servers).
- Click on Next to continue.
- In the last, step a name for the archiving profile can be specified. After clicking Finish, the archiving profile will be listed under Saved Profiles and can be run immediately or automatically, if desired.

Public Folders
MailStore Server can archive the emails from the public folders of Exchange 2007 and make them available to some or all MailStore Server users. The archiving process can be executed manually or automatically.
Step 1: Creating a User Archive for Public Folders
Archived emails are always assigned to a particular user. You also need to specify a target archive when archiving a public folder.
As best practice, please create a dedicated MailStore Server user (e.g. publicfolder) whose archive acts as target for the public folder archiving profile. Through the user privileges you can grant access to the archive of the user publicfolder to other MailStore Server users. This way the archived emails of the public folder are made available to those MailStore Server users.
You can find more information on how to create a new user in MailStore Server in the chapter User Management.
Step 2: Granting permissions on public folders in Exchange 2007
Accessing public folders needs an Exchange 2007 user that has a mailbox because the necessary permissions are implemented on mailbox level. If the above mentioned MailStore service account should be used for public folder access also, a mailbox has to be created for that account first.
To grant the Exchange 2007 user the necessary permissions, please proceed as follows:
- Open a Microsoft Exchange Management Shell session on the Microsoft Exchange 2007 Server.
- Run the following command in the Microsoft Exchange Management Shell
Get-PublicFolder -GetChildren | Get-PublicFolder -Recurse | Get-PublicFolderClientPermission -User mailstore@example.com | Remove-PublicFolderClientPermission

Get-PublicFolder -GetChildren | Get-PublicFolder -Recurse | Add-PublicFolderClientPermission -User mailstore@example.com -AccessRights @("ReadItems", "DeleteAllItems")
Step 3: Setting up the Archiving Process
Please proceed as follows:
- Log on to MailStore Client as administrator.
- Click on Archive Email.
- From the Email Servers list in the Create Profile area of the window, select Microsoft Exchange to create a new archiving profile.
- A wizard opens to assist in specifying the archiving settings.
- Select Public Folders.
- Under Access via, select HTTPS or HTTP.
- Please note if you choose HTTPS: If the certificate provided by the remote host cannot be verified (e.g. self-signed or signed by an unknown certificate authority), enable the option Accept all certificates to allow MailStore to establish a connection. As this option leads to an insecure configuration, warnings may appear in the summary and/or the dashboard.
- Under Host, enter the name of your Exchange server.
- Under User Name, enter the Windows login name of the user you have prepared in step 2 for public folder access.
- Under Password, enter the user's password.
- Click on Test to verify that MailStore can access the public folders.
- Click on Next to continue.
- Adjust the settings for the List of Folders to be Archived. By default, all public folders that contain emails will be archived.
- If needed, adjust the filter and the Deletion Rules. By default, no emails will be deleted from the public folders. The Timeout value only has to be adjusted in specific cases (e.g. with very slow servers).
- Click on Next to continue.
- In the next step, select the archive of the user you have prepared in step 1.
- In the last step, specify a name for the archiving profile. After clicking Finish the archiving profile will be listed under Saved Profiles and can be run immediately or automatically if desired.


Shared mailboxes grant multiple users shared access to a mailbox, somewhat comparable to public folders.
A shared mailbox is a special kind of mailbox that, unlike a normal mailbox, is associated with a disabled Active Directory account. Like for normal mailboxes, MailStore Server is able to create user entries for shared mailboxes via Active Directory Synchronization. For this, you have to deactivate the option Synchronize enabled users only in the section User Database Synchronization.
After synchronization you can grant MailStore Server users access to the archive of the shared mailbox by assigning privileges.
Step 2: Setting up the Archiving Process
In order to archive emails from a shared mailbox you must grant a user account full access to that mailbox (either by delegated access or impersonation) because the Active Directory user account associated with that mailbox is disabled. You can use the service account you created to archive multiple mailboxes for this purpose.
Once you have created the service account, setup a new Single Mailbox archiving profile. Enter the credentials of the service account and fill the optional Mailbox field with the primary e-mail address of your shared mailbox.

Further steps are analog to the archiving of individual Exchange mailboxes.
