Archiving Emails from Microsoft Exchange 2010
Centrally Archiving Multiple Exchange Mailboxes
With MailStore, some or all mailboxes of an Exchange server can be archived in a single step. All necessary preparations, such as creating MailStore users, can be made automatically. The archiving process can be executed manually or automatically according to a schedule.
Before the archiving process can be set up in MailStore, a user with Impersonation rights to all mailboxes to be archived has to be created.
The following prerequisites are required to configure Exchange Impersonation:
- Administrative credentials for a computer that is running Exchange 2010 that has the Client Access server role installed
- Domain Administrator credentials
All following commands can be executed from the Microsoft Exchange Management Shell.
Add access rights
 New-ManagementRoleAssignment -Name:"MailStore Impersonation" `
 -Role:ApplicationImpersonation -User:serviceAccount
serviceAccount is the user account you want to use in UPN notation. Please take care that this user is not a member of an Exchange or Windows administrative group.
Check access rights
 Get-ManagementRoleAssignment -Role:ApplicationImpersonation '
 -RoleAssigneeType:User | Format-List *

 Get-ManagementRoleAssignment -Identity:"MailStore Impersonation" '
 | Format-List *
Remove access rights
Remove-ManagementRoleAssignment "MailStore Impersonation"
Archiving Incoming and Outgoing Emails Directly
With the support of the Exchange Server Journaling functionality, MailStore can archive the incoming and outgoing emails of all users automatically. This is the only way to ensure that all emails are archived in their entirety
Basic Functionality
Microsoft Exchange Server provides the option to take down all incoming, outgoing and internal email traffic. At the time of sending and receiving, a copy of the respective email is created and stored in a mailbox called Journal Mailbox. Additionally, the email is provided with a Journal report containing information about the actual senders and recipients.
MailStore can be configured to archive this Journal mailbox at regular intervals. During this process, the emails from the Journal mailbox will be assigned to their respective MailStore users (i.e. their user archives) automatically. This means that, with this type of archiving as well, each user is able to view only their own emails.
Step 1: Creating a Mailbox for Journaling
To set up a new Exchange user with a meaningful name, e.g. journal, please proceed as follows:
- Start the Exchange Management Console and click on Recipient Configuration.
- Click on New Mailbox.
- Select User Mailbox and confirm by clicking on Next.
- Select New User and confirm by clicking on Next.
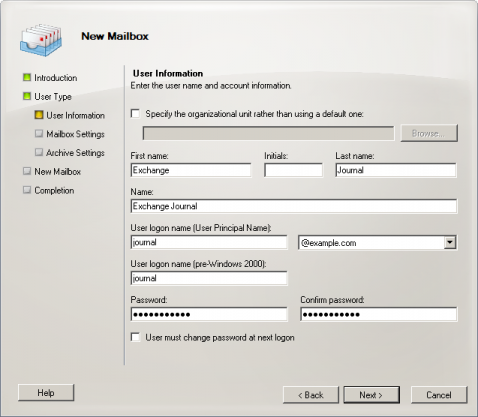
- Enter journal as user name (see screen shot below) and confirm by clicking on Next.
- Click on Browse to select a Mailbox database and confirm by clicking on Next.
- Confirm the summary by clicking on New. The user journal is created.
Step 2: Configuring a New Mailbox as Journal Mailbox
Open the Exchange Management Console. In the tree structure, open Organization Configuration and then Hub Transport. Click on the register card Journaling and in the area on the right on New Journal Rule.
The dialog window New Journal Rule opens:
- Enter a name for the Journaling rule, e.g. Journaling.
- Click on Browse and select the user "journal" just created.
- Under Scope, choose Global to capture all messages, Internal to capture internally sent messages only, or External to capture only those message with an external sender or recipient.
- Make sure that the control checkbox Enable Rule is activated.
- Click on New to activate the rule. Please keep in mind that in complex Microsoft Exchange environments it may take several minutes until the new rule becomes effective.
Public Folder
To be able to access all objects stored in all Public Folders without hassle, it's a good idea to give serviceAccount appropriate access rights. To do so, please use the following commands from the Microsoft Exchange Management console:
 Add-Rolegroupmember -Identity "Public Folder Management" -Member '
 serviceAccount
Afterwards use the PowerShell Script AddUsersToPfRecursive.ps1 to add "Editor" permissions for all Public Folder. Script can be found in the folder "Scripts" after installation of Exchange 2010 succeeded.
 .\AddUsersToPfRecursive.ps1 -TopPublicFolder "\" -User '
  serviceAccount -Permission Editor
serviceAccount is now able to read, write and delete all objects stored in Public Folders.

