Difference between revisions of "Installation"
| [unchecked revision] | [checked revision] |
| (55 intermediate revisions by 3 users not shown) | |||
| Line 1: | Line 1: | ||
| − | + | MailStore Server can be installed on virtually any Windows PC. Neither a server operating system nor a database system is required. For example, you can set up a test installation of MailStore Server on your desktop machine without any problem. Running MailStore Server inside a virtual machine is supported as well. For more information, please refer to the [[System Requirements]] article. | |
| − | |||
| − | |||
| − | |||
| − | |||
== Choosing a Computer for the Installation of MailStore Server == | == Choosing a Computer for the Installation of MailStore Server == | ||
| − | + | Whenever possible, MailStore Server should be installed on a dedicated machine. Depending on the environment, archiving strategy and usage, MailStore Server can be installed on an already existing server, too. On the part of the email server to be archived, no components need to be installed though. | |
| − | |||
| − | |||
| − | |||
| − | |||
| − | MailStore Server can be installed on an already existing server | ||
| − | |||
| − | |||
| − | |||
== Starting the Installation == | == Starting the Installation == | ||
| + | To start the installation process, double-click on the downloaded setup file. This is a regular Windows installation, just follow the instructions on the screen: | ||
| + | * If you want to install MailStore Server in a language different to the operating system's, you can choose it at the beginning of the installation. | ||
| + | * Carefully read the license agreement and privacy policy. You have to agree to these terms to continue. | ||
| + | * In the next step you can choose which folder to install MailStore Server in. In most cases, you should keep the default setting. | ||
| + | * The installation program now deploys the necessary components. | ||
| − | + | === Install License === | |
| − | + | * [[File:Setup003.png|right|320px]]You must now enter your MailStore product key which you have received by email after your trial registration or upon buying MailStore Server. Alternatively you can import a license file here. That file you can download either through the link provided in the dialog or directly from our {{go.mailstore.com|target{{=}}activate|website}}. | |
| − | + | * If you've entered a valid 30-day-trial key, it will be activated automatically. If you've entered a production license key, all information that is sent to MailStore will be displayed before activation. | |
| − | + | <br clear=all/> | |
| − | == | ||
| − | |||
| − | |||
| − | |||
| − | |||
| − | |||
| − | |||
| − | |||
| − | [[File: | ||
| − | |||
| − | |||
| − | |||
| − | |||
| − | |||
| − | |||
| − | |||
| − | |||
| − | |||
| − | |||
| − | |||
| − | |||
| − | |||
| − | |||
| − | |||
| − | |||
| − | |||
| − | |||
| − | |||
| − | |||
| − | |||
| − | |||
| − | |||
| − | |||
| − | |||
| − | |||
| − | |||
| − | |||
| − | |||
| − | |||
| − | |||
| − | |||
| − | |||
| − | |||
| − | |||
| − | |||
| − | |||
| − | |||
| − | |||
| − | |||
| − | |||
| − | |||
| − | |||
| − | |||
| − | |||
| − | |||
| − | |||
| − | |||
| − | |||
| − | |||
| − | |||
| − | |||
| − | |||
| − | |||
| − | |||
| − | |||
| − | |||
| − | |||
| − | |||
| − | |||
| − | *If | ||
| − | |||
| − | |||
| − | |||
| − | |||
| − | |||
| − | |||
| − | |||
| − | |||
| − | |||
| − | |||
| − | |||
| − | |||
| − | The | + | === Configure Certificate === |
| + | * In the next step, you need to configure the certificate to be used by MailStore Server in order to ensure authenticity and security for all inbound connections. The certificate can be changed any time after the installation through the [[MailStore Server Service Configuration]] tool. | ||
| + | ** '''Create self-signed certificate'''[[File:Setup003a.png|right|320px]]<br/>Though not recommended for production use, self-signed certificates may be a good choice for a trial installation. But keep in mind that self-signed certificates will trigger certificate warning in web browsers and email clients. | ||
| + | ** '''Use existing certificate'''<br/>If a certificate from a trusted Certificate Authority already exists (i.e. a wildcard certificate for your domain), this is the best option to select. | ||
| + | ** '''Obtain certificate from Let's Encrypt'''<br/>Select this option if you would like to obtain a certificate from the free Certificate Authority Let's Encrypt | ||
| − | = | + | <br style="clear: both;" /> |
| − | [[File: | + | ==== Option 1: Create Self-Signed Certificate ==== |
| + | * [[File:Setup003a1.png|right|bottom|320px]]To create a self-signed certificate, that matches the actual server name, enter the name (i.e. mailstore.example.com) into the corresponding field ''Server Name''. This server name should be resolvable by your client computer. | ||
| + | <br clear=all> | ||
| − | + | ==== Option 2: Use Existing Certificate ==== | |
| − | <br | + | * [[File:Setup003b1.png|right|bottom|320px]]Click on the ellipses choose from: |
| + | ** '''Select from Certificate Store...'''<br>Use an existing certificate from the computer's certificate store. | ||
| + | ** '''Import from File...'''<br/>Import a certificate from a file into the computer's certificate store. | ||
| − | + | <br clear=all> | |
| − | [[File: | + | ==== Option 3: Obtain Certificate from Let's Encrypt ==== |
| + | * [[File:Setup003c1.png|right|bottom|320px]]This page lists the prerequisites for obtaining a certificate from Let's Encrypt, which are: | ||
| + | ** A public DNS record (A or CNAME) for this server must exist and point to its public IP address. | ||
| + | ** The server must be accessible from the Internet on TCP port 80 (HTTP) for Let's Encrypt's automatic domain approval process. A port forwarding on your firewall or gateway may be necessary. | ||
| + | * Further information are available in [[Using Lets Encrypt Certificates]]. | ||
| − | + | <br clear=all> | |
| − | + | * [[File:Setup003c2.png|right|bottom|320px]]To obtain a certificate from Let's encrypt an email address and the server name for which the certificate is requested must be entered in the corresponding fields. | |
| + | * Check the ''I accept Let's Encrypt's Subscriber Agreement'' box after you have read Let's Encrypt's Subscriber Agreement by clicking on the corresponding link. | ||
| − | + | <br clear=all> | |
| − | [[File: | + | === Completing the MailStore Server Setup Wizard === |
| + | *In the next step you can configure several settings of your MailStore Server installation: | ||
| + | ** [[File:Setup004.png|right|bottom|320px]]'''Auto-configure Windows Firewall'''<br/>If this option is enabled, the [[MailStore_Server_Service_Configuration#IP_Addresses_and_Ports|default MailStore TCP ports]] will be opened in the Windows Firewall by the installation program automatically. | ||
| + | ** '''Enable automatic update check for server'''<br/>If this option is enabled, MailStore Server regularly checks for new product versions. If a new version is available, this will be displayed on the dashboard in the MailStore Client. | ||
| + | ** '''Enable automatic update check for Web Access'''<br/>If this option is enabled, MailStore Server regularly checks for new versions of the [[Accessing_the_Archive_with_MailStore_Web_Access|MailStore Web Access]]. If a new version is available, this will be displayed on the dashboard in the MailStore Client. | ||
| + | ** '''Automatically install updates'''<br/>If this option is enabled, new versions of MailStore Web Access will be downloaded and installed automatically without having to restart the [[MailStore_Server_Service_Configuration|MailStore Server Service]]. | ||
| − | + | === Help us to improve MailStore === | |
| + | * At the end of the installation process you can opt to help us improving MailStore: | ||
| + | ** [[File:Setup005.png|right|bottom|320px]]'''Submission of anonymous usage data'''<br/>If this option is enabled, MailStore Server regularly sends data on how the program is being used to MailStore. This data allows us to better understand different usage scenarios of MailStore Server and focus our development capacities accordingly. The submitted data is collected and evaluated exclusively for this purpose.<br/>No personal data such as user names, passwords or email content will be submitted. The submitted data is completely anonymized and cannot be correlated to a specific customer installation. You can enable or disable this option in the MailStore Client under [[Product Updates|Administrative Tools > Miscellaneous > Product Updates]] at any time; the option is disabled by default (opt-in). | ||
| + | * By clicking on ''Finish'' the installation will be completed and the MailStore Server Service and the MailStore Client will be started. | ||
| − | [[ | + | == Customizing the Installation == |
| + | The installation program creates a fully functional default installation of MailStore Server, which is perfectly suited for testing purposes. For production environments, parameters such as the Master Database directory, features, TCP ports, SSL certificates etc can be customized via the [[MailStore Server Service Configuration]]. | ||
| − | + | == First Time Installation == | |
| + | After successfully installing MailStore Server for the first time, it is recommended to continue with the [[Quick Start Guide]]. A step-by-step tutorial explains the basics, from creating users to successfully archivig emails for the first time. | ||
| + | <noinclude> | ||
| + | [[de:Installation]] | ||
| + | [[en:Installation]] | ||
| + | </noinclude> | ||
Revision as of 14:06, 19 February 2019
MailStore Server can be installed on virtually any Windows PC. Neither a server operating system nor a database system is required. For example, you can set up a test installation of MailStore Server on your desktop machine without any problem. Running MailStore Server inside a virtual machine is supported as well. For more information, please refer to the System Requirements article.
Choosing a Computer for the Installation of MailStore Server
Whenever possible, MailStore Server should be installed on a dedicated machine. Depending on the environment, archiving strategy and usage, MailStore Server can be installed on an already existing server, too. On the part of the email server to be archived, no components need to be installed though.
Starting the Installation
To start the installation process, double-click on the downloaded setup file. This is a regular Windows installation, just follow the instructions on the screen:
- If you want to install MailStore Server in a language different to the operating system's, you can choose it at the beginning of the installation.
- Carefully read the license agreement and privacy policy. You have to agree to these terms to continue.
- In the next step you can choose which folder to install MailStore Server in. In most cases, you should keep the default setting.
- The installation program now deploys the necessary components.
Install License
- You must now enter your MailStore product key which you have received by email after your trial registration or upon buying MailStore Server. Alternatively you can import a license file here. That file you can download either through the link provided in the dialog or directly from our website.
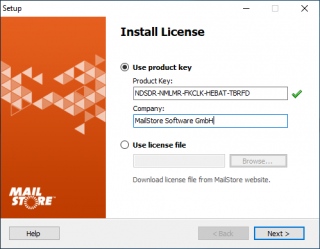
- If you've entered a valid 30-day-trial key, it will be activated automatically. If you've entered a production license key, all information that is sent to MailStore will be displayed before activation.

Configure Certificate
- In the next step, you need to configure the certificate to be used by MailStore Server in order to ensure authenticity and security for all inbound connections. The certificate can be changed any time after the installation through the MailStore Server Service Configuration tool.
- Create self-signed certificate
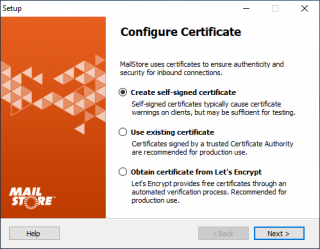
Though not recommended for production use, self-signed certificates may be a good choice for a trial installation. But keep in mind that self-signed certificates will trigger certificate warning in web browsers and email clients. - Use existing certificate
If a certificate from a trusted Certificate Authority already exists (i.e. a wildcard certificate for your domain), this is the best option to select. - Obtain certificate from Let's Encrypt
Select this option if you would like to obtain a certificate from the free Certificate Authority Let's Encrypt
- Create self-signed certificate

Option 1: Create Self-Signed Certificate
- To create a self-signed certificate, that matches the actual server name, enter the name (i.e. mailstore.example.com) into the corresponding field Server Name. This server name should be resolvable by your client computer.


Option 2: Use Existing Certificate
- Click on the ellipses choose from:
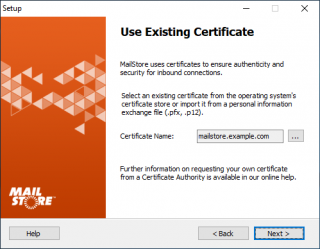
- Select from Certificate Store...
Use an existing certificate from the computer's certificate store. - Import from File...
Import a certificate from a file into the computer's certificate store.
- Select from Certificate Store...

Option 3: Obtain Certificate from Let's Encrypt
- This page lists the prerequisites for obtaining a certificate from Let's Encrypt, which are:
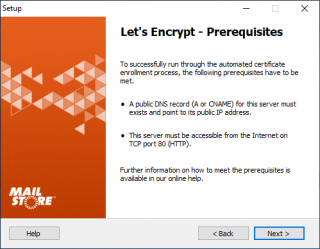
- A public DNS record (A or CNAME) for this server must exist and point to its public IP address.
- The server must be accessible from the Internet on TCP port 80 (HTTP) for Let's Encrypt's automatic domain approval process. A port forwarding on your firewall or gateway may be necessary.
- Further information are available in Using Lets Encrypt Certificates.

- To obtain a certificate from Let's encrypt an email address and the server name for which the certificate is requested must be entered in the corresponding fields.
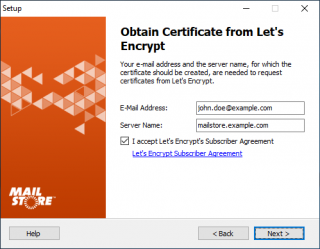
- Check the I accept Let's Encrypt's Subscriber Agreement box after you have read Let's Encrypt's Subscriber Agreement by clicking on the corresponding link.

Completing the MailStore Server Setup Wizard
- In the next step you can configure several settings of your MailStore Server installation:
- Auto-configure Windows Firewall
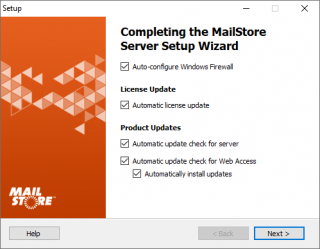
If this option is enabled, the default MailStore TCP ports will be opened in the Windows Firewall by the installation program automatically. - Enable automatic update check for server
If this option is enabled, MailStore Server regularly checks for new product versions. If a new version is available, this will be displayed on the dashboard in the MailStore Client. - Enable automatic update check for Web Access
If this option is enabled, MailStore Server regularly checks for new versions of the MailStore Web Access. If a new version is available, this will be displayed on the dashboard in the MailStore Client. - Automatically install updates
If this option is enabled, new versions of MailStore Web Access will be downloaded and installed automatically without having to restart the MailStore Server Service.

Help us to improve MailStore
- At the end of the installation process you can opt to help us improving MailStore:
- Submission of anonymous usage data
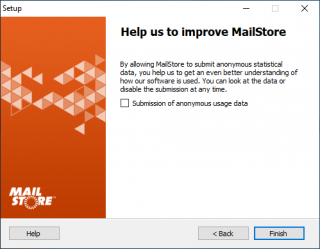
If this option is enabled, MailStore Server regularly sends data on how the program is being used to MailStore. This data allows us to better understand different usage scenarios of MailStore Server and focus our development capacities accordingly. The submitted data is collected and evaluated exclusively for this purpose.
No personal data such as user names, passwords or email content will be submitted. The submitted data is completely anonymized and cannot be correlated to a specific customer installation. You can enable or disable this option in the MailStore Client under Administrative Tools > Miscellaneous > Product Updates at any time; the option is disabled by default (opt-in).
- By clicking on Finish the installation will be completed and the MailStore Server Service and the MailStore Client will be started.

Customizing the Installation
The installation program creates a fully functional default installation of MailStore Server, which is perfectly suited for testing purposes. For production environments, parameters such as the Master Database directory, features, TCP ports, SSL certificates etc can be customized via the MailStore Server Service Configuration.
First Time Installation
After successfully installing MailStore Server for the first time, it is recommended to continue with the Quick Start Guide. A step-by-step tutorial explains the basics, from creating users to successfully archivig emails for the first time.
