Difference between revisions of "Template:Archiving Exchange Journal Mailbox"
| [unchecked revision] | [checked revision] |
Rrommelrath (talk | contribs) |
|||
| (18 intermediate revisions by 5 users not shown) | |||
| Line 1: | Line 1: | ||
Please proceed as follows: | Please proceed as follows: | ||
| − | * | + | * Log on to MailStore Client as MailStore administrator. |
* Click on ''Archive Email''. | * Click on ''Archive Email''. | ||
| − | * From the list in the | + | * From the ''Email Servers'' list in the ''Create Profile'' area of the window, select ''Microsoft Exchange'' to create a new archiving profile. |
* A wizard opens to assist in specifying the archiving settings. | * A wizard opens to assist in specifying the archiving settings. | ||
* Select ''In- and Outbound Email Automatically''. | * Select ''In- and Outbound Email Automatically''. | ||
| − | * | + | *: {{#if:{{{DSLink|}}}|{{Archiving_Multiple_or_Multidrop_Note|from a journal mailbox|{{{DSLink}}}}}|{{Archiving_Multiple_or_Multidrop_Note|from a journal mailbox}}}} |
| − | *:[[File:Xchg_jour_mailstore_01.png|center| | + | {{#ifeq: {{{1|Exchange}}}|Office 365|*: [[File:Office365_jour_mailstore_01.png|center|347px]] |
| − | * Under | + | * Under ''Access via'', select the protocol to be used to access the email server that hosts the journal mailbox. If this is an Exchange server, ''HTTPS'' should be used whenever possible. |
| − | + | *: '''Please note:''' {{Option Accept all certificates}} | |
| − | * Under | + | * Under ''Host'', enter the name of the email server that hosts the journal mailbox. |
| − | * Under | + | * Under ''User Name'' and ''Password'' enter the credentials for the journal mailbox. |
| − | + | * If the journal mailbox is an Exchange mailbox that you want to access through ''HTTP/HTTPS'' with credentials that are not those of the mailbox owner, you have to specify the primary email address of the journal mailbox in the field ''Mailbox (opt.)''. | |
| − | * '''Synchronize with | + | |*:[[File:Xchg_jour_mailstore_01.png|center|350px]] |
| − | * | + | * Under ''Access via'', select the protocol to be used to access the Exchange server. Whenever possible, ''HTTPS'' should be used. |
| − | * | + | *: '''Please note:''' {{Option Accept all certificates}} |
| + | * Under ''Host'' enter the name of the Exchange server. | ||
| + | * Under ''User Name'' and ''Password'' enter the credentials for the Exchange journal mailbox. | ||
| + | * If you want to access the journal mailbox through ''HTTP/HTTPS'' with credentials that are not those of the mailbox owner, you have to specify the primary email address of the journal mailbox in the field ''Mailbox (opt.)''.}} | ||
| + | * Click on ''Test'' to verify that MailStore can access the mailbox. | ||
| + | * '''Synchronize with Directory Services before archiving'''<br/>If this option is enabled, the MailStore user list will be synchronized with configured directory service before the archiving process actually runs. This has the advantage that, for example, new employees will be created as MailStore users before archiving which enables MailStore to sort their emails into the correct archives. This option is recommended if you want to have the journal archiving job run automatically. | ||
| + | * '''Messages with unknown e-mail addresses'''<br/> In this section you can configure whether to archive messages that contain only email addresses which do not belong to any MailStore user. By default, such emails will be archived into a ''catchall'' folder but you can select another folder through the ''Ellipsis (…)''.<br/>Alternatively, you can opt not to archive these emails at all. | ||
| + | * '''When e-mails are successfully archived'''<br/>Enabling the option ''Delete them in origin mailbox'' will delete emails automatically in the journal mailbox after they have been archived successfully by MailStore. The option has no effect whatsoever on the emails in the users' mailboxes. | ||
* Click on ''Next'' to continue. | * Click on ''Next'' to continue. | ||
| − | + | * A ''Timeout'' value can be specified. Change this value only in case of definite need (e.g. with very slow servers). | |
| − | * A | ||
* Click on ''Next'' to continue. | * Click on ''Next'' to continue. | ||
| − | * | + | * In the last, step a name for the archiving profile can be specified. After clicking ''Finish'', the archiving profile will be listed under ''Saved Profiles'' and can be run immediately or automatically, if desired. |
| − | + | <noinclude> | |
| + | [[de:Vorlage:Archivierung Exchange Journal-Postfach archivieren]] | ||
| + | [[en:Template:Archiving Exchange Journal Mailbox]] | ||
| + | </noinclude> | ||
Latest revision as of 08:54, 4 November 2022
Please proceed as follows:
- Log on to MailStore Client as MailStore administrator.
- Click on Archive Email.
- From the Email Servers list in the Create Profile area of the window, select Microsoft Exchange to create a new archiving profile.
- A wizard opens to assist in specifying the archiving settings.
- Select In- and Outbound Email Automatically.
- Please note: To be able to archive from a journal mailbox, MailStore Server users along with their email addresses must exist in the MailStore Server user management. If this is not the case, MailStore Server will offer to set up and run the directory synchronization at this point. Once completed, the wizard will resume.
Alternatively, you can cancel the wizard and create users manually as described the in chapter User Management. 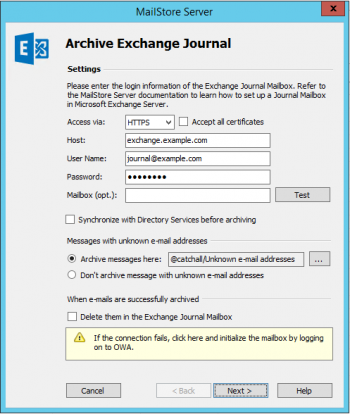
- Please note: To be able to archive from a journal mailbox, MailStore Server users along with their email addresses must exist in the MailStore Server user management. If this is not the case, MailStore Server will offer to set up and run the directory synchronization at this point. Once completed, the wizard will resume.
- Under Access via, select the protocol to be used to access the Exchange server. Whenever possible, HTTPS should be used.
- Please note: If the certificate provided by the remote host cannot be verified (e.g. self-signed or signed by an unknown certificate authority), enable the option Accept all certificates to allow MailStore to establish a connection. As this option leads to an insecure configuration, warnings may appear in the summary and/or the dashboard.
- Under Host enter the name of the Exchange server.
- Under User Name and Password enter the credentials for the Exchange journal mailbox.
- If you want to access the journal mailbox through HTTP/HTTPS with credentials that are not those of the mailbox owner, you have to specify the primary email address of the journal mailbox in the field Mailbox (opt.).
- Click on Test to verify that MailStore can access the mailbox.
- Synchronize with Directory Services before archiving
If this option is enabled, the MailStore user list will be synchronized with configured directory service before the archiving process actually runs. This has the advantage that, for example, new employees will be created as MailStore users before archiving which enables MailStore to sort their emails into the correct archives. This option is recommended if you want to have the journal archiving job run automatically. - Messages with unknown e-mail addresses
In this section you can configure whether to archive messages that contain only email addresses which do not belong to any MailStore user. By default, such emails will be archived into a catchall folder but you can select another folder through the Ellipsis (…).
Alternatively, you can opt not to archive these emails at all. - When e-mails are successfully archived
Enabling the option Delete them in origin mailbox will delete emails automatically in the journal mailbox after they have been archived successfully by MailStore. The option has no effect whatsoever on the emails in the users' mailboxes. - Click on Next to continue.
- A Timeout value can be specified. Change this value only in case of definite need (e.g. with very slow servers).
- Click on Next to continue.
- In the last, step a name for the archiving profile can be specified. After clicking Finish, the archiving profile will be listed under Saved Profiles and can be run immediately or automatically, if desired.

