Template:Archiving Multidrop Mailbox
Revision as of 16:43, 24 January 2018 by Ltalaschus (talk | contribs)
Setting up archiving processes for multidrop mailboxes is done using archiving profiles. General information about archiving profiles is available in chapter Working with Archiving Profiles.
Please proceed as follows:
- Log on as MailStore administrator using MailStore Client.
- In MailStore, click on Archive Email.
- To create a new archiving profile, select Other Server via IMAP/POP3 from the Email Server list in the Create Profile area of the application window.
- A wizard opens guiding you through the setup process.
- Select Multidrop Mailbox and click OK.
- Fill out the fields Access via, Host, Username and Password. Click on Test to verify the data entered.
- For the TLS and SSL protocols only: You have the option to ignore SSL warnings. Generally, these warnings appear if an unofficial certificate is used on the server.
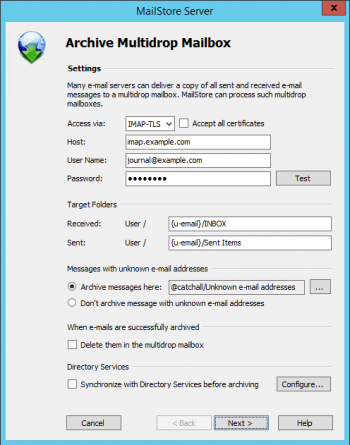
- Adjust any further settings such as how to handle emails with unknown addresses or asking MailStore to delete emails after they have been archived. The latter option is especially sensible when dealing with mailboxes that are exclusively used for archiving.
- Notice: When you are additionally archiving messages from the users mailboxes and you do not want to have additional or similar folders in the users' archives you have to set the target folder names here to the folder names that match the names that were created by the user mailbox archiving profiles. The folder names are case-sensitive.
- If the option Synchronize with Directory Services before archiving is enabled, the MailStore user list will be synchronized with configured directory service before the archiving process actually runs. This has the advantage that, for example, new employees will be created as MailStore users before archiving which enables MailStore to sort their emails into the correct archives.
- Click on Next.
- The timeout value only has to be adjusted on a case-by-case basis (e.g. with very slow servers).
- Click on Next.
- At the last step, select a name for the new archiving profile. After clicking on Finish, the archiving profile will be listed under Saved Profiles and can be run immediately or automatically, if desired.


