Difference between revisions of "Using Lets Encrypt Certificates"
| [unchecked revision] | [unchecked revision] |
| Line 65: | Line 65: | ||
* If the test was successful, MailStore will automatically request a certificate from Let's Encrypt's production system and confirm that setup was successful. | * If the test was successful, MailStore will automatically request a certificate from Let's Encrypt's production system and confirm that setup was successful. | ||
* Click on ''Finish''. | * Click on ''Finish''. | ||
| + | |||
| + | [[de:Verwendung_von_Lets_Encrypt_Zertifikaten]] | ||
| + | [[en:Using Lets Encrypt Certificates]] | ||
Revision as of 09:49, 27 February 2019
Background
To ensure authenticity and security, MailStore Server uses TLS certificates in all services it provides. During the installation MailStore Server allows to either
- create a self-signed certificate,
- use an existing certificate,
- or obtain a certificate from Let's Encrypt.
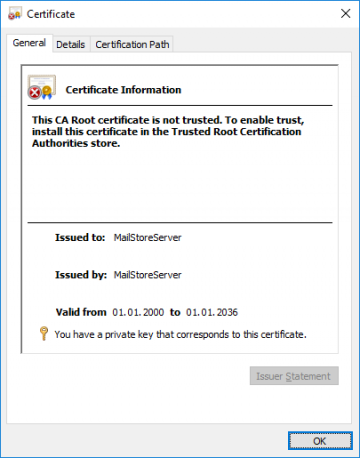
The default choice of creating a self-signed certificates is often used when installing MailStore Server for the first time, since it does not have any external dependencies. While this is perfectly fine in a non-production setup, it is not recommended for production use, as self-signed certificates are not trusted by other client computer, due to no being signed by a trusted certificate authority, and user might get used to ignoring certificate warnings.
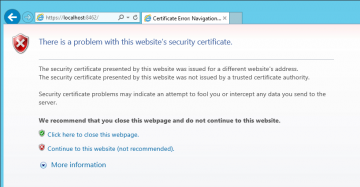
Because of this, the following or a similar warning message is displayed when opening MailStore Web Access when a self-signed certificate is used.
To eliminate warnings, increase security as well as enhance usability, MailStore needs to be reconfigured to use a certificate that is singed by a trusted certificate authority.
The following describes how to obtain and use certificates from the free certificate authority Let's Encrypt. If you are already in possession of certificates (i.e. a wildcard certificate for your domain), that have been signed by a trusted certificate authority, or if you would like to manually request a certificate from you favorite CA, refer to Using Your Own SSL Certificate for detailed instructions.
About Let's Encrypt
Let's Encrypt is a free, automated, and open certificate authority, which is trusted by all major web browsers and operating systems. Many large, well known sponsors from the IT industry support Let's Encrypt effort to help to make the Internet a safer place.
A fully automated certificate approval process eliminates email or phone verification of traditional certificate authorities that often take days.
Let's Encrypt certificates are only valid for 90 days and should be automatically renewed after 60 days. MailStore Server user don't have to worry about this, because it is all handled automatically by the MailStore Server service.
Prerequisites
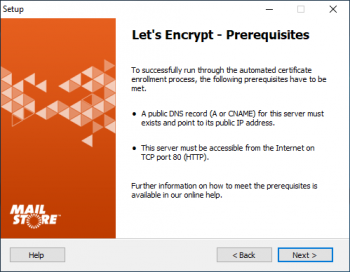
- A public DNS record (A or CNAME) for this server must exist and point to its public IP address.
- The server must be accessible from the Internet on TCP port 80 (HTTP) for Let's Encrypt's automatic domain approval process. A port forwarding on your firewall or gateway may be necessary.
Scenario 1: MailStore Server on Local Area Network (LAN)
The most common scenario for a MailStore Server installation is on a local network inside the organization's premises. Typically the MailStore Server computer has a private IP address (i.e. 192.168.0.10) and the Internet connection is established through a router, that masquerades all internal IP addresses with its own public IP address. This is also known as Network Address Translation (NAT).
For this scenario, we assume that MailStore Server is running on a dedicated computer
- Ask your Internet access provider to assign a static, public IP address to your Internet router.
- Assign an available static IP Address from your local network to the MailStore Server computer.
- Create a port forwarding rule on the Internet router, that forwards all connections to TCP port 80 to the public IP address, which was assigned in step 1, to the internal IP address of your MailStore Server computer.
- Add an A or CNAME record to the DNS zone of your public domain, e.g. mailstore.example.com pointing to the public ip address which was assigned in step 1.
- Depending on how DNS resolution is handled in your local network, you need to add a corresponding DNS record on your internal DNS server or router as well. This record should point to the internal IP Address of the MailStore Server computer.
Scenario 2: MailStore Server on External Network
If the MailStore Server computer is already on a network that used public IP address, e.g. in a data center, or a DMZ it is much easier to fulfill the prerequisites.
For this scenario, we assume that MailStore Server is running on a dedicated computer.
- Assign an available public IP Address from your public network to the MailStore Server computer.
- If there is a firewall in place, create a firewall rule, that allows all connections to TCP port 80 to the public IP address to pass through.
- Add an A or CNAME record to the DNS zone of your public domain, e.g. mailstore.example.com pointing to the public ip address which was assigned in step 1.
Obtaining the Certificate
- Open the MailStore Server Service Configuration.
- Select Network Settings
- In the certificate section, click on the ellipsis next to the certificate
- Select Request from Let's Encrypt...
- The prerequisites are shown.
- Click Next to proceed.
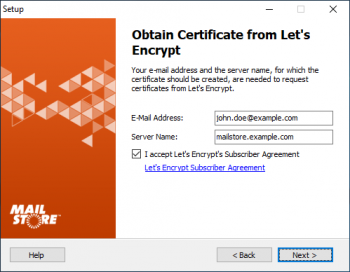
- Enter your email address and the server name into the corresponding fields
- Click on the link to the Let's Encrypt Subscriber Agreement.
- Once you have read and understood the Let's Encrypt Subscriber Agreement, tick the checkbox I accept Let's Encrypt's Subscriber Agreement
- Click Next to continue.
- MailStore now tests the settings against Let's Encrypt's staging environment. If an issue occurs, MailStore will show a warning. Please review the log output, resolve the issue and try again.
- If the test was successful, MailStore will automatically request a certificate from Let's Encrypt's production system and confirm that setup was successful.
- Click on Finish.
