Instance Management
For each instance further individual administrative functions exist. These functions are accessible through the instance details, which appear in pane below the instance list (General > Instances) of the Management Console when clicking on a running instance in the list.
All these functions are group by tabs, for which further details are provided below.
Overview
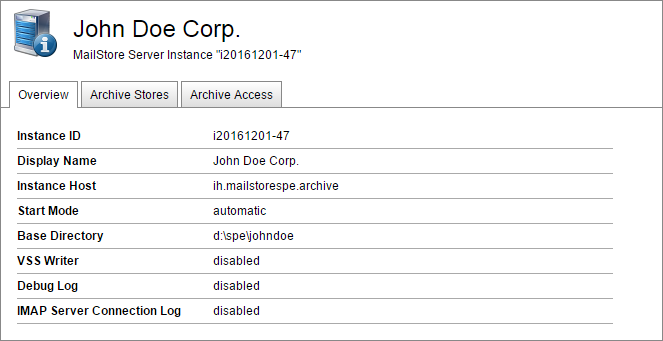
On the Overview tab of the instance details a summary of the configuration is shown.
Archive Stores
The Archive Stores tab allows the administration of the instance storage as well as the search indexes. New archive stores are automatically created in the base directory of the instance every 5.000.000 messages.
Create Archive Stores
Although MailStore Service Provider Edition creates new archive stores automatically, this can also be done manually as described in the following:
- Log on to the Management Console, if not already logged on.
- Click on General > Instances.
- Open the instance details by clicking on a running instance in the list.
- Click on the Archive Stores tab.
- Click Create Store.
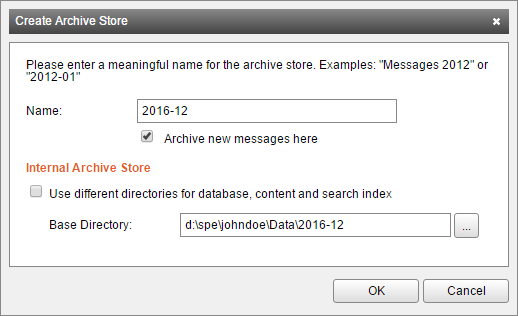
- Fill out the Create Archive Store form:
- Name: Meaningful name for the archive store.
- Archive new messages here: Enabled by default, new message will be archived in the newly created archive store if this option is checked.
- Use different directories for database, content and search index: If checked, a non-default directory structure can be used, e.g. the database and index directory may reside on a fast storage while the content resides in on a slower storage.
- Directory: Directory in which the new archive store will be created. A proposal is created from the Name of the archive store and the base directory of the instance. Use the tilde to point to a directory relative to the base directory of the instance, e.g.
~\Messages-2013-10
- Click OK to create the new archive store.
Attach Existing Archive Store
Archive stores from MailStore Service Provider Edition instances or from on-premises MailStore Servers can be attached to an instance as described below:
- Log on to the Management Console, if not already logged on.
- Click General > Instances.
- Open the instance details by clicking on a running instance in the list.
- Click on the Archive Stores tab.
- Click Attach Store.
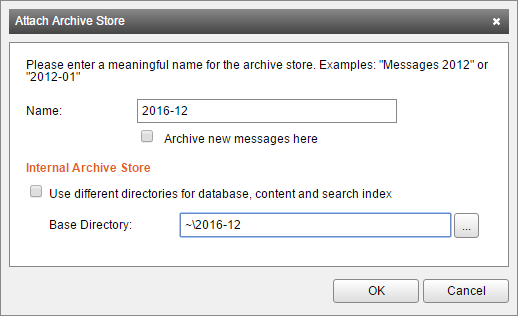
- Fill out the Attach Archive Store form:
- Name: Meaningful name for the archive store
- Archive new messages here: If checked, new message will be archived in the newly created archive store. (default: unchecked)
- Use different directories for database, content and search index: If checked, a non-default directory structure can be used, e.g. archive stores created before MailStore SPE/Server 10 do have the search index files located in the same directory as the database. So you have to activate this option and remove the \Index directory from the Index Directory-field.
- Base Directory: Directory of the archive store to attach. This directory must contain the file "MailStoreFileGroup.fdb". Use the tilde to point to a directory relative to the base directory of the instance, e.g.
~/2016-12.
- Click OK to attach the archive store.
Unlock Archive Stores
In case the archive store was migrated from MailStore Server 10 or newer to MailStore SPE, additional steps are required.
The archive store is protected with a recovery key
- The archive store cannot be loaded successfully and the note Unable to unlock archive store (Identifier: <identifier>) appears.
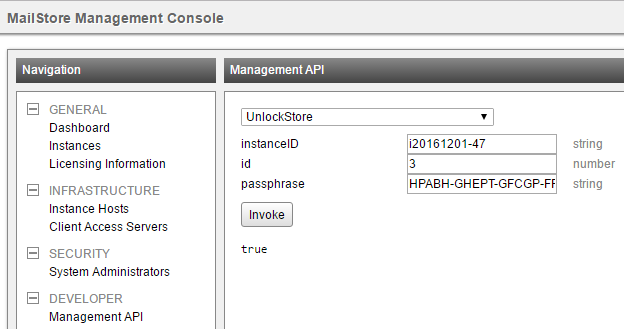
- To finalize the migration of this archive store you need to know the recovery key identified by <identifier>, the instanceID of the instance where the archive store is attached to and the ID of the attached archive store.
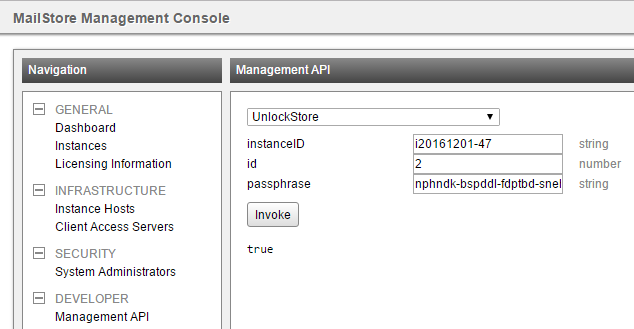
- Navigate to Navigation > DEVELOPER > Management API. Select UnlockStore from the drop down menu and enter the instanceID of the instance, the ID of the archive store and the recovery key. The recovery key must be entered in lowercase letters.
- Click Invoke, true should appear below the text fields.
- Verify that the archive store was attached successfully.
The archive store is protected with a product key
- The archive store cannot be loaded successfully and the note Unable to open the archive store <name>. Can't decrypt encryption key. appears.
- To finalize the migration of this archive store you need to know the product key of the installation where the archive store was attached to last, the instanceID of the instance where the archive store is attached to and the ID of the attached archive store.
- Navigate to Navigation > DEVELOPER > Management API. Select UnlockStore from the drop down menu and enter the instanceID of the instance, the ID of the archive store and the product key. The product key must be entered in uppercase letters.
- Click Invoke, true should appear.
- Verify that the archive store was attached successfully.
More information about archive security can be found in the MailStore Server Service Configuration article.
Maintain FS Databases
For storing meta data of the archive store's content embedded Firebird databases exist in every archive store. Under certain circumstances (e.g. after a disaster recovery of the server or storage) it might become necessary to perform a maintenance task on those databases. This can easily be done for all archive stores of a particular instance be following the instructions below:
- Log on to the Management Console, if not already logged on.
- Click General > Instances.
- Open the instance details by clicking on a running instance in the list.
- Click on the Archive Stores tab.
- Click Maintain FS Databases to start the maintenance.
- A progress windows will appear.
- Wait until the process is completed successfully and click OK. Otherwise click Cancel to interrupt maintenance process at any time.
Auto-Create Stores
MailStore Service Provider Edition automatically creates new archive stores every 5.000.000 messages. This setting can be adjusted to your need:
- Log on to the Management Console, if not already logged on.
- Click General > Instances.
- Open the instance details by clicking on a running instance in the list.
- Click on the Archive Stores tab.
- Click Auto-create.
- Adjust the settings in the Auto-Create Archive Stores dialog.
- Important notice: Non-optimal settings can have a negative impact on the overall performance of the instance.
- Click OK to save the settings.
Store Commands
Advanced store commands are accessible by following these steps:
- Log on to the Management Console, if not already logged on.
- Click General > Instances.
- Open the instance details by clicking on a running instance in the list.
- Click on the Archive Stores tab.
- Select an archive store and click on Store Commands or right-click on an archive store to open a context menu.
A summary of the available store commands can be found in the tables below:
Requested State
| State | Description |
|---|---|
| Disabled | Disabled archive stores are not in use but the instance still knows about their existence. The content is not available to users or administrators while the archive store is disabled. This state is useful when moving archive stores to a new directory. |
| Write Protected | The content of write protected archive stores is available to users, but cannot be modified (e.g. delete or move messages, rename or move folders) |
| Normal | The content of archives store is available to users and can be modified if the user has the appropriate permission. |
| Current | Same as Normal but new messages will be archived in the archive store that is set to Current. |
Commands
| Command | Description |
|---|---|
| Detach | Detaches the selected archive store. The archive store can be re-attached by using the Attach function. Please note that the archive store's name and ID will not be retained when detaching and re-attaching. Therefore, when moving an archive store to a new location, disabling the the archive store and using Set Path afterwards is preferred over re-attaching. |
| Rename | Specify a new name for the archive store. |
| Set Path | Change the path of the archive store. The archive store must be disabled before changing the path. Please note that the file system directory must be moved manually to the new location before re-enabling the archive store. |
| Compact | Optimizes the data structures. |
| Upgrade | If an archive store from a MailStore Server 5 or older was attached to an instance, it is highly recommended to upgrade the archive store to the latest format by using this function. Upgrade process can be interrupted and continued at any time. |
| Verify | Verification of the data integrity between folder information and meta data as well as email headers, content and recovery records. |
| Recreate Recovery Records | Recreates broken recovery records of an archive store. Use Verify to verify the state of the Recovery Records. |
Search Indexes
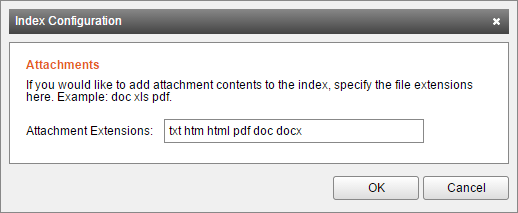
Additionally to container files storing the actual email content and the embedded Firebird databases used for storing meta information, a full-text index file is created for each archive that has emails stored in an archive store. By default the full-text index only included email bodies, but virtually any file type is supported (see Configure).
To access these functions, follow the instructions below:
- Log on to the Management Console, if not already logged on.
- Click General > Instances.
- Open the instance details by clicking on a running instance in the list.
- Click on the Archive Stores tab.
- Click Search Indexes.
The below functions are available in the search index menu to configure and maintain the full-text indexes of an instance.
Rebuild Broken Indexes
Starts a rebuild of all search indexes across all archive stores that are marked a broken.
Rebuild All Indexes
Starts a rebuild of all search indexes in all archives stores. This is usually only required after making changes to the list of attachment extensions to be included in the full-text index.
Configure
Specify a list of file extensions for attachments to be included in the full-text index. MailStore Service Provider Edition can index all file types for which a so-called IFilter driver is installed on the instance host on which the MailStore instance is running. The list of file extensions has to be separated by space.
Under the name Microsoft Office 2010 Filter Packs Microsoft offers a package that, additionally to all legacy as well as recent Microsoft Office Formats, supports the Open Document Format (OpenOffice/LibreOffice). For indexing PDF files the Adobe Reader or Adobe PDF iFilter must be installed on the instance host. Further background information about the IFilter system itself as well as links to additional IFilter drivers can be found in the corresponding Wikipedia article IFilter.
For reasons of stability and performance, MailStore Service Provider Edition processes the following file types directly, regardless of the IFilter drivers that are installed:
- Text files (TXT)
- HTML files (HTM and HTML)
Archive Access
The Archive Access tab provides access to the service provider archive access as well as download links for the client and Outlook Add-in.
Please note: Details about the logon process for customers and their end users can be found in the article End User Access.
Enable or Disable Service Provider Archive Access
Service provider archive access is only necessary if the administration of the instance is not done by the customers or if the customer requests support from the service provider. To enable or disable service provider access follow these instructions:
- Log on to the Management Console, if not already logged on.
- Click General > Instances.
- Open the instance details by clicking on a running instance in the list.
- Click on the Archive Access tab.
- Click either Enable or Disable
- When enabling click OK to confirm that the service provider archive access really should be enabled.
- Please notice: Enabling the service provider archive access is logged in the audit log of the instance.
Using Service Provider Archive Access
Before the service provider archive access can be used, this access method must be enabled (see previous section) and the client must be installed on the computer from where you want to connect.
- Log on to the Management Console, if not already logged on.
- Click General > Instances.
- Open the instance details by clicking on a running instance in the list.
- Click on the Archive Access tab.
- Click Open Client
- Depending on your web browser's settings further security related questions may appear.
- Afterwards the client will automatically log on to the instance using the special $archiveadmin system account and a one-time password.
Inside the Instance
No matter whether logging on to an instance as the customer's administrator or as service provider via service provider archive access, the available functions of the MailStore Client are nearly the same. Only accessing and or modifying the archive content (e.g. creating folders, deleting messages,..) is prohibited for the $archiveadmin user.
Please refer to Instance Administration to get an overview of the functions available inside each individual instance, such as managing users and setting up archiving and how these relate to the on premises solution MailStore Server.
Live Statistics
The Live Statistics tab shows real time graphics about the instance activity such as I/O, memory and CPU usage as well as number of Remote Procedure Calls (RPC) and the number of emails verified and archived by the instance's archiving mechanism.
