Difference between revisions of "Exporting Email"
| [unchecked revision] | [unchecked revision] |
| Line 26: | Line 26: | ||
=== Using the folder tree === | === Using the folder tree === | ||
| − | Right-click on an element in the folder tree (user archive, folder | + | Right-click on an element in the folder tree (user archive, folder or saved search), then select ''Export to'' from the context menu and select the export destination. A dialog appears in which additional settings may have to be specified. |
=== Using the list of emails === | === Using the list of emails === | ||
Revision as of 14:51, 10 December 2019
MailStore provides several functions regarding the export of archived emails. Emails can be exported directly into server mailboxes, or to the file system as individual email files (EML or MSG format), for example.
Please note: Backup strategies (a backup of the entire archive) are discussed separately in the article Backup and Restore.
Available Export Destinations
Email Server
- Exchange mailbox - A folder named MailStore Export is created in the Exchange mailbox into which emails are copied.
- Google Apps - A folder named MailStore Export is created in a Google Apps mailbox into which emails are copied.
- Gmail - A folder named MailStore Export is created in a Gmail mailbox into which emails are copied.
- IMAP mailbox - A folder named MailStore Export is created in an IMAP mailbox into which emails are copied.
Email Clients
- Microsoft Outlook - A folder named MailStore Export is created in Microsoft Outlook into which emails are copied.
- Mozilla Thunderbird - A folder named MailStore Export is created in Mozilla Thunderbird into which emails are copied.
- Mozilla SeaMonkey - A folder named MailStore Export is created in Mozilla SeaMonkey into which emails are copied.
Email Files
- Directory (File System) - Either EML or MSG files are created (one per email). When enabling the option Update existing export only not already existing email files will be written into the target folders, or else all email files will be written again. The option Sign Export allows to ensure integrity of the exported data outside of the archive. Refer to Verifying a Signed Export for further details on how to verify integrity.
- Outlook PST File - A folder named MailStore Export is created in a Microsoft Outlook PST file into which emails are copied.
Please note: EML files can be opened independently from MailStore by double-clicking and moving to applications such as Mozilla Thunderbird via drag & drop. Outlook MSG files can be opened or archived directly with all versions of Microsoft Outlook.
Starting an Export
Depending on the user's permissions, MailStore allows to export multiple emails in one step. Exporting or opening individual emails is possible at all time.
Using the folder tree
Right-click on an element in the folder tree (user archive, folder or saved search), then select Export to from the context menu and select the export destination. A dialog appears in which additional settings may have to be specified.
Using the list of emails
Highlight the emails to be exported by holding down the control key (Ctrl) and right-clicking onto the emails. Pressing Ctrl and A highlights all emails. Click Export To and select the export destination. A window appears in which additional settings may have to be specified.
Using the email preview
To export an email currently displayed in the Email Preview, click on Export in the menu bar above the preview and select the export destination. A window appears in which additional settings may have to be specified.
Using the page "Export Email"
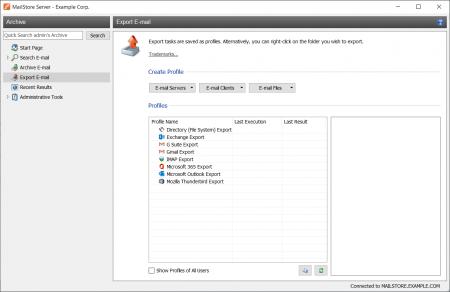
On this page, exporting tasks can be created and executed as export profiles (just like archiving profiles). Export profiles hold information about which emails will be exported to which destination. Each profile (i.e. the exporting task) can be executed manually or regularly according to a schedule. To learn more, please read on in the next section.
Working with Exporting Profiles
In MailStore, every exporting task is stored as an exporting profile. The exporting process is started by executing such a profile.
Such an exporting profile could contain the following information:
- WHAT: Mailbox [email protected]
- TO: Exchange server EXCHANGE01
- SCOPE: All folders except drafts
Like archiving profiles, existing export profiles can be executed, modified, deleted or even executed automatically. Further details can be found in the chapters Working with Archiving Profiles and Automating the Archiving Process
Important notice: Be aware that an export does not verify if the messages already exist in the destination. Therefore duplicates are created in the selected destination when re-executing an export profile multiple times. Thus is is not recommended to automate the execution of export profiles. Only exception is the Directory (File System) export profile, where MailStore is able to do a comparison based on the file names.
Creating an Export Profile
To create a new export profile, please proceed as follows:
- Start MailStore Client on the computer which is to execute the export. Log on as administrator if the emails of other users are to be exported as well. Only a MailStore administrator is allowed to export the emails of others.
- In MailStore, click on Export Email.
- From the lists in the upper Create Profile area, select the destination to which emails are to be exported.
- A wizard opens to assist in specifying the export settings.
- At the first step, specify which folder is to be exported (subfolders are always included). Depending on the export destination, the file format to be used (e.g. EML , MSG or PST) can be selected as well. Click on Next.
Please note: Below the list of folders, a saved search can also be selected. MailStore runs the search before executing the actual export procedure; all emails returned by the search will be exported. - At the second step, specify the exact target location to which emails are to be exported. For example, if Exchange Mailbox was selected as export destination earlier, the access data for the target mailbox can be specified and verified by clicking on Test. Then click on Next.
- Depending on the export destination specified, additional settings can be selected at the next step. For example, if IMAP mailbox was selected as the destination, a timeout value can be set, if needed.
- At the last step, a name for the export profile can be specified. After clicking on Finish, the profile will be listed under Saved Profiles and can be run immediately, if desired.

