Difference between revisions of "Quick Start Guide"
| [unchecked revision] | [checked revision] |
Ltalaschus (talk | contribs) |
|||
| (27 intermediate revisions by 3 users not shown) | |||
| Line 1: | Line 1: | ||
__NOTOC__ | __NOTOC__ | ||
== Install MailStore Server == | == Install MailStore Server == | ||
| − | If you have not already downloaded the free 30-day trial version, please download it from | + | If you have not already downloaded the free 30-day trial version, please download it from {{go.mailstore.com|target{{=}}website&context{{=}}server-trial-download|www.mailstore.com}} and start the installer by double-clicking the setup file. |
| − | ''' | + | {{#ev:youtube|https://youtu.be/uIyH3kePDG4|350|right|''Tech Tip: Basics of Installing''}} |
| + | It is a typical Microsoft Windows installer package. Thus, simply follow the on-screen prompts until you are asked to install a license. | ||
| − | A test installation can be converted to a full version by just replacing the | + | '''Hint''': Due to low system requirements, MailStore Server can be installed on a normal workstation computer for testing. Tests with a larger number of users should be done in an environment that follows our [[System Requirements]]. Our Tech Tip video provides an overview. |
| + | |||
| + | A test installation can be converted to a full version by just replacing the license key. It can also be moved to another computer at any time. | ||
| + | <br clear="all"> | ||
=== Install Trial License === | === Install Trial License === | ||
[[File:Setup003.png|right|350px]] | [[File:Setup003.png|right|350px]] | ||
| − | After the program files have been copied by the installation program, you are required to | + | After the program files have been copied by the installation program, you are required to enter a product key. |
| + | |||
| + | You can now either install the trial license you were emailed after downloading the free trial version or a license you have purchased. | ||
| + | |||
| + | <br style="clear: both;" /> | ||
| + | |||
| + | === Configure Certificate === | ||
| + | [[File:Setup003a.png|right|350px]] | ||
| + | In the next step you need to configure the certificate to be used by MailStore Server in order to ensure authenticity and security for all inbound connections. | ||
| + | |||
| + | Though not recommended for production use, self-signed certificates may be a acceptable choice for a trial installation. But keep in mind that self-signed certificates will trigger certificate warnings in web browsers and email clients. | ||
| + | |||
| + | A better option is [[Using_Lets_Encrypt_Certificates|using Let's Encrypt Certificates]], which are suitable for both production and trial use. | ||
| + | |||
| + | The certificate can be changed any time after the installation through the [[MailStore Server Service Configuration]] tool. | ||
| + | |||
| + | <br style="clear: both;" /> | ||
| + | |||
| + | === Configure Self-Signed Certificate === | ||
| + | [[File:Setup003a1.png|right|350px]] | ||
| + | |||
| + | To create a self-signed certificate that matches the actual server name, enter the name (i.e. mailstore.example.com) into the corresponding field ''Server Name''. This server name should be resolvable via DNS by your client computer. | ||
<br style="clear: both;" /> | <br style="clear: both;" /> | ||
| Line 15: | Line 40: | ||
=== Complete the Installation === | === Complete the Installation === | ||
[[File:Setup004.png|right|350px]] | [[File:Setup004.png|right|350px]] | ||
| − | At the end of the installation, select whether MailStore should automatically configure the Windows firewall | + | At the end of the installation, select whether MailStore should automatically configure the Windows firewall and search for license and product updates regularly. |
'''Help us to improve MailStore''' by enabling the option ''Submission of anonymous usage data'', whereby you help us to even better understand how our software is being used. | '''Help us to improve MailStore''' by enabling the option ''Submission of anonymous usage data'', whereby you help us to even better understand how our software is being used. | ||
| Line 22: | Line 47: | ||
== Logging on as Administrator == | == Logging on as Administrator == | ||
| − | [[File: | + | [[File:Gsta_login_02.png|right|350px]] |
| − | + | The logon credentials (username/password: ''admin'') required for a newly-installed MailStore Server show up automatically in the two login dialogs. | |
| − | + | ||
| + | Therefore simply click ''Next'' and ''Log in'' in the username and password dialog to log on. | ||
<br style="clear: both;" /> | <br style="clear: both;" /> | ||
| Line 32: | Line 58: | ||
After you have logged in, you are required to change the admin user's password. | After you have logged in, you are required to change the admin user's password. | ||
| − | Enter the new password into the ''New Password'' and ''Repeat Password'' fields | + | Enter the new password into both the ''New Password'' and ''Repeat Password'' fields and click ''OK'' to proceed. |
| + | |||
| + | The passwords must meet the [[Notes on Password Complexity|complexity rules]]. | ||
| + | |||
| + | <br style="clear: both;" /> | ||
== Create Users == | == Create Users == | ||
| − | It may be more economical to synchronize users with a directory service rather than creating them manually, depending on your system environment. In addition to Active Directory and generic LDAP support, MailStore Server also enables you to synchronize users from MDaemon, Kerio Connect and IceWarp mail servers. By means of the generic Application Integration, | + | It may be more economical to synchronize users with a directory service rather than creating them manually, depending on your system environment. In addition to Active Directory and generic LDAP support, MailStore Server also enables you to synchronize users from MDaemon, Kerio Connect and IceWarp mail servers. By means of the generic Application Integration, users can also be synchronized with your own backend. |
If your initial archiving needs only encompass a single mailbox or email files (such as a PST file), manual user creation is entirely adequate. | If your initial archiving needs only encompass a single mailbox or email files (such as a PST file), manual user creation is entirely adequate. | ||
| Line 59: | Line 89: | ||
* Click Create ''New...''. | * Click Create ''New...''. | ||
* Enter a user name for the new user and confirm with ''OK''. | * Enter a user name for the new user and confirm with ''OK''. | ||
| − | * In the next window, enter the full user name and click the ''Password...'' button to specify a MailStore password for the new user. | + | * In the next window, enter the full user name and click the ''Password...'' button to specify a MailStore password for the new user. Passwords must meet the [[Notes on Password Complexity|complexity rules]]. |
* Click ''OK'' to apply the settings and exit the User Properties. | * Click ''OK'' to apply the settings and exit the User Properties. | ||
| Line 74: | Line 104: | ||
'''Note:''' Archiving profiles can either be run manually or according to a | '''Note:''' Archiving profiles can either be run manually or according to a | ||
| − | schedule | + | schedule and they can be modified or deleted at any time. This has no |
| − | effect on previously | + | effect on previously archived emails. |
'''Note:''' In MailStore Server, archived emails are always associated with | '''Note:''' In MailStore Server, archived emails are always associated with | ||
| Line 95: | Line 125: | ||
After archiving is complete, you can immediately access the archived emails using the folder structure provided on the left of the window. The archiving profile you have just created is now displayed in the ''Saved Profiles'' list. From here, you can run it whenever it is required. | After archiving is complete, you can immediately access the archived emails using the folder structure provided on the left of the window. The archiving profile you have just created is now displayed in the ''Saved Profiles'' list. From here, you can run it whenever it is required. | ||
| − | '''Note:''' If you are logged on as the MailStore Administrator while setting up the archiving profile, you can also specify the user archive in which the emails are stored. If you are logged on as a regular user, this is always your own user archive. Please | + | '''Note:''' If you are logged on as the MailStore Administrator while setting up the archiving profile, you can also specify the user archive in which the emails are stored. If you are logged on as a regular user, this is always your own user archive. Please note that in case you are archiving emails into the archive of another user, you will not be able to access these emails, as long as the ''Archive Access'' is blocked for MailStore administrators in the [[Compliance General|compliance settings]]. |
== User Access to the Archive == | == User Access to the Archive == | ||
| Line 107: | Line 137: | ||
=== Via Other Email Clients === | === Via Other Email Clients === | ||
| − | MailStore Server | + | MailStore Server provides an integrated IMAP server, that offers you read-only access to the archive for any IMAP capable email client. Especially for alternative email clients (Mozilla Thunderbird) or operating systems (e.g. MacOS or Linux), as well as for mobile platforms such as Android, IPhone or Symbian, this is a very convenient way of accessing the archive. |
| − | |||
| − | |||
| − | |||
| − | |||
=== Via an Internet Browser (MailStore Web Access) === | === Via an Internet Browser (MailStore Web Access) === | ||
| − | MailStore Web Access provides users with access to the archive via any Internet browser. No additional software needs to be installed on the user computers. Simply enter | + | MailStore Web Access provides users with access to the archive via any Internet browser and due to its responsive design also supports mobile devices. No additional software needs to be installed on the user's computers. Simply enter <tt><nowiki>https://servername:8462</nowiki></tt> in your browser. Make sure to replace ''servername'' with the actual fully qualified domain name (e.g. <tt>mailstore.example.com</tt>) of the computer where MailStore Server is installed. |
| − | |||
| − | |||
[[de:Quick_Start_Guide]] | [[de:Quick_Start_Guide]] | ||
[[en:Quick_Start_Guide]] | [[en:Quick_Start_Guide]] | ||
Latest revision as of 12:07, 16 April 2021
Install MailStore Server
If you have not already downloaded the free 30-day trial version, please download it from www.mailstore.com and start the installer by double-clicking the setup file.
It is a typical Microsoft Windows installer package. Thus, simply follow the on-screen prompts until you are asked to install a license.
Hint: Due to low system requirements, MailStore Server can be installed on a normal workstation computer for testing. Tests with a larger number of users should be done in an environment that follows our System Requirements. Our Tech Tip video provides an overview.
A test installation can be converted to a full version by just replacing the license key. It can also be moved to another computer at any time.
Install Trial License
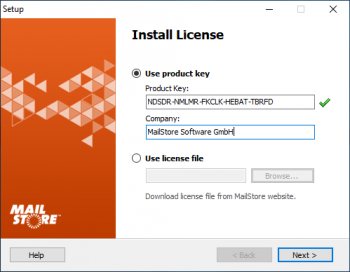
After the program files have been copied by the installation program, you are required to enter a product key.
You can now either install the trial license you were emailed after downloading the free trial version or a license you have purchased.
Configure Certificate
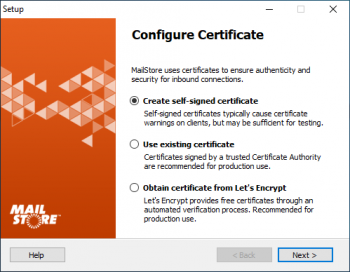
In the next step you need to configure the certificate to be used by MailStore Server in order to ensure authenticity and security for all inbound connections.
Though not recommended for production use, self-signed certificates may be a acceptable choice for a trial installation. But keep in mind that self-signed certificates will trigger certificate warnings in web browsers and email clients.
A better option is using Let's Encrypt Certificates, which are suitable for both production and trial use.
The certificate can be changed any time after the installation through the MailStore Server Service Configuration tool.
Configure Self-Signed Certificate
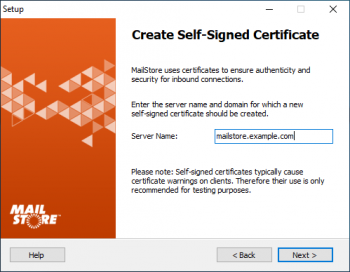
To create a self-signed certificate that matches the actual server name, enter the name (i.e. mailstore.example.com) into the corresponding field Server Name. This server name should be resolvable via DNS by your client computer.
Complete the Installation
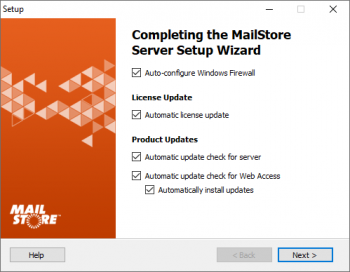
At the end of the installation, select whether MailStore should automatically configure the Windows firewall and search for license and product updates regularly.
Help us to improve MailStore by enabling the option Submission of anonymous usage data, whereby you help us to even better understand how our software is being used.
Logging on as Administrator
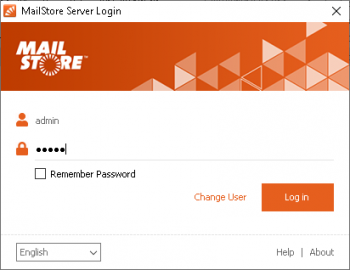
The logon credentials (username/password: admin) required for a newly-installed MailStore Server show up automatically in the two login dialogs.
Therefore simply click Next and Log in in the username and password dialog to log on.
Changing the Password
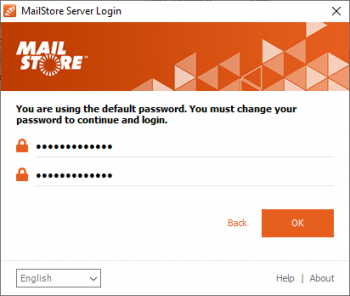
After you have logged in, you are required to change the admin user's password.
Enter the new password into both the New Password and Repeat Password fields and click OK to proceed.
The passwords must meet the complexity rules.
Create Users
It may be more economical to synchronize users with a directory service rather than creating them manually, depending on your system environment. In addition to Active Directory and generic LDAP support, MailStore Server also enables you to synchronize users from MDaemon, Kerio Connect and IceWarp mail servers. By means of the generic Application Integration, users can also be synchronized with your own backend.
If your initial archiving needs only encompass a single mailbox or email files (such as a PST file), manual user creation is entirely adequate.
Option 1: Synchronize Users
To set up synchronization with a directory service in MailStore Server, proceed as follows:
- Click Administrative Tools > Users and Archives > Directory Services.
- Change the Directory Services Type to the directory service that matches your environment.
- Next, enter the required settings for the selected Directory Services Type. In-depth descriptions of these settings are provided in the MailStore Server help section.
- Optional: Click Default Privileges... to view and specify privileges for new users provided from a directory service.
- To test your entries, click Test Settings and check the results.
- To synchronize, and thereby create the users, click Synchronize Now.
Hint: Some archiving profiles provide a Synchronize with directory service before archiving option, which can be used to ensure that MailStore synchronizes users and their properties regularly.
Option 2: Create Users Manually
To create users manually, proceed as follows:
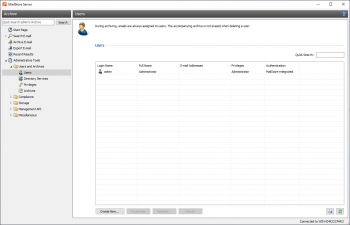
- Click Administrative Tools > Users and Archives > Users.
- Click Create New....
- Enter a user name for the new user and confirm with OK.
- In the next window, enter the full user name and click the Password... button to specify a MailStore password for the new user. Passwords must meet the complexity rules.
- Click OK to apply the settings and exit the User Properties.
Note: Manually-created users are permitted to archive email by default.
Archiving Management based on Profiles
Overall Concept
In MailStore Server, email archiving is controlled using archiving profiles. An archiving profile contains the following data:
- What is archived (for example, a specific mail server)
- How much is archived (for example, specified mailboxes or a specific folder within a mailbox)
- Additional settings such as deletion rules (these settings are disabled by default, enabling you to safely test MailStore in live operating environments)
Note: Archiving profiles can either be run manually or according to a schedule and they can be modified or deleted at any time. This has no effect on previously archived emails.
Note: In MailStore Server, archived emails are always associated with specific users and stored in the corresponding user archives.
Archiving Your First Email
MailStore users who are assigned the required privileges by the MailStore Administrator are able to archive individual mailboxes, local email client profiles, and email files.
Administrators are additionally able to centrally archive email for several or all users. Archiving profiles such as Multiple Mailboxes can be used for this purpose. To get to know MailStore, we recommend first archiving a single mailbox or a local email client profile. To do this, proceed as follows:
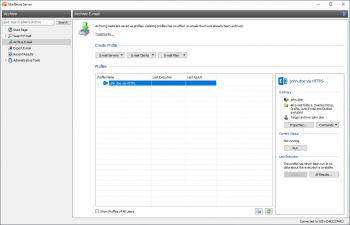
- Click Archive Email.
- In the Create Profile area, select the source for archiving your email.
- You can then specify the properties of the archiving profile using the Setup Wizard provided.
- The last page in the Setup Wizard dialog box provides a Finish button, which you need to click in order to run the archiving profile.
After archiving is complete, you can immediately access the archived emails using the folder structure provided on the left of the window. The archiving profile you have just created is now displayed in the Saved Profiles list. From here, you can run it whenever it is required.
Note: If you are logged on as the MailStore Administrator while setting up the archiving profile, you can also specify the user archive in which the emails are stored. If you are logged on as a regular user, this is always your own user archive. Please note that in case you are archiving emails into the archive of another user, you will not be able to access these emails, as long as the Archive Access is blocked for MailStore administrators in the compliance settings.
User Access to the Archive
Users can access their individual user archives in a variety of ways. Click the Install MailStore Client on other Computers link on the desktop to access the installers for MailStore Client and the MailStore Outlook add-in.
Via MailStore Client
With MailStore Client, users can access MailStore Server from any computer in the network. With this option, users can search and view emails that have been archived specifically for them. Additionally, users with the corresponding privileges can use MailStore Client to archive emails themselves.
Via the MailStore Outlook Add-In
The MailStore Outlook add-in provides an additional toolbar in Microsoft Outlook that permits easy access to the archive.
Via Other Email Clients
MailStore Server provides an integrated IMAP server, that offers you read-only access to the archive for any IMAP capable email client. Especially for alternative email clients (Mozilla Thunderbird) or operating systems (e.g. MacOS or Linux), as well as for mobile platforms such as Android, IPhone or Symbian, this is a very convenient way of accessing the archive.
Via an Internet Browser (MailStore Web Access)
MailStore Web Access provides users with access to the archive via any Internet browser and due to its responsive design also supports mobile devices. No additional software needs to be installed on the user's computers. Simply enter https://servername:8462 in your browser. Make sure to replace servername with the actual fully qualified domain name (e.g. mailstore.example.com) of the computer where MailStore Server is installed.
