Difference between revisions of "Template:Archiving Exchange Public Folder"
| [checked revision] | [unchecked revision] |
Rrommelrath (talk | contribs) |
|||
| Line 7: | Line 7: | ||
* Select ''Public Folders''. | * Select ''Public Folders''. | ||
{{#ifeq: {{{1}}}|Office 365|*: [[File:Office365_public_01.png|center|347px]] | {{#ifeq: {{{1}}}|Office 365|*: [[File:Office365_public_01.png|center|347px]] | ||
| − | * Under ''Access via'', leave the protocol on ''HTTPS''. The option '' | + | * Under ''Access via'', leave the protocol on ''HTTPS''. The option ''Accept all certificates'' should also be left deactivated because Office 365 uses trusted certificates.|*:[[File:Xchg_public_01.png|center|350px]] |
* Under ''Access via'', either ''HTTPS'' or ''HTTP'' has to be selected as protocol to archive public folders. | * Under ''Access via'', either ''HTTPS'' or ''HTTP'' has to be selected as protocol to archive public folders. | ||
| − | *: '''Please note:''' If you choose ''HTTPS'', you can enable the option to '' | + | *: '''Please note:''' If you choose ''HTTPS'', you can enable the option to ''Accept all certificates''. Generally, these warnings appear if an unofficial or self-signed certificate is used on the Exchange server.}} |
* {{#ifeq: {{{1}}}|Office 365|Leave the setting of ''Host'' to its default ''(Auto Detect)''.|Under ''Host'', enter the name of your Exchange server.}} | * {{#ifeq: {{{1}}}|Office 365|Leave the setting of ''Host'' to its default ''(Auto Detect)''.|Under ''Host'', enter the name of your Exchange server.}} | ||
* Under ''User Name'', enter the {{{1|Windows}}} login name of the user you have prepared in step 2 for public folder access. | * Under ''User Name'', enter the {{{1|Windows}}} login name of the user you have prepared in step 2 for public folder access. | ||
Revision as of 08:23, 4 November 2022
Please proceed as follows:
- Log on to MailStore Client as administrator.
- Click on Archive Email.
- From the Email Servers list in the Create Profile area of the window, select Microsoft Exchange to create a new archiving profile.
- A wizard opens to assist in specifying the archiving settings.
- Select Public Folders.
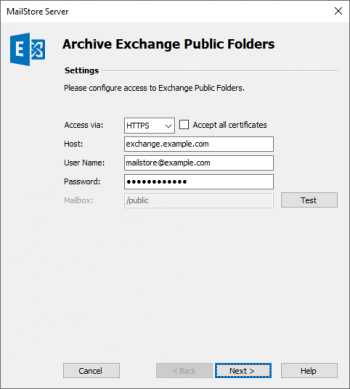
- Under Access via, either HTTPS or HTTP has to be selected as protocol to archive public folders.
- Please note: If you choose HTTPS, you can enable the option to Accept all certificates. Generally, these warnings appear if an unofficial or self-signed certificate is used on the Exchange server.
- Under Host, enter the name of your Exchange server.
- Under User Name, enter the Windows login name of the user you have prepared in step 2 for public folder access.
- Under Password, enter the user's password.
- Leave the field Mailbox to its preset value /public.
- Click on Test to verify that MailStore can access the public folders.
- Click on Next to continue.
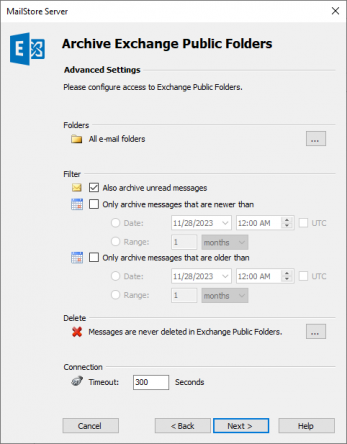
- Adjust the settings for the List of Folders to be Archived. By default, all public folders that contain emails will be archived.
- If needed, adjust the filter and the Deletion Rules. By default, no emails will be deleted from the public folders. The Timeout value only has to be adjusted in specific cases (e.g. with very slow servers).
- Click on Next to continue.
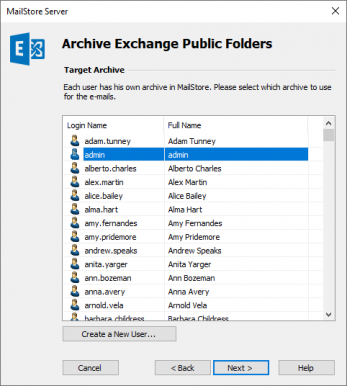
- In the next step, select the archive of the user you have prepared in step 1.
- In the last step, specify a name for the archiving profile. After clicking Finish the archiving profile will be listed under Saved Profiles and can be run immediately or automatically if desired.


