Accessing the Archive with the MailStore Client software
Searching by Folder Structure
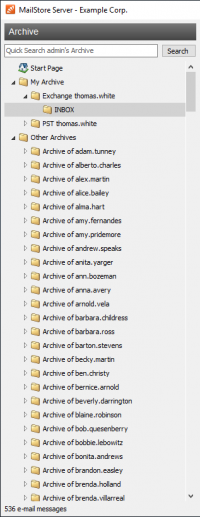
MailStore stores all archived emails in a MailStore-specific folder structure, in which emails are displayed using the same structure as their corresponding source application. This means that folders created in the source application (e.g. Microsoft Outlook) are not changed during the archiving process and can be found easily in MailStore as well.
User Archives
For every user, MailStore creates a folder called My Archive on the highest level of the folder structure. Each folder corresponds to the user archive of the respective user and contains all his or her emails.
If the user has access to the archives of other users, their folders are listed as Archive of <User Name>.
Opening a User Archive
To open a folder, click on the plus sign [+] next to the folder name (as is done in Windows Explorer). Proceed the same with any subfolders.
Viewing the Emails in a Folder
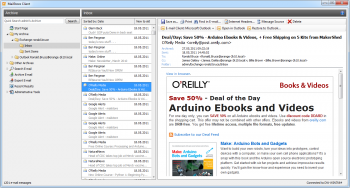
To view the emails in a folder, simply click on the folder name. The emails will be listed below the folder structure.
Click on the text Sorted by: <value> to change the order in which emails are displayed. Emails can be sorted according to:
- Date
- From/To (sender/recipient of the email)
- Subject
Click on the Field to the right of Sorted by (called New to old in the graphic) to reverse the order in which emails are arranged. By default, the latest email is displayed first.
Number of Emails Contained in a Folder
The number of emails in the current folder is shown below the list of messages.
Refreshing the View
To refresh the list of folders, click on a folder and press F5 on your keyboard.
Click on the folder again to refresh the list of emails.
Creating, Renaming and Deleting Folders
Information about how to create, rename and delete folders is available in chapter The MailStore Folder Structure.
Quick Search
With MailStore's integrated quick search feature, users can browse through all emails in all user archives they have access to. Quick search is especially suitable for simple queries. Alternatively, an Extended Search can be used.
Using Quick Search
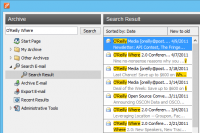
Quick search is located in the upper left area of the application window. Simply enter one or more keywords into the search field and click on Search or press Enter. Search results are displayed in the lower left area or the window. If a keyword appears in the header or the subject line, it is highlighted.
Searching for Word Fragments
To view all emails containing a particular word fragment, use the wildcard character ( * ). For example:
auto*
would locate "auto", "automatic", "automobile" and others.
Searching for Phrases
To search for words appearing consecutively and in a certain order, use quotation marks ( "" ). For example:
"Microsoft Windows"
would only locate Microsoft Windows, not Microsoft Works or Windows 95.
Narrowing by Fields
A search for keywords or phrases can be limited to particular fields. For example:
subject:News                  only in Subject
from:[email protected]       only in From
to:[email protected]      only in To
cc:[email protected]         only in Cc
bcc:[email protected]   only in Bcc
Excluding Words
To narrow a search, it may be desired to specify words that must NOT be present in the emails. To exclude keywords from the search results, simply place a minus ( - ) sign in front of them. For example:
ZDNet -download-hint
would locate all emails from ZDNet, but not download-hint.
Combining Search Options
The search options described above can also be combined. For example:
ZDNET -"Daily Update"
would locate all emails from ZDNet which do not contain the consecutive words Daily Update.
Extended Search
With MailStore's integrated extended search, complex search processes can be carried out. Not only can the email content be searched but also parameters such as date and email size.
Using the Extended Search
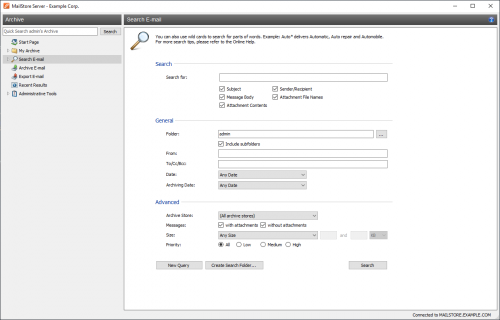
In the MailStore application window, click on Search Email. Specify the search criteria for the emails that are to be included in the results. The criteria are AND-connected, meaning that the search results include only those emails that satisfy all criteria specified. Click on Search to start the search.
Search Criteria under "Extended Search - Search For"
Enter a keyword or phrase into the text field, and specify where MailStore is to direct the search.The following options are available:
- Subject - The subject line of the email is searched.
- Sender/Recipient - The fields "From", "To", "Cc", and "Bcc" are searched.
- Message body - The text-only or HTML sections of the email are searched (depending on availability).
- Attachments - The file names of the email attachments are searched.
- Attachment contents - The contents of the email attachments are searched. If and to what extent attachments can be searched depends on the indexing options specified (under Administrative Tools).
In the textfield Search for, all options described in section Quick Search, such as phrases and wildcards, are available here as well.
Search Criteria under "General"
Under General, the following options are available:
- Folder - The folder to be searched by MailStore can be selected here. By default, this is the main folder of the current user. By clicking the button to the right of the text field, folders can also be selected using the folder structure. As administrator, the folders of all users can be searched.
- Include subfolder - If selected, MailStore not only searches the selected folder (e.g. Inbox), but all subfolders created therein (e.g. Inbox / Projects 2008 / Profit Optimization) as well.
- From - Any keywords or email addresses entered here are searched for only within the email's sender field.
- To/Cc/Bcc - Any keywords or email addresses entered here are searched for only within the email's recipient fields.
- Date - The timeframe the search is to cover can be selected here. Either a predefined range, such as Yesterday or This year, can be selected or, by choosing Custom, a specific period can be specified manually. In this case, the start and end dates will be included.
In the fields From and To/Cc/Bcc, all options, such as phrases and wildcards, described in section Quick Search are available.
Search Criteria under "Extended"
Under Extended, the following options are available:
- Messages with/without attachments - By default, all messages are searched, regardless of whether or not they have any file attachments. Clear one of the check boxes to remove certain emails, such as those without attachments, from the results. Important: These searches can be imprecise at times because items like background pictures could be regarded as attachments.
- Size - By default, all messages are searched regardless of their size. Use the appropriate fields provided to limit the search according to the size of the emails, e.g. at least 5 MB or between 400 and 600 KB.
- Priority - Emails are searched according to the priority level of the email as assigned by the sender. When choosing Low, all emails with a priority level lower than Normal are returned, when choosing High, all emails with a priority level higher than Normal are returned. Emails not containing any information regarding priority are assumed to have a priority level of Normal.
Starting the Search
Click on Search to start the search. Results are displayed in a list in the left section of the main window.
Refining the Search Results
Click on Extended Search again to further narrow the results after a search has been executed. Specify any additional search criteria and click on Search once more.
Starting a New Search
Click on New Query to start a new search. All search criteria will be reset to their default values (i.e. an unrestricted search of the folders of the current user).
Saving Search Criteria for Reuse
Search criteria that are used repeatedly (such as "all receipts from last month") can be saved and reused at a later time: In the upper area of the application window, click on Save Criteria and provide a meaningful name for the search. To access, edit or restart the search, click on Load Criteria.
To rename or delete saved search criteria, click on Manage Criteria.
Email Preview
MailStore offers an integrated email preview displaying emails the same way as standard email applications. To activate the preview, simply click on an email or use the arrow keys to highlight the desired email in the list.
The menu bar above the email preview shows all functions available for the email currently displayed.
Open in...
In order to forward or reply to an email, users can temporarily restore the current email in the MailStore preview to an email application. The following options are available:
- Open in Outlook
- Open in Windows Mail / Outlook Express
- Open in Windows Live Mail
- Open in Thunderbird
Please note: Emails are simply opened, not stored, in the application. To restore emails to an email application, please use MailStore's Export Feature.
Using the print function, the email currently displayed will be printed including header information such as Date and Subject.
Save
Click on Save as to save the current email in any Windows folder. Emails can be saved in the following file formats:
- RFC822 EML - These files can be opened independently from MailStore by double-clicking and can be moved to applications such as Outlook Express by drag & drop.
- Outlook MSG - These files can be opened with or imported to all versions of Microsoft Outlook (not Outlook Express) directly.
Export
Using the Export feature, the current email can be exported to other applications, such as Microsoft Outlook, forwarded using SMTP, or burned to a CD. Additional information about this topic is available in section Exporting Emails.
Internet Headers...
Click on Internet Headers to view the header of the current email, including all MIME parts. Hold down the SHIFT key while clicking on Internet Headers to view the entire source code of the message.
Delete (only with the appropriate privilege)
Click on Delete to delete the current email from the archive. Please keep in mind that, in order to use this function, the appropriate privilege has to be in place.
Reopening Emails in an Email Application
Emails previewed in MailStore can be reopened in any email application to reply to or forward them. Simply click on Email Commands and select one of the following options:
- Open in Outlook
- Open in Windows Mail / Outlook Express
- Open in Windows Live Mail
- Open in Mozilla Thunderbird
Please note: Emails are simply opened, not stored, in the application. To restore emails to an email application, please use MailStore's Export Feature.
Exporting Emails
MailStore provides several functions regarding the export of archived emails. Emails can be exported directly into server mailboxes, or to the file system as individual email files (EML or MSG format), for example.
Please note: Backup strategies (a backup of the entire archive) are discussed separately in chapter Backup.
Available Export Destinations
- Microsoft Outlook - A folder named MailStore Export is created in Microsoft Outlook into which emails are copied.
- Exchange mailbox - A folder named MailStore Export is created in the Exchange mailbox into which emails are copied.
- IMAP mailbox - A folder named MailStore Export is created in an IMAP mailbox into which emails are copied.
- Directory (File System) - Either EML or MSG files are created (one per email).
- Email address using SMTP- Emails are forwarded to a specified email address using SMTP, the standard protocol for sending emails.
- CD/DVD - Either EML or MSG files (one per email) are burned to CD or DVD. MailStore can also distribute the backup among several storage media; CDs and DVDs can be used interchangeably. Rewritable disks (CD-RW or DVD-/+RW) can be used as well.
Please note: EML files can be opened independently from MailStore by double-clicking and moving to applications such as Outlook Express via drag & drop. Outlook MSG files can be opened or archived directly with all versions of Microsoft Outlook (except Outlook Express).
Starting an Export
Using the email preview - To export an email currently displayed in the Email Preview, click on Export in the menu bar above the preview and select the export destination. A window appears in which additional settings may have to be specified.
Using the list of emails (folder contents or search results) - Highlight the emails to be exported by holding down the control key (Ctrl) and right-clicking onto the emails. Pressing Ctrl and A highlights all emails. Click Export To and select the export destination. A window appears in which additional settings may have to be specified.
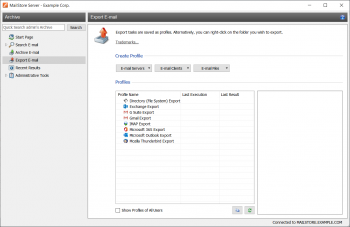
Using the page "Export Email" - On this page, exporting tasks can be created and executed as export profiles (just like archiving profiles). Export profiles hold information about which emails will be exported to which destination. Each profile (i.e. the exporting task) can be executed manually or regularly according to a schedule. To learn more, please read on in the next section.
Creating an Export Profile Using the Page "Export Email"
To create a new export profile, please proceed as follows:
- Start MailStore Client on the computer which is to execute the export. Log on as administrator if the emails of other users are to be exported as well. Only a MailStore administrator is allowed to export the emails of others.
- In MailStore, click on Export Email.
- From the list in the upper right area, select the destination to which emails are to be exported.
- A wizard opens to assist in specifying the export settings.
- At the first step, specify which folder is to be exported (subfolders are always included). Depending on the export destination, the file format to be used (e.g. EML , MSG or database backup) can be selected as well. Click on Next.
- Please note: Below the list of folders, a saved search can also be selected. MailStore runs the search before executing the actual export procedure; all emails returned by the search will be exported.
- At the second step, specify the exact target location to which emails are to be exported. For example, if Exchange Mailbox was selected as export destination earlier, the access data for the target mailbox can be specified and verified by clicking on Test. Then click on Next.
- Depending on the export destination specified, additional settings can be selected at the next step. For example, if IMAP mailbox was selected as the destination, a timeout value can be set, if needed.
- At the last step, a name for the export profile can be specified. After clicking on Finish, the profile will be listed under Saved Settings (Profiles) and can be run immediately, if desired
Just like archiving profiles, already existing export profiles can be executed, edited or deleted at any time. Additional information is available in chapter Working with Archiving Profiles.
Executing an Export Profile Using the Page "Export Email"
On the start page of MailStore Client, click on Export Email. From the list under Saved Settings (Profiles), select the profile to be executed and click on Run. After the export process has finished, a message appears containing information about any errors that may have occurred.
Executing an export profile regularly according to a schedule
In addition to being executed manually, archiving profiles can also be run automatically according to a schedule. For further information please read on in the next chapter: Automating the Export Process.
Automating the Export Process
With MailStore, every exporting task (every export profile) can be executed automatically according to specified points in time.
Procedure
- Start MailStore Client on the computer on which the exporting task is to be executed according to a schedule. Please keep in mind that, if a full backup is to be performed, this has to be the computer on which MailStore Server is installed. If the emails of other users are to be exported, log on as administrator.
- On the start page of MailStore Client, click on Export and Backup.
- Right-click on an existing profile and select Schedule Task. Information about creating exporting tasks is available in the previous chapter: Exporting Emails.
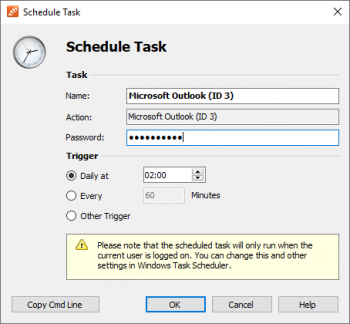
In the next window ("Schedule Task"), the following settings of the planned task can be specified:
Task - Name: The task name can be chosen freely. By default, the name of the export profile and its internal MailStore ID are used.
Trigger: A time for daily execution (the task is executed once a day) or a time time interval (e.g. every 60 minutes) can be specified.
If the option Other Trigger is chosen, the exporting task is created as Windows task but execution times still have to be specified. This has to be done using the Windows task planner and is described in Windows Help. All options offered by your current Windows version can be used.
Windows Account: Specify here which user account is to be used when executing the scheduled task. The option Local System Account can be used for exports with destination Directory (File System) or CD/DVD, for example, and has the advantage that no password is required to execute the task. If the emails are to be archived from the applications of the current user (e.g. from Microsoft Outlook), the corresponding user account must be selected. In such cases, the option Local System Account is deactivated.
Log Messages - File Name: If a log file is to be created, the name for that file can be specified here. The placeholders {DATE} and {TIME} can be used in the file name which will be replaced by the actual date and time during the archiving process. If desired, the log file can also be created on a network drive.
After all settings have been specified, the task can be created by clicking on OK. Confirm the following safety prompt by clicking OK again. If any account other than the Local System Account has been selected under Windows Account, the Windows password of the currently logged on user has to be entered.
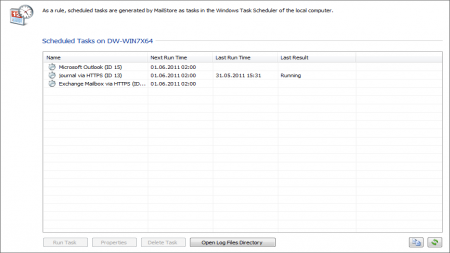
A list of scheduled tasks is displayed in MailStore's Administrative Tools, showing all tasks created on the current computer up to this point.
Managing Scheduled Tasks
Scheduled tasks created on the current computer are managed in Administrative Tools under Scheduled Tasks.
The list shows all scheduled tasks for archiving and export processes that were created on the current computer.
Run Task: The selected task is executed immediately regardless of its scheduled runtime.
Properties: The Windows task planner is opened for the selected task; all options offered by the current Windows version can be used.
Delete Task: The selected task is deleted. This does not affect the underlying archiving profile or any of the archived emails.
Open Log Files Directory: The directory containing the protocols for the selected task is opened.
Viewing the Command Line
If desired, the export process can be incorporated into a larger procedure, such as one run by a batch file (.bat). To simplify this process, MailStore offers the option Copy Cmd Line in the Schedule Task window (see above). Click on it to view a command line that can be incorporated into the desired procedure. For example:
REM *** Microsoft Outlook (ID 77) ***

"C:\Program Files\deepinvent\MailStore Server\MailStoreCmd.exe"
--h="localhost" --pkv3="16:0e:95:b0:79:d2:e8:e0" -u="admin" --p="admin"
--o="C:\ProgramData\MailStore\TaskLog\77_{DATE}-{TIME}.log"
-c export-execute --id=77 --user="admin" --verbose
The command line is to be read as follows:
"...\MailStoreCmd.exe" - MailStoreCmd.exe is the MailStore Management Shell. It was developed for the automated execution of certain processes in MailStore. Additional information about MailStoreCmd is available in chapter The MailStore Management Shell.
--h="localhost" - The computer name of the MailStore server to which MailStoreCmd.exe is to connect.
--pkv3="..." - Public Key Fingerprint. It ensures that the MailStore server at the time of archiving is the same as it was at the time when the scheduled task was created (optimal safety feature).
--u="admin" - User name.
--p="admin" - Password.
-c - The actual command follows (non-interactive mode).
import-execute --id=77 --user="admin" - Execute the archiving profile of user admin with the internal ID 77.
