Management Console - General
Dashboard
The dashboard of the Management Console is divided into the following parts.
Service Health
This sections gives a quick overview of the status of all configured hosts and their roles which are under the control of the Management Server. The root node of the tree always represents the Management Server, the left branch the Instance Hosts and the right branch shows the Client Access Servers. Instance Host nodes also show the number of available and active instances.
Version and License Information
Details about the product version in use and the licensee including their customer number are displayed here.
My Resources
The My Resources sections lists all resources created in the MailStore Service Provider Edition. This includes the number of Management Server, Instance Hosts, Client Access Server and the total number of instances available and running.
Messages
System messages that might require further administrative actions are shown in the Messages section of the dashboard. Typical message may contain warnings about license update failures or necessary search index rebuilds.
Related Links
This sections contains links to the most valuable online resources including this online help, Customer Service Center, etc.
Instances
The main task of each MailStore Service Provider Edition administrator will be the management of instances. General administrative tasks such as creating, configuring, stating, stopping and deleting instances is described in the following.
Individual instance tasks like managing archive stores and search indexes, managing users and creating setting up archiving is covered in Instance Management.
Creating Instances
To create new instances for customers follow these steps:
- Log on to the Management Console, if not already logged on.
- Click on General > Instances.
- Click Create Instance.
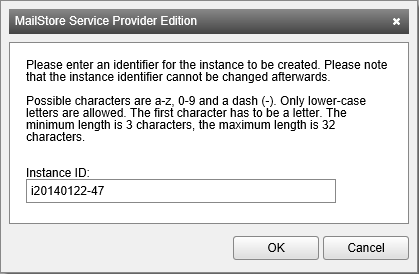
- Enter a unique Instance ID.
- Hint: It is not necessary to choose a meaningful instance ID, as an alias name can define in the next step. The instance ID could for example be a customer number or any other unique identifier from a CRM system.
- Click OK.
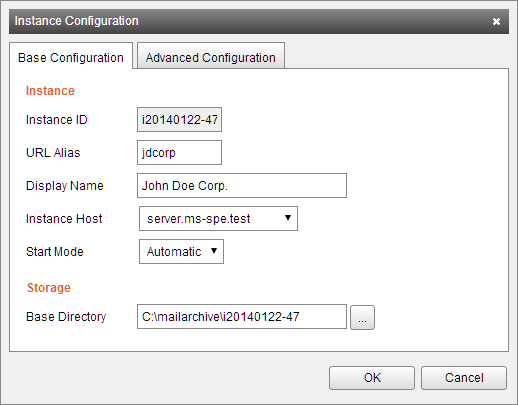
- Fill out the Instance Configuration form:
- Tab: Base Configuration
- URL Alias Meaningful unique alias name that can be used as an alternative to the instance ID.
- Display Name: Additional identification information for the instance, e.g. customer name.
- Instance Host: Instance Host on which the new instance gets created.
- Start Mode: Defines how the instance is started. Choose from the following options (Default: Automatic):
- Disabled: The instance can neither be started automatically nor manually.
- Manual: The instance can only be started manually.
- Automatic: The instance will automatically be started with the Instance. Host.
- Base Directory: Directory where instance's data will be stored.
- Tab: Advanced Configuration
- Enable VSS Writer: Enable support for Volume Shadow Service.
- Exclude Indexes from VSS Backup: Excludes the unencrypted search index files from the backup set reported by the VSS writer.
- Please note: This option can be set so that administrators which have access to the backup files cannot access the unencrypted search index files. When restoring backups that do not include search index files, the search indexes have to be rebuilt.
- Exclude Indexes from VSS Backup: Excludes the unencrypted search index files from the backup set reported by the VSS writer.
- Enable Debug Log: Enable debug logging for the instance.
- Enable IMAP Server Connection Log: Enable IMAP Server connection logging for the instance.
- Enable VSS Writer: Enable support for Volume Shadow Service.
- Click OK to create the instance.
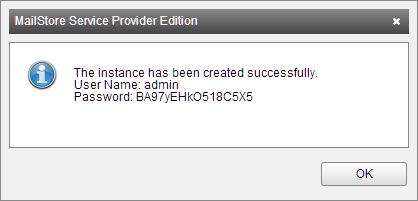
- MailStore Service Provider Edition will now create the new instance and displays the login credential for afterwards.
- If the end customer should be able to administrate the newly created MailStore Server instance on his own, these credentials must be made available to him. Otherwise it is not necessary to save these credentials.
- Click OK to finish.
Irrespective of the configured Start Mode, the newly created instance must be started manually before it can be used. Read more about starting, stopping and restarting of instances in the next section.
Controlling Instances
To start, stop or restart instances follow the steps:
- Log on to the Management Console, if not already logged on.
- Click on General > Instances.
- Select one or multiple instances from the list using the appropriate checkboxes.
- Click either on Start, Safe Mode, Stop or Restart.
Please notice that the Start Mode of an instance must be set to Automatic or Manual in order to start an instance.
Safe Mode
An instance can be started in Safe Mode to perform maintenance on its configuration.
While the Safe Mode is active:
- Only administrators can log in to the instance
- Automatic archiving and export profiles are not started
- Jobs are not started automatically
- All internal heartbeats are disabled
Configuring Instances
Most configuration settings of existing instances can be modified. The instance to modify must be stopped before its configuration can be changed. To change the configuration proceed as follows:
- Log on to the Management Console, if not already logged on.
- Click on General > Instances.
- Select the instances to modify.
- Click on Configure....
- Make the desired configuration changes.
- Tab: Base Configuration
- URL Alias Meaningful unique alias name that can be used as an alternative to the instance ID.
- Display Name: Additional identification information for the instance, e.g. customer name.
- Instance Host: Instance Host on which the new instance gets created.
- Start Mode: Defines how the instance is started. Choose from the following options (Default: Automatic):
- Disabled: The instance can neither be started automatically nor manually.
- Manual: The instance can only be started manually.
- Automatic: The instance will automatically be started with the Instance. Host.
- Base Directory: Directory where instance's data will be stored.
- Tab: Advanced Configuration
- Enable VSS Writer: Enable support for Volume Shadow Service.
- Exclude Indexes from VSS Backup: Excludes the unencrypted search index files from the backup set reported by the VSS writer.
- Please note: This option can be set so that administrators which have access to the backup files cannot access the unencrypted search index files. When restoring backups that do not include search index files, the search indexes have to be rebuilt.
- Exclude Indexes from VSS Backup: Excludes the unencrypted search index files from the backup set reported by the VSS writer.
- Enable Debug Log: Enable debug logging for the instance.
- Enable IMAP Server Connection Log: Enable IMAP Server connection logging for the instance.
- Enable VSS Writer: Enable support for Volume Shadow Service.
- Click OK to save the changes.
Important notice: Neither changing the Instance Host nor the Base Directory will move the archive data to the new location. If necessary this must be done manually before starting the instance again.
Deleting Instances
Instances can be deleted at any time as long as they are stopped. Deleting an instance only removes it from the management database of the MailStore Service Provider Edition. All instance data remains on the hard disk and must be removed manually if necessary. To delete an instance follow these instructions:
- Log on to the Management Console, if not already logged on.
- Click on General > Instances.
- Select the instances to delete.
- Click on Command > Delete.
- Confirm the security query with OK to delete the instance, otherwise click Cancel to abort.
License Information
Clicking on the License Information menu item opens an overview of all data that is used by the billing process.
Used Licenses per Instance
Displays a list off all instances and their respective amount of used licenses.
Used Resources
This is a statistical overview of used resources.
Raw Licensing Request
The raw licensing request tab shows how the actual licensing request to our accounting servers looks like. The Management Server sends this information once every 24 hours to renew the local licensing information of the MailStore Service Provider Edition.
SMTP Settings
Notifications are send by email in the following situations:
- product updates are available,
- a new Web Access version was installed automatically,
- license renewal requests failed for three consecutive days.
To send emails to administrators of the Service Provider Edition, the following settings have to be defined:
- Server: Enter the host name or IP address of the SMTP server.
- Port: By default, port 587 is used for email submission. If a different port (i.e. 25) is required by the SMTP server, change it here.
- Protocol: Select the protocol required by the SMTP server. Select SMTP for an unencrypted connection to the SMTP server. For an encrypted connection, select SMTP-TLS (STARTTLS, Explicit SSL) or SMTP-SSL (Implicit SSL). If the certificate provided by the remote host cannot be verified (e.g. self-signed or signed by an unknown certificate authority), enable the option Accept all certificates to allow establishing a connection, otherwise the sending process will fail. Be advised that enabling this option leads to an insecure configuration and is not recommended.
- Server requires authentication: If the SMTP server requires authentication prior to sending, check the corresponding checkbox and enter the appropriate credentials into the User Name and Password fields.
- Display Name: Enter a name that helps to identify the origin of the emails send by the Service Provider Edition.
- Email Address: Enter the email address of the sender. Some email servers, like Microsoft Exchange, verify that the authenticated users is allowed to use a particular email address.
- Recipient for Notifications: Select the system administrators who should receive notifications. When none are listed, verify that at least one system administrator has the email address attribute set.
Once all settings have been specified, the SPE can be instructed to send a test email to the selected system administrators; simply click on Apply and Test. If an error message appears or the recipient specified does not receive the email, the following hints for troubleshooting may be helpful.
Troubleshooting
- If no error occurs upon sending but the email does not arrive, please check the spam or junk mail folder of the mailbox.
- If an error message appears because of an invalid certificate ("Server's certificate was rejected by the verifier because of an unknown certificate authority."), check Accept all certificates and try again.
- If an error message appears indicating that "One or more recipients rejected", the SMTP server probably requires authentication. Enter the appropriate credentials as described above.
- If an error message appears because of invalid credentials (e.g. "Incorrect authentication data"or "Authentication failed"), verify the data entered.
- If further error messages appear or other problems arise, please check your input for possible mistakes.


